- Intro
- Code
- 10.1
- 10.2
- 10.3
- 10.4
- 10.5
- 10.6
- 10.7
- 10.8
- 10.9
- 10.10
- 10.11
- 10.12
- 10.13
- 10.14
- 10.15
- 10.16
- 10.17
- Summary
-
10.1 Increment 3: Enhancing the Room class
In this increment we will develop the GCU adventure game further to meet the following additional requirements:
● The game world consisting of connected rooms should be created when the program starts
● The player should be able to navigate from one room to a anotherMostly this will involve adding capabilities to the Room class that was created in the previous increment. However, we will also spend time improving the way in which the Room class was designed without changing the functionality that was implemented. This process of improvement is known as refactoring, and to be done successfully it should be make use of the unit testing process you saw previously. Some of the refactoring will involve the use of library classes that are available to programmers within the Java platform to use as “building blocks” in their own programs.
-
10.2 The Java platform
Java is not just a programming language. It also provides:
● the Java Application Programming Interface (API) which is a set of library classes which Java developers can use within their own applications
● the Java Virtual Machine (JVM) which is the platform that allows Java programs to run on a computerJava APIs
There are actually many Java APIs, both official and third-party. We will look here only at classes that are provided within the official core Java API, which is contained within the Java Development Kit (JDK). The core API is known as Java SE – SE stands for Standard Edition. The Java SE API provides classes which help with many aspects of programming, for example for working with databases, for creating graphical user interfaces, for working with networks, etc. These classes are organised in packages, each of which contains a set of related classes.
You can access the documentation for the Java version 11 SE API using the following link
https://docs.oracle.com/en/java/javase/11/docs/api/This web-based resource provides Javadoc pages for all the classes in the API, similar to the documentation that we did for our own classes in the previous chapter. It is virtually impossible to write a “real” Java program without referring to the API documentation – there is simply too much information there for any developer to remember. Understanding how to use the API documentation is a crucial skill for all Java developers. Take a look to see what the documentation pages look like. You will learn more shortly about how to use these. Note that updates to the JDK are now released frequently, so the current version number changes every six months or so.
There are actually two different versions of the Java SE platform:
The Java Runtime Environment (JRE)
This provides the Java Virtual Machine and the core Java classes. If you want to simply run existing Java programs on a system, then it is sufficient to have a JRE installed on the system.
The Java Software Development Kit (JDK or Java SDK)
This includes the JRE, together with compilers and debuggers and other development tools. If you want to develop Java programs, a JDK must be installed on your system.
-
10.3 The Java Virtual Machine
A Java source code file must be compiled to an intermediate language called bytecode before it can actually be run. Bytecode is interpreted by the Java Virtual Machine (JVM), which translates it into the machine code for the specific computer system it runs on, for example for an Intel x86 compatible processor on a PC. The bytecode is exactly the same for all systems.
The JVM is itself a software application which must be installed on your computer in order to run Java programs on that computer. You write and compile your program once, and it will run on any platform for which a JVM is available.
Java source files have a .java extension.
Bytecode (compiled) files have a .class extension.
You can see both types of file when you look at a folder that contains a BlueJ project. There is a .class file for each .java file, and the .class file is created on compilation.
Advantage: Java programs are portable between platforms with no additional programming effort – this is valuable as many organisations use a variety of computer systems.
Disadvantage: Java can be slower than other languages as it is interpreted rather than native machine code. It is possible to compile Java programs to native code for specific processors, and some Java development tools allow this, but the cross platform capability is then lost.
A further benefit of the JVM is garbage collection. As a program runs, many objects may be created, and stored in an area of the computer’s memory known as the heap. Each one takes up some space in this heap memory, and eventually as more objects are created this memory could fill up completely. However, objects are often used only for a short time and are then no longer needed. The JVM’s garbage collector is a process that checks to see which objects are still in use by the program (an object is in use if any reference to it exists) and removes those that aren’t, freeing up memory. In contrast, some programming languages, such as C++, require the programmer to explicitly allocate and free up memory.
-
10.4 Using library classes
In this section we will look at a situation where the use of a Java SE API library class can improve a program and make it easier to write.
Problems with arrays
The Room class implemented in the previous lecture used an array to store its Item objects. Arrays are a core feature of the Java language. However, an array is not always the best way to store a collection of objects.
The Room class illustrates some problems with using arrays:
● The array size is fixed – what happens if we want to add more items than the maximum number?
● We need to keep track separately of the number of items which have been stored in the array – look at this code, from the getItem method of Room:while(!found && i<numberOfItems) { if(items[i].getDescription().equals(description)) ... }What would happen if we did not keep track of numberOfItems, and tried to search through the whole array, like this?
while(!found && i<MAX_ITEMS)
{
    if(items[i].getDescription().equals(description))
    ...
}
If the array was not full, then some array elements would be null references - references to objects which have not been instantiated and do not yet exist. The call to items[i].getDescription() would then cause an error (actually an error called a null pointer exception) as you can’t call a method of an object when the object does not exist.
● The code for adding items to and especially for removing items from the array is a bit clumsy and may involve moving elements around within the array.
All of these problems can be avoided by using a library class called ArrayList.
The ArrayList class
ArrayList is a library class which is part of the JavaSE API. The name sounds quite similar to an array, but ArrayList has a number of very useful features that make it a better choice for use in the Room class.
In order to know how to use the ArrayList class we need to find and make use of the documentation for the ArrayList class. The next demo shows how to use the documentation.
📹 WATCH DEMO: Looking at Java API documentationX -
10.5 Using the ArrayList library class
We are now ready to start modifying Room to use an ArrayList instead of an array.
Importing the ArrayList class
Firstly, in order to use a library class, we need to add a line of code at the start of the Java file, before the class name, to import the class (or its package). If we don’t do this, then the compiler will complain that it does not know about the library class. ArrayList belongs to the package java.util, so we need to specify the full name of the class, including the package name.
import java.util.ArrayList;
Declaring an ArrayList
The items field is now of type ArrayList. We don’t need the MAX_ITEMS constant or numberOfItems field any more. Why not? Well, an ArrayList is clever. It can tell you how many items it is currently holding – you just call its size method. Also, it does not have a maximum size. It can resize itself automatically to hold as many items as you add to it. If you keep adding, it will keep resizing as required.
The ArrayList library class is designed to store any kind of objects. Note that when we declare an >ArrayList, we can specify what kind of objects it will store. ArrayList <Item> specifies an ArrayList which stores only Item objects.
The items field is declared in the modified Room class as follows:
public class Room
{
    // a description of the room
    private String description;
    // the items in the room
    private ArrayList<Item> items;
Note that the return type of the getItems method is an array of Item objects. We don’t want to change the way the Room class is used, so the method needs to convert the ArrayList to an array before returning it. After consulting the ArrayList documentation, we find that this can be done as follows:
public Item[] getItems()
{
  return items.toArray(new Item[items.size()]);
}
Constructing an ArrayList
The constructor of Room now needs to create a new ArrayList by calling an appropriate constructor of the ArrayList class. You can see from the documentation for the class that there is a default constructor which takes no parameters. Note that the initial capacity is 10, but this will change automatically if it needs to.
public Room(String description) { this.description = description; items = new ArrayList<Item>(); } -
10.6 Using methods of an ArrayList
We will really see the benefit of replacing the array of items with an ArrayList when we look at the methods for adding, finding and removing items from the Room.
Adding an Item is very simple. We just call the add method of ArrayList – no need to check whether we have reached a maximum number of items, or to keep track of the number of items.
public void addItem(Item newItem)
{
  items.add(newItem);
}
Getting a specified Item is slightly more complicated. We need to create a target Item object with the required value of description, and call the indexOf method of ArrayList to tell us the position in the list of the Item which matches the target Item. If there is no match for the target Item, indexOf returns a value of -1.
The get method of ArrayList then returns the Item at that position in the list.
public Item getItem(String description)
{
  Item target = new Item(description);
  int pos = items.indexOf(target);
  if (pos!=-1)
     return items.get(pos);
  else
     return null;
}
Removing an item is very similar, using the remove method of ArrayList.
public void removeItem(String description)
{
  Item target = new Item(description);
  int pos = items.indexOf(target);
  if (pos!=-1)
     items.remove(pos);
}
To allow indexOf to work for an ArrayList of Item objects, the Item class needs to have a new method called equals – you can see the equals method in the full code for this chapter which you can download from your course website.
The 📷 object diagram for the new version of Room is actually simpler than before:
Actually, if we looked inside the ArrayList object, we would find that it is considerably more complicated than an array (although, as the name suggests, there is an array in there). However, we don’t need to look inside– all we need to know is that the object will handle the job of storing any items we give it, we don’t need to know how it does it. This is an example of information hiding – a class hides everything about itself other than the public fields and methods it provides to allow other classes to use it. This is a key benefit of library classes, which can be re-used over and over again in different projects.
X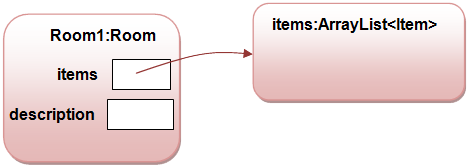
-
10.7 Refactoring
What we have now done is to change (and improve) the way the Room class is implemented without changing what it does and the way that other objects can make use of it. Although the new Room class stores its items in a different way from before, a Room should still appear exactly the same to other objects as the previous version.
This process is known as refactoring. The benefit of refactoring is not in adding new capabilities, but in making the class more robust and easier to modify further if we need to. It should now be possible to use the new improved Room class in exactly the same way as the previous version.
Unit testing is very useful for making sure that changes in the way a class works “under the hood” don’t change the way it behaves, and is a vital part of the process of refactoring. You write the code, test, refactor, then test again to make sure the refactoring hasn’t “broken” anything. Automated testing makes it very easy to repeat the same tests over and over again after refactoring.
If it is true that we haven’t changed the way the Room class is used, then the RoomTest unit test class we used in the previous lecture should still pass. The next demo shows this.
📹 WATCH DEMO: Refactoring and re-testingX -
10.8 Linking rooms together
So far we can only have one room in the game because once a player has been placed in a room there is no way out of that room. We will need to make it possible for rooms to have exits. An exit should lead into another room, so that players can move from one room into another. This will allow us to join rooms together to design a game “world”.
This means that a room must be linked to, or associated with, the other room or rooms next to it in the game world. This is shown in the 📷 class diagram by a self-relationship. A Room object can be associated with other Room objects.A new code pattern
This is an example of the 💡 “self” code pattern.
Here's the code for this:
public class Room
{
    // a description of the room
    private String description;
    // the items in the room
    private ArrayList<Item> items;
    // the exit from the room
    private Room exit;
This is still pretty limiting, as room could only have one exit. We want to give the game players a choice of which room to move into, so we will need to allow a room to have several exits.
How about using an ArrayList? This would be possible. However, there may be another library class which would be a better choice here. The Java SE API provides many classes for storing collections of objects in different ways (this is known as the Collections Framework).
It would be useful to be able to store each exit along with a label to identify it. This will make it easy to select a room based on the player’s choice. For example, a room might have exits labelled “east”, “west”, and so on. The player will then be able to choose to “go east”, or “go west”, or go in whatever direction the available labelled exits allow.
X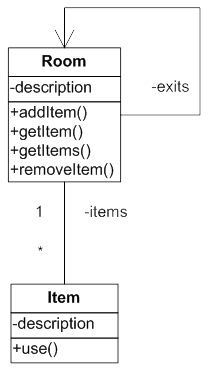 X
XCODE PATTERN: “SELF”
Problem: how do you implement a self-relationship, where an object is linked to other objects of the same class
Solution: the class has a field whose type is the same as the name of the class
-
10.9 Using a HashMap
The HashMap library class is a good choice here. You can look up the documentation for this and see if you agree. A HashMap stores objects (as many as needed) along with a label, or key, for each one. A HashMap<String, Room> will store Room objects each with a String as its key.
First, we must import the HashMap class:
import java.util.HashMap;
We can then declare the exits in Room like this:
// the exits from the room
private HashMap<String,Room> exits;
We can construct the HashMap like this:
exits = new HashMap<String,Room>();
What else do we need to do? Well, when we are building the game world we will need to be able to set the exits for each room so that the rooms are linked together the way we want them to be. When the player chooses which direction to go, we will need to be able to get the required room which is the exit in the chosen direction, so that the player can use the items in the room. These tasks may sound difficult, but they are actually really easy with a HashMap.
Getting objects into and out of a HashMap
The documentation for HashMap shows the following useful methods:


We can use these to help add setExit and getExit methods to our Room class:
public void setExit(String direction, Room neighbor) { // add a Room object to the HashMap with a String label exits.put(direction, neighbor); } public Room getExit(String direction) { // gets the Room object stored with the specified label return exits.get(direction); } -
10.10 More changes to Room? Test Again!
We have added some new capability to the Room class. Any time we change a class, whether it’s refactoring or adding something new, we need to test the class. We can add another test to RoomTest to test the new capability which has been added to Room. The new test will create some more Room objects, and set these as the exits of the test Room. It will then check that the correct Room is returned by getExit. Note that setUp is shared by all test methods and must create all the test objects for the class.
 protected void setUp()
{
  room1 = new Room("kitchen");
  item1 = new Item("cooker");
  item2 = new Item("fridge");
  item3 = new Item("knife");
  room1.addItem(item1);
  room1.addItem(item2);
  room1.addItem(item3);

  room2 = new Room("dining room");
  room3 = new Room("hall");
  room4 = new Room("study");
  room1.setExit("east",room2);
  // north exit is hall
  room1.setExit("north",room3);
  room1.setExit("west", room4);
}

public void testGetExit()
{
  Room target = room1.getExit("north");
  // north exit should be hall
  assertEquals("hall", target.getDescription());
}
📹 WATCH DEMO: Testing the enhanced Room classX -
10.11 Different kinds of items
Sometimes when you are developing a program there can be changes or additions to the requirements between or during increments. It could be, for example, that the customer who you are developing the program for requests a feature that wasn’t considered at the start. Here we will introduce a new requirement regarding the items in the rooms:
● Some items may be special bonus items which reveal a secret code word when used
At the moment there is only one kind of item in the game. We now have a requirement to include different kind of item, the bonus item, which will behave somewhat differently when used. A bonus item is essentially a specialised type of item. It will do the things that any item can, but it may have its own variation of the way an item behaves, and it may do something extra that an ordinary item doesn’t do.
We will add a new kind of item to the game. This will be called a BonusItem, and its extra feature is that it can reveal a secret bonus keyword. This situation is an example of a new code pattern, the 💡 “is-a” pattern.
This pattern is usually called inheritance.
XCODE PATTERN: “IS-A”
Problem: how do you implement a relationship where one class is a specialized version of another more general class and shares some of its behaviour
Solution: the specialised class extends the more general class and adds new methods or overrides methods of the general class
-
10.12 Inheritance
Defining a new class to create a new type can involve a lot of effort. Sometimes a class already exists that is close to what you need. You can extend that class to produce a new class that is exactly what you need. In many cases, this will require much less effort than that required to start from scratch and define a new class.
You can extend your own classes, or you can extend classes which have been written by others and which you have access to (for example the Java API classes).
When you extend a class, the new class is called the subclass and the class that was extended is called the superclass.
To extend another class you use the extends keyword in your new class declaration:
public class MyNewClass extends MyOtherClass {What is inherited?
The subclass inherits all of the variables and all of the methods defined the superclass, as if you had completely defined the new class from scratch, and had reproduced all of the code already defined in the existing superclass.
Therefore, inheritance often makes it possible to define a new class with a minimum requirement to write new code by reusing the code that was previously written in superclasses.
The behaviour of the methods defined in a superclass and inherited into your new class may or may not be appropriate for an object instantiated from your new class. If those methods are appropriate, you can simply leave them alone.
Overriding
If the behaviour of one or more methods defined in a superclass and inherited into your new class is not appropriate for an object of your new class, you can change that behaviour by overriding the method in your new class.
To override a method in your new class, define a method in your new class with the same name and signature (i.e. parameter list, and return type) as the original. Then provide a body for the new method. Write code in that body to cause the behaviour of the overridden method to be appropriate for an object of your new class.
Any method that is not declared final can be overridden in a subclass.
Don't confuse method overriding with method overloading. Overloading means having methods (or constructors) within the same class with the same name, but different argument lists.
Additional Methods
If your new class needs to implement additional behaviour, you can simply add new methods to the subclass.
Inheriting from Object
Every class in Java extends some other class. If you don't explicitly specify the class that your new class extends, it will automatically extend the class named Object. All classes in Java are in a class hierarchy where the class named Object is the root of the hierarchy.
Some classes extend Object directly, while other classes are subclasses of Object further down the hierarchy.
-
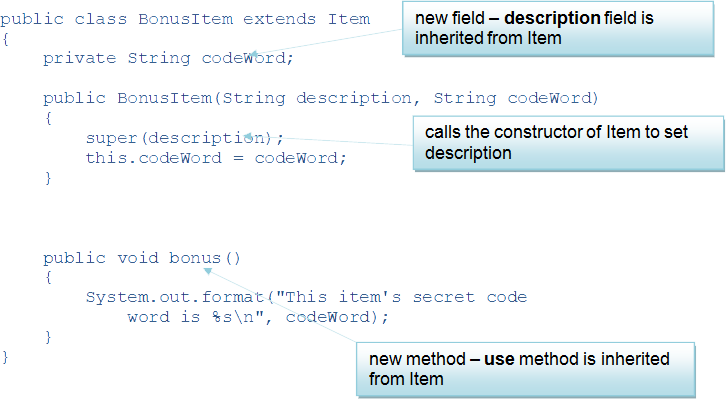
10.13 The BonusItem class
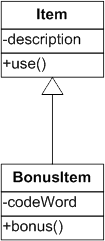
The BonusItem class extends the Item class, and inherits its use method. It adds a new method, bonus, which prints out the value of a new field, codeWord. The class diagram for Item and BonusItem looks like this (note that the triangle arrowhead on the connector between the classes represents an inheritance relationship):
The object diagram for a situation where a BonusItem has been created looks like this:
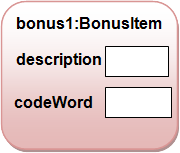
Note that there is only one object here. In the other relationships we have seen, the classes are used to create two or more collaborating objects. Here, a single object is created by combining template information from two classes.
The code for the BonusItem class is as follows:
-
10.14 Accessing fields in the superclass
Sometimes it is useful in a subclass to access a field that has been inherited from the superclass. For example, we could modify the bonus method of BonusItem to print the item’s description in addition to the secret code word:
public void bonus()
{
  System.out.format("The secret code for %s
  is %s\n", description, codeWord);
}
This should work, because as you have seen a BonusItem object has a description field, inherited from the Item class.
If you make this change, though, the compiler will report an error. Why is this? Well, the problem is that the field description in Item was declared as private. This means that no code in other classes can access that field – even code in BonusItem which inherits the field!
So how do we access an inherited field? We could use a getter (or setter) method, but that’s not really satisfactory. The solution is to change the declaration of the field itself in the superclass, Item, to
protected String description;
This introduces a new key word, protected, which is slightly less restrictive than private, but still offers much more protection for the field than public (which doesn’t offer any protection!). A protected field can be accessed by code in the class where it is declared and by code in any subclass of that class.
This means that code in BonusItem, or any other subclass of Item that we might create, can properly access description (read and write), but no other classes can access it. With this small change to Item, the modified bonus method will now compile.
📹 WATCH DEMO: Creating an instance of a subclassX -
10.15 Polymorphism
The word “polymorphism” literally means “one name, many forms”. Polymorphism is an important idea in object-oriented programming. One form of polymorphism makes use of inheritance.
Here’s how it works. We can declare a variable of type Item, like this:
Item myItem;
This declaration says that there will be a variable called myItem which can refer to an object of type Item.
The object doesn’t exist yet. We need to create, or instantiate it, using the new keyword.
Item myItem;
myItem = new Item(“my item”);
Polymorphism allows us to do a trick here. A variable of type Item can refer to either:
● an Item object, OR
● an object whose type is a subclass of Item, for example BonusItemThis means we can do this:
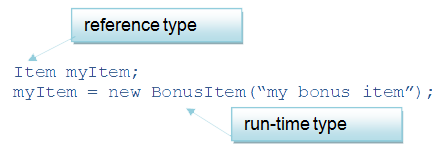
It is possible to have a situation where a variable is declared with a specific type, known as the reference type, but the actual type of the object it refers to is not defined until the program is actually running. The actual object type is the run-time type. This is runtime polymorphism, sometimes also referred to as late-binding.
Note that polymorphism doesn’t work the other way:

Polymorphism in collections
Polymorphism is particularly useful when dealing with collections of objects. Think about the Room class. It has an ArrayList which can hold Item objects. Through polymorphism, a reference to an Item can also refer to any subclass of Item.
The result is that the ArrayList, items, in the Room class can hold Item objects, or BonusItem objects, or any combination of these. When we add an item to the room, we can add either one of Item or BonusItem.
We can use this when we set up the game. Any combination of Item and BonusItem objects can be added to any room. For example:
Room theatre = new Room("in a lecture theatre");
theatre.addItem(new Item("projector"));
theatre.addItem(new BonusItem("screen","BLUEJ"))

Room lab = new Room("in a computing lab");
lab.addItem(new BonusItem("computer","JAVA"));
lab.addItem(new Item("printer"));
📹 WATCH DEMO: Looking at polymorphismX -
10.16 Casting
We have to be careful when using polymorphism. Look at this code:

At first sight, this looks OK. However, the second line will cause a compiler error.
Although the object myItem has run-time type BonusItem, the reference type is still Item. You cannot call a method which is not defined in the object’s reference type. The method bonus is only defined in the subclass BonusItem.
The solution is to convert, or cast, the object to its run-time type, like this:
BonusItem myBonus = (BonusItem) myItem;
myBonus.bonus();
This is called downcasting. We have cast the Item reference myItem to type BonusItem and assigned it to a new reference of type BonusItem. We can call the bonus method using this BonusItem reference. Both references still point to the same object, which is a BonusItem object, but the types of the two references are different. We can therefore use the object as though it is an Item, or use it specifically as a BonusItem.
We can put this into practice by rewriting the code inside the takeTurn method of Player to be able to use BonusItem objects. First, each item is used by calling the use method – by polymorphism Item and BonusItem objects can both be used in the same way. Then, each item is checked to see if it is actually a BonusItem object, using the instanceof operator, and if it is then the additional method bonus is called. The object reference that we get from the array is of type Item, as the array is of type Item[]. Therefore we have to cast the reference to BonusItem before calling the bonus method.
Item[] items = currentRoom.getItems(); for(Item it : items) { if(it!=null) { it.use(); if (it instanceof BonusItem) { BonusItem bit = (BonusItem) it; bit.bonus(); } } } -
10.17 Creating the game “world”
We can now add a method to the Game class to create the game “world” as a set of linked rooms. In the game the player can then navigate through the world by moving from room to room. The Game object only needs to store a reference to the starting Room object – each room, as we have seen, will know about the other rooms it is linked to.
public class Game
{
    // the starting room
    private Room startingRoom;
Here is a map of a possible game world.

This world can be created by the following getRooms method which is called from the setUp method when a new Game is created.
private void createRooms()
{
  Room outside, theatre, pub, lab, office;

  // create the rooms and put some items in them
  outside = new Room("outside the main entrance of the university");
  outside.addItem(new Item("phone"));
  outside.addItem(new Item("bin"));
  outside.addItem(new BonusItem("bench","GCU"));

  theatre = new Room("in a lecture theatre");
  theatre.addItem(new Item("projector"));
  theatre.addItem(new Item("screen"));
  theatre.addItem(new BonusItem("screen","BLUEJ"));

  pub = new Room("in the campus pub");
  pub.addItem(new Item("fruit machine"));

  lab = new Room("in a computing lab");
  lab.addItem(new BonusItem("computer","JAVA"));
  lab.addItem(new Item("printer"));

  office = new Room("in the computing admin office");
  office.addItem(new Item("computer"));
  office.addItem(new Item("filing cabinet"));

  // initialise room exits
  outside.setExit("west", theatre);
  outside.setExit("south", lab);
  outside.setExit("east", pub);

  theatre.setExit("east", outside);

  pub.setExit("west", outside);

  lab.setExit("north", outside);
  lab.setExit("west", office);

  office.setExit("east", lab);

  // start game outside
  startingRoom = outside;
}
Note that these exits are all designed to be two-way doors – for example the east exit of the admin office is the computer lab, while the west exit of the lab is the office. This will allow the player to move freely around the world. The Room class doesn’t enforce this feature but the createRooms method has been carefully designed to create a world that “makes sense”.
-
Summary
You’ve been introduced in this lecture to the following concepts:
Java Platform, Java Virtual Machine, Java API and library classes, API documentation, ArrayList, Refactoring, HashMap, Inheritance, Polymorphism
In the next lecture we will take a break from the adventure game and you will learn about using a more advanced Java IDE and to create Graphical User Interfaces for Java programs. After that you will return to see the final increment of the game.
Download PDF Version