-
Forms
HTML forms are used to process user data and also pass data to a server.
The most important form element is the <input> element. The <input> element is used to select user information.
A form can contain <input> elements like text fields, checkboxes, radio-buttons, submit buttons and more.
- The <form> tag is used to create an HTML form for user input and is also used to pass data to a server.
- We will return to this later
HTML form input types
Input
TypeAttribute Description button Id Creates a generic button for user input. It has no default action. text id, size, maxlength Creates a text box for user input. size specifies the size of the text box. maxlength specifies the maximum number of characters allowed. textarea id, size, rows,cols Creates a text area that can take input spanning multiple lines. rows and cols specify the size of the box. password id, value Like text box but input is hidden. Asterisks appear in the box to replace characters typed. checkbox id, value Displays a square box that can be checked. Creates name/value pairs from user input. Multiple boxes can be checked. radio id, value Like checkboxes, except only one button (or circle) can be checked. select id, option, size, multiple Provides pop-up menus and scrollable lists. Only one can be selected. Attribute multiple creates a visibly scrollable list. A size of 1 creates a pop-up menu with only one visible box. file Id Specifies files to be uploaded to the server. MIME type must be multipart/form-data. hidden id, value Provides name/value pair without displaying an object on the screen. submit id, value When pressed, executes the form; launches cgi. image src, value, align Same as submit button, but displays an image instead of text. The image is in a file found at src. reset id, value Resets the form to its original position; clears all input fields. -
Text Fields
<input type="text" />
defines a one-line input field that a user can enter text into
- Attributes :
- id
- size - specifies the size of the text box (default is 20)
- maxlength - maximum number of characters allowed
<textarea ……. > </textarea>
defines a a text area that can take input spanning multiple lines.
- Attributes :
- id
- rows/cols – specifies size of box
Input Attributes
These include :
- 'value'
- specifies the value of an input element
- Can be read and/or changed
- 'disabled'
- specifies that an input element should be disabled.
- A disabled input element is unusable and un-clickable.
- Can be used to display values which cannot be changed
http://www.w3schools.com/tags/tag_input.asp
Basic Forms
💡 Form1.htm – input data – using a Text Box and also textarea .. notice the difference
<script type=”text/javascript”>
function Test(){
var val1 = document.getElementById("T1_txt").value
var val2 = document.getElementById("T2_txt").value
if ((val1=="") || (val2==""))  // check for blank field
  {  alert("You must type in data"); }
  else
  {  alert("You typed in " + val1 + " and " + val2); }
}
</script>
</head>
<body>
   <input type="text" id="T1_txt" size="15"  maxlength="10">
<br/>
   <textarea id="T2_txt" rows="5" cols="20">This is a textarea</textarea>
<br/>
  <p><input type="button" value="Click Here" id="B1" onClick="Test()"></p>
</body>
</html>
💡 Form2.htm – copy text – note the use of ‘value’ and ‘disabled’
<!-- function CopyValues() { document.getElementById('field2').value = document.getElementById('field1').value; } --> </script> </head> <body> Field1: <input type="text" id="field1" value="Hello World!" /> <br /> Field2: <input type="text" id="field2” disabled="disabled" /> <br /><br /> Click the button to copy the content of Field1 to Field2. <br /> <input type="button" value= "Copy Text" onclick="CopyValues()“> </body> -
Basic Forms
- 💡 Form3.html - join text – with some STRING Methods
- also uses a Table to keep tidy (some tags are missing here – refer to htm file)
<!-- function JoinText() { var txt1 = document.getElementById('field1').value; var txt2 = document.getElementById('field2').value; document.getElementById('FullName').value= txt1+ " " + txt2; document.getElementById(UserID').value= txt1.charAt(0) + "." + txt2.toUpperCase(); } //--> .... <td> <h3> Enter First Name : </h3> </td> <td> <input type="text" id="field1" /> </td> <tr> <td> <h3> Enter Surname : </h3> </td> <td> <input type="text" id="field2" /> </td> <tr> <td colspan=2> <input type="button" value="Display Full Name” onclick="JoinText()"> <td> <h3> Full Name : </h3> </td> <td> <input type="text" id="FullName“ disabled="disabled" /> </td> <td> <h3> User ID : </h3> </td> <td> <input type="text" id=“UserID" disabled="disabled" /> </td>Video
focus
A useful feature for forms
Focus () can be used to set the initial cursor position
function setFocus()
{
  document.getElementById("field1").focus();
}

<body onload="setFocus()">
Password Field
<input type="password" />
Password Fields are almost identical to text boxes as far as HTML and JavaScript are concerned.
The only real differences are that an <input type = password> HTML statement generates the password and that asterisks (*) replace any values that the user types into the text field.
The actual characters that the user types are still recorded, but the field displays only the asterisks.
<script type=”text/javascript”> function checkPass(){ var actual ="abc“ // set password var guess = document.getElementById("pwdGuess").value // get input if (guess == actual ) { document.getElementById("txtOutput").value = " Valid Password \n You may proceed."; } else { document.getElementById("txtOutput").value = " Invalid Password \n That is incorrect."; } } // end checkPass </script> <body> <td>Please enter password</td> <td><input type = "password" id = "pwdGuess"> </tr> <tr> <input type = "button" value = "click me" onClick = "checkPass()"> <tr> <textArea id = "txtOutput" rows = 2 cols = 35> </textarea> </td>XX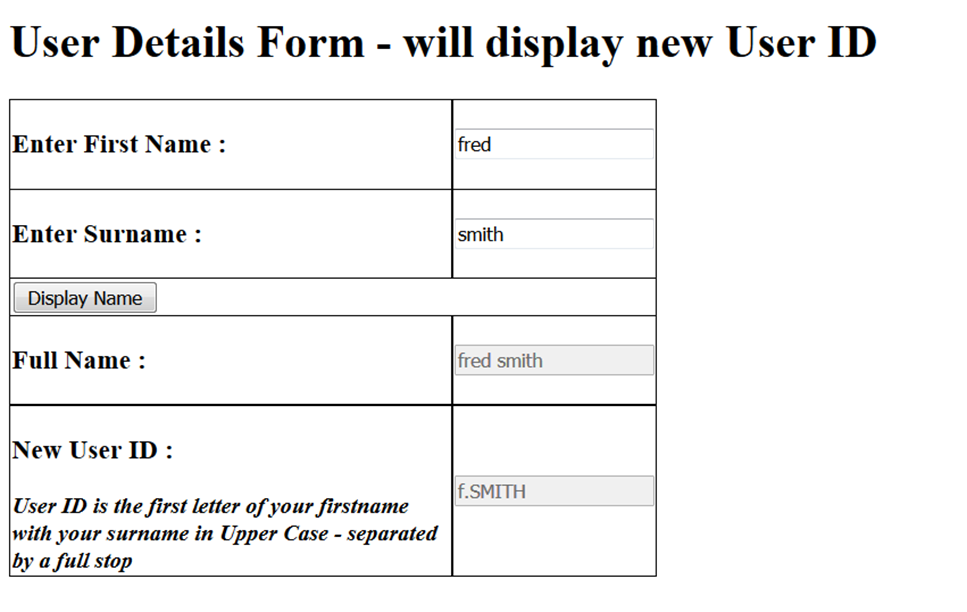
-
Hidden Fields
<input type = "hidden">
The code is much like that of text boxes and password boxes, but the hidden field has different behavior.
It stores a value in a form, but the value is not visible at all to the user.
You can use hidden fields to store values in the form.
These can be used as temporary storages areas – can also be used to pass data to the Server
In this example, the hidden field has been added to store the correct password.
function checkPass(){
var guess = document.getElementById("pwdGuess").value

var secret = document.getElementById("hdnSecret").value;

 if (guess == secret)
 {
  document.getElementById("txtOutput").value = " Valid Password \n You may proceed.";
 }
 else
 {
  document.getElementById("txtOutput").value = " Invalid Password \n That is incorrect.";
 } // end if
} // end checkPass

<input type = "hidden" id= "hdnSecret" value = "abc">
Drop-Down Boxes
<Select Object>
The Select object represents a dropdown list in an HTML form.
They are used to display multiple choices in a small amount of space.
You can access a <Select> object by searching through the elements array of the form, or by using document.getElementById().
<select id='whichNum'>
  <option value=1>1</option>
  <option value=5 selected>5</option>
  <option value=10>10</option>
  <option value=20>20</option>
</select>
The following example uses document.getElementById
- Other attributes :
- size - Specifies the number of visible selections.
- multiple - Enables users to select multiple selections.
<script type='text/javascript'> function getValue() { var maxLoop = document.getElementById('whichNum').value; alert ( "you chose .... " + maxLoop ) } </script> <body> Choose a Number : <select id='whichNum'> <option value=1>1</option> <option value=5 selected>5</option> <option value=10>10</option> <option value=20>20</option> </select> <p><button onClick='getValue()'>Click</button></p> </body> </html> -
Drop-Down Boxes
The ‘values’ are used for processing the User Input
Thus, the values can be different from what is actually displayed
Choose a Number :
<select id='whichNum'>
  <option value= 1 > ONE </option>
  <option value= 5 selected> FIVE </option>
  <option value= 10 > TEN </option>
  <option value= 20 > TWENTY </option>
</select>
<script type='text/javascript'> function getValue() { var choice = document.getElementById('whichColour').value; document.bgColor = choice } </script> </head> <body> Choose a Background Colour : <br /> <select id='whichColour'> <option value="blue">blue</option> <option value="white" selected>white</option> <option value="green">green</option> </select> <p><button onClick='getValue()'>Click</button> </body> </html> -
Radio Buttons
<input type="radio" />
Radio buttons let a user select ONLY ONE of a limited number of choices:
Radio buttons display a series of option buttons; however, only one in a group can be selected at any time.
- You can access a radio object by :
- searching through the checkbox array of a form
- Or
- by using document.getElementById().
Checkboxes
<input type="checkbox" />
Similar to radio buttons, check boxes allow yes/no-type selections: Either the box is checked or it is not.
- Unlike radio buttons, however, groups of check boxes are not mutually exclusive:
- None can be selected
- All can be selected
- or any subset can be selected.
Check boxes are often used to allow users to make ONE or MORE selections in a long list
For each <input type="checkbox"> tag in an HTML form, a Checkbox object is created.
- You can access a checkbox object by :
- searching through the checkbox array of a form
- Or
- by using document.getElementById().
HTML5 – Input Types
range – displays a movable slider to specify values
number – displays a spinner for inputting a number
HTML5 - Number
function ShowNumberValue()
{
  document.getElementById('NUM_field').value=document.getElementById('num').value;
}

<strong> Number (1-10): </strong>
<br/>
<input type="number" id="num" min="1" max="10" >
<br />
<input type="button" value= "Show Number Value"  onclick="ShowNumberValue()">
<br />
Number Output Value: <input type="text" size="5" id="NUM_field" disabled="disabled" />
HTML5 - Range
function ShowRangeValue()
{
  document.getElementById('RANGE_field').value = document.getElementById('slider1').value;
}

<strong> Range (1-50) : </strong>
1
<input id="slider1" type="range" min="1" max="50"  />
50
<br />
<input type="button" value= "Show Range Value"  onclick="ShowRangeValue()">
<br />
Range Output Value :
<input type="text" size = "5" id="RANGE_field" disabled="disabled" />
X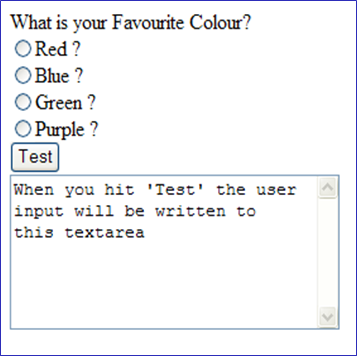 X
X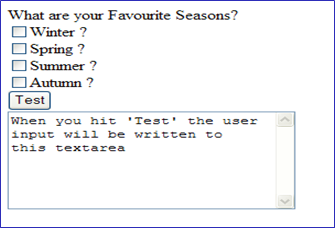 X
XNew Input Types New Input Attributes color
date
datetime
datetime-local
email
month
number
range
search
tel
time
url
weekautocomplete
autofocus
form
formaction
formenctype
formmethod
formnovalidate
formtarget
height and width
list
min and max
multiple
pattern (regexp)
placeholder
required
step -
Validation
- A major advantage of elements such as :
- Radio Buttons
- Check Boxes
- Drop Down Lists
- Number
- Ranges etc
.... is that they reduce the amount of validation that is required – e.g check if value is an integer, that it is in a specific range etc
The user can only choose the given options – so no invalid data
Only have to check that the user has selected an option
Submit Button
<input type="submit" /> //defines a submit button
A submit button is used to send form data to a server.
We will cover this in more detail in PHP
Form Structure
Up until now – we have been accessing Form data by using the id field and the document.getElementById function
This is ok to use for basic Forms and also for client-side processing
But, to use the full functionality of forms, extra code has to be added …
A Form should be defined as :
<form name="example“>
   ....form elements .....
</form>
All elements (text, button, etc) must use the ‘name’ tag – this is accessed at the Server-side
Also- by using <form> tag – changes how we can access items within the form
- For Server-side coding :
- You should ALWAYS include the ‘name’ Tag ( as well as the ‘id’ Tag)
The 'name' tag is used to access data at the server-side
We will use this in more detail when we cover PHP ( server side programming)
function Test() { // access form value var val1 = document.exampleform.T1_txt.value var val2 = document.exampleform.T2_txt.value .... } <form name="exampleform"> <input type="text" id="T1_txt" name="T1_txt" size="15" maxlength="10"> <textarea name="T2_txt" id="T2_txt" rows="5" cols="20">This is a textarea</textarea> <p><input type="button" value="Click Here" id="B1" onClick="Test()"></p> </form> -
Radio Buttons
<input type="radio" />
Radio buttons let a user select ONLY ONE of a limited number of choices:
Radio buttons display a series of option buttons; however, only one in a group can be selected at any time.
- You can access a radio object by :
- searching through the Radio Array of a form
- Or
- by using document.getElementById().
E,g … to choose a favourite colour ….
<form name="example">
What is your Favourite Colour?    <br />
  <input type="radio" name="colour" value= "red" />Red ?
  <input type="radio" name="colour" value= "blue" />Blue ?
  <input type="radio" name="colour" value= "green" />Green ?
  <input type="radio" name="colour" value= "purple" />Purple ?
</form>
- Note that they all have the :
- Same 'name'
- Different 'value'
To access the radio button group, you use this syntax:
document.formName.groupName
This references the object associated with the radio button group. E.g. In this example formName = "example" and groupName = "colour"
This object is an array containing an entry for each button in the group
- Each of these entries has several properties, including two critical ones for this task:
- checked - Indicates if the radio button is currently selected
- value - Reflects the value of the ‘value’ attribute for the radio button
Therefore, the property document.example.colour[0].value would contain the value of the first radio button in a radio button group.
We could check every single radio button using a very long If … then ….else statement
<input type="button" value= "Test" onclick="checkradio()“> <script type='text/javascript'> function checkradio() { user_input = ""; // check if item 0 has been checked if (document.example.colour[0].checked) { // now get the ‘value’ = "red" user_input = document.example.colour[0].value; } else // check if item 1 has been checked if (document.example.colour[1].checked) { // now get the ‘value’ = "blue" user_input = document.example.colour[1].value; } else // check if item 2 has been checked if (document.example.colour[2].checked) { // now get the ‘value’ = "green" user_input = document.example.colour[2].value; } else // check if item 3 has been checked if (document.example.colour[3].checked) { // now get the ‘value’ = "purple" user_input = document.example.colour[3].value; } // no value has been selected by user if (user_input == "") alert("no value selected") else // Write textstring to the textarea. document.example.output_txt.value = "You chose ...." + user_input; } // --> </script> -
But this code could be simplified and made more efficient by using a For Loop …..
<input type="button" value= "Test" onclick="checkradio()“> <script type="text/javascript"> <!— function checkradio() { user_input = ""; // length is size of array = 4 entries) for (i=0;i<document.example.colour.length;i++) { // check which item has been check - selected if (document.example.colour[i].checked) { //get the ‘value’ from the array user_input = document.example.colour[i].value; } } if (user_input == "") alert("no value selected") else // Write textstring to the textarea. document.example.output_txt.value = "You chose ...." + user_input; } // --> </script>To check a specific button – can use :
- if (document.example.colour[i].checked)
- where ‘i’ is specific button in range 0 ... 3
Note : The question has changed slightly in this example :
- From :
- What is your Favourite Colour?
- To :
- Which Colour has the most letters ?
function checkradio() { // check that purple button has been selected if (document.example.colour[3].checked) document.example.output_txt.value = "You chose Purple - Correct Answer" else document.example.output_txt.value = "Wrong Answer"; } <body> <form name="example"> Which Colour has the most letters ? <br /> <input type="radio" name="colour" value="red" />Red ? <br /> <input type="radio" name="colour" value="blue" />Blue ? <br /> <input type="radio" name="colour" value="green" />Green ? <br /> <input type="radio" name="colour" value="purple" />Purple ? <br /> <input type="button" value= "Test" onclick="checkradio()"> <br /> <textarea cols="30" rows="7" name="output_txt">When you hit 'Test' - will check if purple has been chosen</textarea> </form> -
Checkboxes
<input type="checkbox" />
Similar to radio buttons, check boxes allow yes/no-type selections: Either the box is checked or it is not.
Unlike radio buttons, however, groups of check boxes are not mutually exclusive: None can be selected, All can be selected, or any subset can be selected.
Check boxes are often used to allow users to make ONE or MORE selections in a long list
For each <input type="checkbox"> tag in an HTML form, a Checkbox object is created.
- You can access a checkbox object by :
- searching through the checkbox array of a form
- Or
- by using document.getElementById().
Example 1
For example … What are your Favourite Seasons?
<input type="checkbox" name="season" value= "winter" />Winter ?
<input type="checkbox" name="season" value= "spring" />Spring ?
<input type="checkbox" name="season" value= "summer" />Summer ?
<input type="checkbox" name="season" value= "autumn" />Autumn ?
Very similar to Radioboxes – but can have one or many
So must check all values
function checkbox() { user_input = ""; // will store all selected values txtstring = ""; for (i=0;i<document.example.season.length;i++) // length is size of array = 4 (but starts at 0) { if (document.example.season[i].checked) // check which items have been checked - selected { //get the ‘value’ from the array user_input = document.example.season[i].value; // add selected value onto the string txtstring = txtstring + " " + user_input } } if (txtstring == "") alert("no value selected") else // Write textstring to the textarea. document.example.output_txt.value = "You chose ...." + txtstring; } -
Example 2
<body>
<form name="uni“>

What Modules are you Studying ?   <br />

<input type="checkbox" name="credits" value=10 />Intro To Databases (10 credits) <br />
<input type="checkbox" name="credits" value=20 />Web Programming 1 (20 credits)  <br />
<input type="checkbox" name="credits" value=20 />SMAD1  (20 credits) <br />

<input type="button" value= "Calculate"  onclick="checkcredits()">
<br />

<textarea cols="30" rows="7" name="output_txt">When you hit 'Calculate' the total credits will be written to this  textarea</textarea>

</form>
</body>
function checkcredits()
{
  var user_input = 0;
  var total = 0;
  for (i=0;i<document.uni.credits.length;i++)
      // length is size of array = 3 (but starts at 0)
   {
    if (document.uni.credits[i].checked)
        // check which items have been checked
      {
        user_input = document.uni.credits[i].value;
        //get the ‘value’ from the array - convert to integer
        total = total + parseInt(user_input);
        // add selected value onto total
      }
    }
      // Write textstring to the textarea.
     document.uni.output_txt.value = "Total Credits = " + total;
}
Can set checked values :
<input type="checkbox" name="season" value="autumn" checked = “true” />Autumn
Can apply to one or more of the Checkboxes
- A single checkbox example :
- http://www.w3schools.com/jsref/prop_checkbox_checked.asp
- Uses ‘id’ for a single checkbox
- Can then use getElementById
Validation
- A major advantage of elements such as :
- Radio Buttons
- Check Boxes
- Drop Down Lists
.... is that they reduce the amount of validation that is required – e.g check if value is an integer, that it is in a specific range etc
The user can only choose the given options – so no invalid data
Only have to check that the user has selected an option