-
Creating a basic web application with Java Servlets
In this unit you will study:
- A very basic web application implementation using Java Servlets.
- Version control with Git
Typical Web Applications
- Web mail,
- Online maps,
- Online shopping sites,
- Online auctions,
- Wikis,
- Social media applications,
- Learning management systems…
Features of Typical Web Applications
- A client–server software application
- in which the client (or user interface) runs in a web browser
- part of the application running on a server
- user authentication (login)
- uses services provided by other application
- data persists for a long period of time, longer than one user uses the application.
-
Java Servlets
- Are Java programs that run on a Web or Application server
- Provide a component-based, platform-independent API
- for the development of Web-based applications
- integrated with the other Java API
- take a request coming from a Web browser or other HTTP client
- and produce a response.
- 📷 Servlet Architecture
Typical Tasks
- Read the implicit HTTP request data sent by the clients (browsers).
- Read the explicit data sent by the clients.
- Process the data and generate the intended output.
- Send the HTTP response to the clients.
The Servlet Package
- In the lab application, identify the following packages in the import statements:
- javax.servlet
- javax.servlet.http
- A link to the 🔗 Java Servlet API is in this week's folder on GCULearn.
- Examine the HttpServlet class and the doGet() method in the API.
HttpServlet
- Provides an abstract class
- to be subclassed to create an HTTP servlet suitable for a Web site.
- A subclass of HttpServlet must override at least one method, usually:
- doGet, if the servlet supports HTTP GET requests
- doPost, for HTTP POST requests
- doPut, for HTTP PUT requests
- doDelete, for HTTP DELETE requests
- init and destroy, to manage resources that are held for the life of the servlet
- getServletInfo, which the servlet uses to provide information about itself
- 🔗 Class HttpServlet
X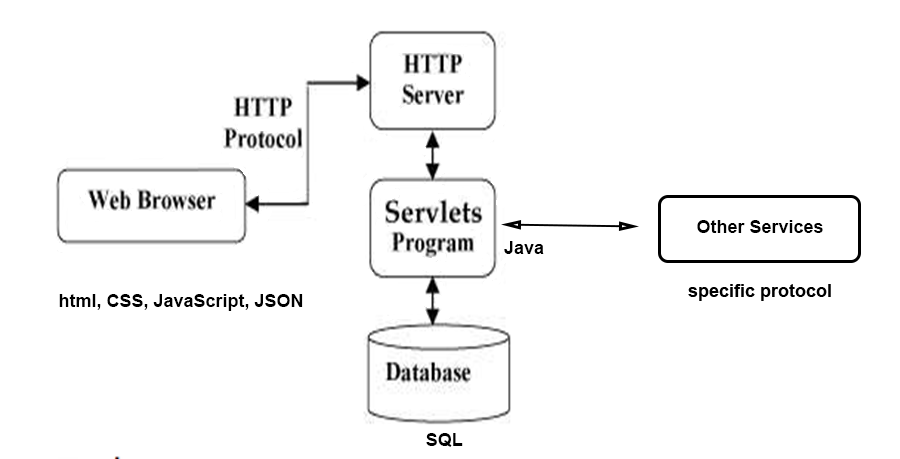
-
Classes of the Lab Application
- Runner.java
- DefaultServlet.java
- DemoServlet.java extends BaseServlet
- BaseServlet.java extends HttpServlet
Runner.java
- Starts the application (contains main())
- Sets up the server, and the port this server listens to (here 9000)
- Sets the document root (/) for this application (here: src/main/resources/webapp)
- Sets for each servlet the request URL to which this servlet responds
- DefaultServlet responds by delivering static pages (or 404)
- DemoServlet implements a response
- Tip: Classes can be identified by their package (see import statements) and looked up in the API
DefaultServlet
- Is part of the Jetty server, see import statement
- (org.eclipse.jetty.servlet.DefaultServlet)
- Provides the handling for static content (pages), OPTION and TRACE methods.
- Is normally mapped to / (root).
- For any receiving request it either returns the requested static page (see URL) or 404 if such a page doesn't exist.
Baseservlet.Java
- Utility class
- Implements functionality that can be used by all servlets, such as
- Setting the mime type of the response
- Setting the response code of the response
Abstract Classes
- Cannot be instantiated,
- but they can be subclassed.
- Can have abstract and concrete methods.
- When subclassing you need to provide implementations for the abstract methods.
DemoServlet.java
- An example of a servlet with minimal processing.
- Visualises the use of the doGet() method.
- Note the request and response parameters.
- Accesses the request URI of the request
- Provides a response by outputting the request URI (echoing).
The Eclipse Jetty Server
- "Don’t deploy your application in Jetty, deploy Jetty in your application!"
- Jetty is designed to be a software component that can be instantiated and used in a Java program just like any POJO.
- This means that when you run the application this starts the server that serves it.
- Starting the server generates logs in the console.
- org.eclipse.jetty.server.Server
- Listens on port 9000.
- org.eclipse.jetty.servlet.ServletContextHandler
- sets the context (where it looks for documents) to "/"
- This is mapped to the resources/webapp folder, i.e.:
- a request to localhost:9000/page.html returns the resources/webapp/page.html file.
-
DevOps
- Support a culture and environment where building, testing, and releasing software can happen rapidly, frequently, and more reliably.
- There is no single “DevOps Tool”...
- ...but a “DevOps toolchain” consisting of multiple tools used together.
- Gartner Market Trends: DevOps – Not a Market, but Tool-Centric Philosophy That supports a Continuous Delivery Value Chain (Report). Gartner. 18 February 2015.
Typical DevOps Tasks and Tools
- To code – Code development and review support tools, such as version control tools.
- To build – Continuous integration tools, e.g. import of libraries, project structure.
- To test – Test and results determine performance.
- To issue tracking.
- To deployment - automated deployment.
- To release – Change management, release approvals, release automation.
- To configure – Infrastructure configuration and management.
- To monitor – Applications performance monitoring, e.g. monitor end user experience.
A Version Control System
- Version control is a system that
- records changes to a file or set of files over time
- so that you can recall specific versions later.
Version Control Systems
- …Keep track of every modification to the code in a special kind of database.
- If a mistake is made, developers can turn back to a previous version.
- Help a software development team to manage changes to source code over time.
- Integrate collaborator’s work into our projects.
- Identify conflicts.
- Provide useful backups.
In this Module ...
- ... we use the version control system Git,
- see: 🔗 https://git-scm.com/.
- And host the repositories online in a system called Bitbucket,
- see: 🔗 https://bitbucket.org/.
-
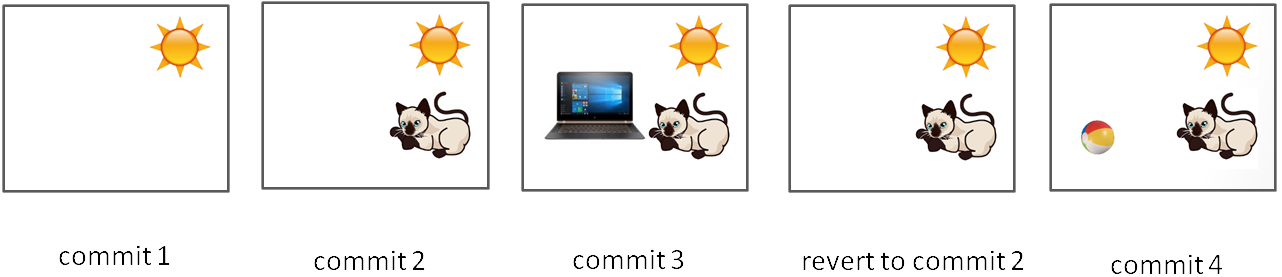
Example 1
- A single developer is restructuring (re-writing) a program. He made numerous changes to several parts of the program but now the program has many errors and he is unable to get it to work. Because he made so many changes in different places of the source code it is difficult to make all changes undone manually and to start again.
- A version control system allows him to easily to revert back to a previous error-free state.
Example 2
- A group of developers are maintaining a piece of software. One developer is working on a new feature while another developer fixes an unrelated bug by changing code. Each developer makes changes to several parts of the programme. But changes made in one part of the software can be incompatible with those made by another developer working at the same time, e.g. when two developers change one part of the system in different ways.
- A version control system discovers the problem and supports resolving it in controllable way without blocking the work of the rest of the team at the same time.
Example 3
- A developer is working on a new feature. During the development this new version should be kept separate from the rest of the project until all testing has been completed and the feature is working safely. Then the new feature should be integrated into the project and distributed to all other developers.
- A version control system allows developers to work on separate “branches” of the same project (think of it as versions) and to switch between branches seamlessly without having to modify the code.
Benefits of Version Control Systems (VCS)
- A complete long-term change history of every file (a record of very change made by anyone over the years, e.g. creation and deletion of files and edits to contents).
- Reverting back to previous versions.
- Branching and merging. Having team members work concurrently on independent streams of changes.
- Provides the facility to merge that work back together, e.g. for each feature or perhaps branching for each release, or both.
- Trace each change made to the software and connect it to project management and bug tracking software.
- Annotate each change with a message describing the purpose.
Centralised vs. Distributed VCS
Distributed VCS
- Do not necessarily rely on a central server to store all the versions of a project’s files.
- Every developer “clones” a copy of a repository and has the full history of the project on their own hard drive.
Centralised VCS
- There is a single “central” copy of the project somewhere.
- Programmers can pull down a copy of the central version of the program.
- Programmers will “commit” their changes to this central copy.
- “Committing” a change means recording the change in the central system.
- Other programmers can then see this change.
- They can also pull down the change.
-
Git – A Distributed Version Control System (DVCS)
- There is no single “good” or "master" copy of the system.
- Instead each client fully mirrors all of the repository, i.e. all changes.
- Every checkout contains a full backup of the complete change history.
- If any server or computer fails any of the client repositories can be copied back up to the server to restore it.
- 📷 View Diagram
Advantages of a Distributed VCS
- Better “merging”.
- Easy and reliable backups.
- Allows private test repositories without having to worry about the politics of having write access to some central repository.
- Work offline.
- Performing actions other than pushing and pulling changesets is extremely fast because the tool only needs to access the hard drive, not a remote server.
- Committing new changesets can be done locally without anyone else seeing them. Once you have a group of changesets ready, you can push all of them at once.
- Everything but pushing and pulling can be done without an internet connection. So you can work on a plane, and you won’t be forced to commit several bugfixes as one big changeset.
- Since each programmer has a full copy of the project repository, they can share changes with one or two other people at a time if they want to get some feedback before showing the changes to everyone.
Disadvantage(s) of a Distributed VCS
- If a project has a very long history (50,000 changesets or more), downloading the entire history can take an impractical amount of time and disk space.
GIT vs. Bitbucket
Bitbucket
- Cloud hosting service for Git (and other VC) projects.
- Private and public repositories (repos).
- Create teams.
- Creates typical 🔗 Git commands for you.
- Provides tools for documentation and issue tracking.
GIT
- A version control system.
- You create files, edit, save, edit, save, edit ... collaboratively.
- Git remembers who changed what when and why.
- Keeps a record of history, can bring sets of changes together (merge).
X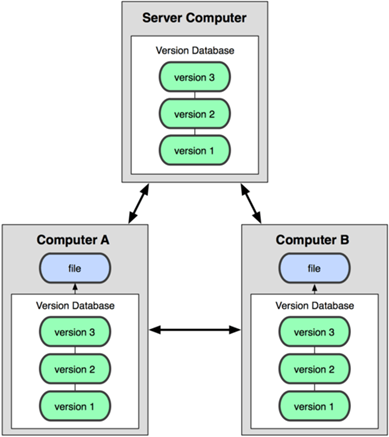
-
Typical Git Actions
- Typical actions now:
- Create a repository
- Clone a repository
- Initialise a repository
- Make changes to a repository
- Add the changes to your local Git repo.
- Commit the changes, i.e. create snapshots (milestones) of your project.
- Push the changes to the remote repository
- Set your local properties
- Later
- Create branches within your project.
- Merge branches or the work of others (pull).
- Revert back to a previous version of the project.
- Resolve conflicts.
- At first only carry out basic actions.
- Gradually enhance your capabilities, first individually, then in teams.
- Don’t be taken in by some of the (quite complicated) things you can do until you are familiar and confident about the basics.
Finding Git
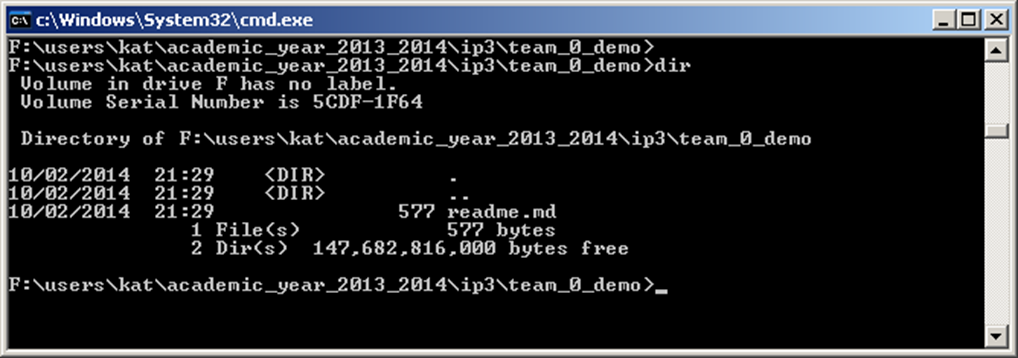
- Git is installed in the labs. You can download and install GIT on your laptop.
- Look for GitBash on the VMWare image.
- Open the shell (command line interface).
- Type “git” at the command prompt.
- You should see syntax information. This shows you that your command shell understands Git commands, thus Git is installed.
- 📷 View Screenshot
Getting Help with Git Commands
- 3 ways to get the manual page (manpage) for any of the Git commands at the command prompt:
- > git help <verb>
- > git <verb> --help
- > man git-<verb>
- <verb> here means the git command that you need help with.
- Example: >git help config <- get help about the config command
- If you are unsure of how to use a Git command, from now on use the help.
Remote and Local Repositories
- Bitbucket hosts your remote (i.e. cloud-based) repository.
- You can inspect its contents, such as:
- The address of this repository
- Command generation for typical actions, such as cloning.
- The code in your remote, down to being able to edit it.
- The commit history.
- You will typically develop your project on your local computer. This is your local repository.
- When you clone your remote repository your local repository "knows" it's corresponding remote.
X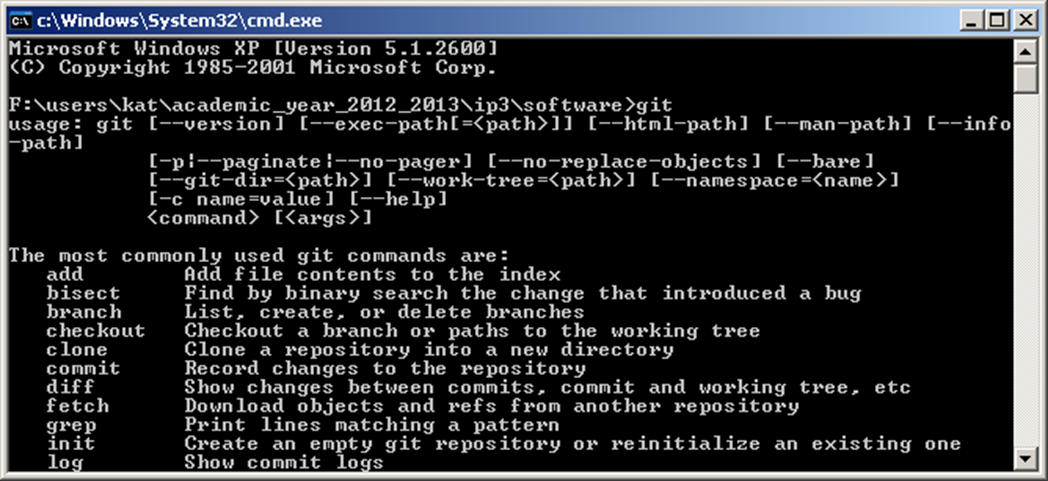
-
Create a Bitbucket Account
- 🔗 https://bitbucket.org/
The Bitbucket User Interface
- Link to the Dashboard
- Address of this repo
- The side bar has shortcuts to:
- Typical actions, such as clone
- Popular pages (navigation)
- Overview
- Sources
- Commit history
- Branches (later)
- Pull requests (later)
- 📷 View Screenshot
Create a new remote repository
- Either
- Repositories -> Create new repository
- Or
- click the link.
- Either
- Create a new repo.
- Then import my repo into yours.
- Or
- Look for the link Import Repo on the create repo page.
Clone the New Repository to your local
- Using GitBash shell navigate to your local repository.
- In Bitbucket, select the git clone command from the left side bar
- Paste this command into your bash shell
- You should see the completion of this task reported in the shell
- Find this file on your file system
- A hidden folder .git shows that this folder is under git version control
- Once you have cloned this folder, it "knows" its corresponding remote
- [You may have to set local variables, such as user.name and user.email; if so, follow the instructions]
Setting up a Git Repo
- The Git directory is where Git stores the metadata and object database for your project.
- This is the most important part of Git, and it is what is copied when you clone a repository from another computer.
- Version control is a system that records changes to a file or set of files over time so that you can recall specific versions later.
X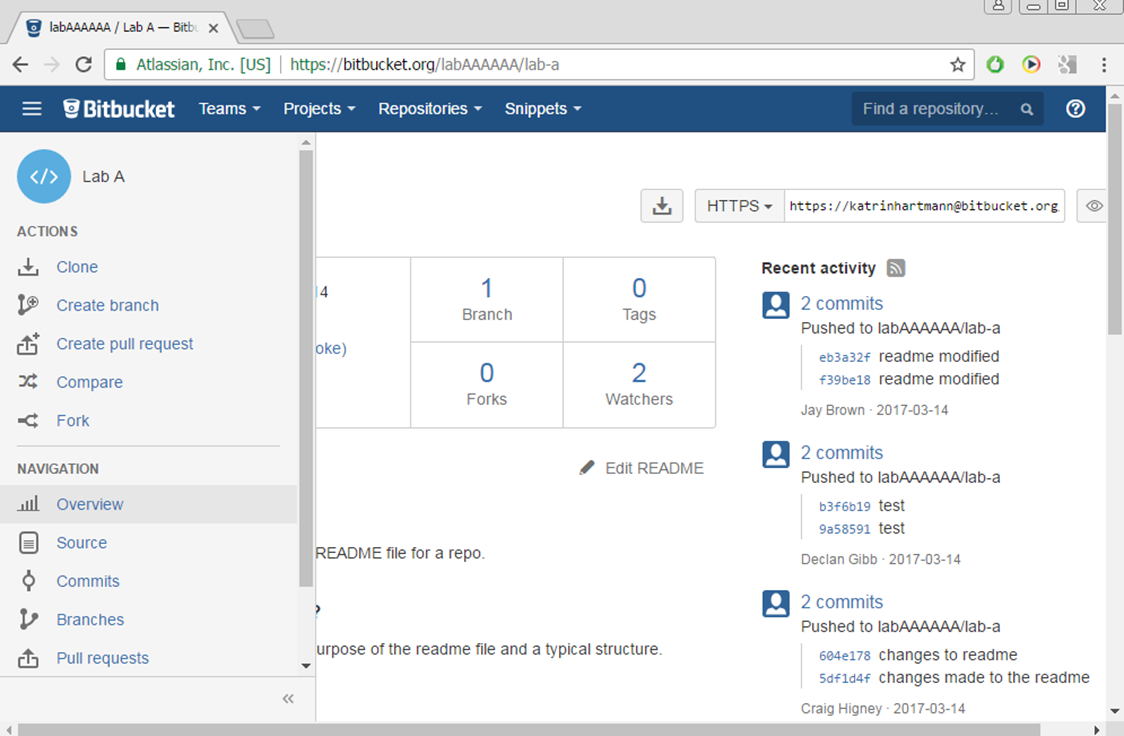
-
Version 2: Start with A LOCAL REPO
- On your local computer navigate to the folder, in which you would like to develop your project under Git version control.
- This folder may or may not already contain some project code, e.g. you could create and save a readme.md file.
- At the command prompt type:
> git init
- Your folder is now under Git version control.
Create a project with readme.md
- On your local computer create a directory (folder).
- In a text editor create a file readme.md and save it in this directory.
- It should look similar to this example.
$ mkdir /path/to/your/project
$ cd /path/to/your/project
$ git init
$ git remote add origin https:∕∕katrinhartmann@bitbucket.org/ip3_2013_team_0/team_0_demo.git
- This is NOT a Git repo yet.
Initializing a Git Repository (Repo) in an existing Directory
> git init
- Creates a new subdirectory named .git (a hidden folder)
- That contains all of your necessary repository files
- a Git repository skeleton.
- At this point, nothing in your project is tracked yet.
Working with Git
- Local Operations:
- Files in the repo can be in 3 states:
- Committed (data is safely stored in your local database)
- Modified (the file has been changed but not been committed to database).
- Staged (a marked modified file in its current version to go into your next commit snapshot)
Basic Git Workflow
- 1. Modify files in your working directory.
- 2. Stage the files, adding snapshots of them to your staging area.
- 3. Commit, which takes the files as they are in the staging area and stores that snapshot permanently to your Git directory.
-
Checking the Status of your Files
> git status
# On branch master
# Untracked files:
# (use "git add <file>..." to include in what will be 	committed)
# …
- Shows untracked files
- Shows tracked files that have been modified (not committed yet)
- Shows current branch (here: master)
Tracking New Files
- To begin tracking a new file use the git add command:
> git add <file_name>
- Starts tracking the named file .
> git add
- Looks at the working directory and adds all paths to the staged changes if they are either changed or are new and not ignored.
- The dot (.) means “current directory (and everything underneath)”.
- 📷 Status Check
Committing Changes
> git commit –m "<your_comment>"
- Any files you have created or modified that you haven’t run git add on since you edited them — won’t go into this commit.
- You can type your commit message inline with the commit command by specifying it after a -m flag
- Every time you perform a commit, you’re recording a snapshot of your project that you can revert to or compare to later. Commit little and often.
Working with Remotes
- Remote repositories are versions of your project that are hosted on the Internet / network.
- To see which remote servers you have configured: run the git remote command.
> git remote –v
- Lists the shortnames and url (if used with flag –v)
- By convention, the default remote repository is called "origin"
- To add a "short name", such as origin (or any other alias to a URL):
> git remote add origin <url>
Pushing to the Remote
- When you want to share your project: push it upstream.
- Command:
- > git push [remote-name] [branch-name].
> git push origin master
- 📷 A Possible Working Scenario
X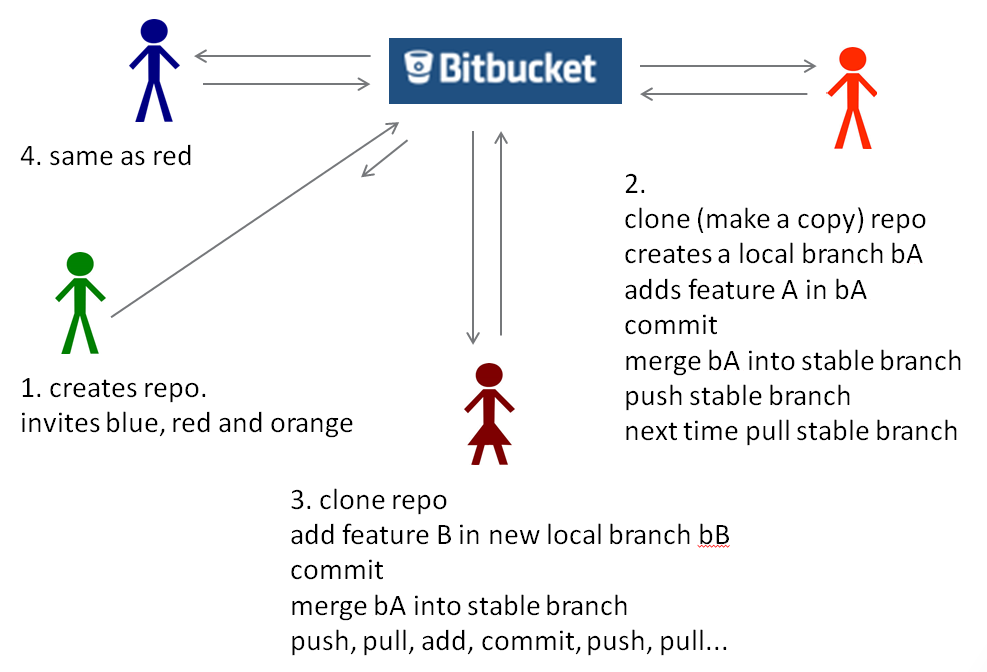
-
Background Reading
- 🔗 What is version control
- 🔗 Learning Git with Bitbucket
- 🔗 Java Servlet Introduction
- 🔗 Embedding Jetty (Server) in your application
-
Background Watching
- 📹 What are DevOps
- 📹 Initializing, adding, committing, and status
- 📹 Introduction to Servlets