02
-
Static and dynamic websites
- A website can be static or dynamic. Static websites display the same content to each person who views the site and do not change over time. Dynamic websites, on the other hand, contain information that changes due to numerous possible factors such as who the viewer is, the time of the day and the time zone. A dynamic website can contain client-side scripting or server-side scripting to generate the changing content, or it can use a combination of both scripting types.
- Server-side scripting is used to change the supplied page source on the server before the page is sent to the requesting browser, adjusting the sequence or reload of the web pages or web content. Server responses may be determined by such conditions as data in a posted HTML form, parameters in the URL, the type of browser being used, the passage of time, or a database or server state.
- Client-side scripting uses scripts running on the requesting browser to provide interactives effects.
- As soon as a site starts to uses forms it moves from being static to being dynamic.
-
Working with forms
- Forms typically use server-side technologies to collect and process input from users. They also often use client-side scripts to validate input from users before the form is submitted to the server for processing. This is useful because it provides a fast response to the user and also allow correctly entered information to be retained thus improving the user experience. To perform basic form processing you need to
- have access to a server
- create a page which includes appropriate html markup to make the form
- write and attach a stylesheet to make the form display appropriately
- (possibly) write some javaScript to validate the users’ input before the file is sent to the server
- write php script to process the user input entered into the form
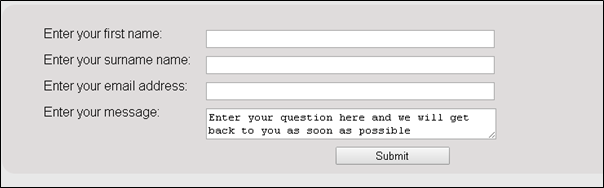
- The markup for this simple form makes use of the form input tag to ask the user for their first name, surname and email address. Each of these items consists of an input tag and a label tag. The label tag is used to associate the text prompt to the user with the relevant text input area e.g “Enter your surname name” is the label for the text input box with the name attribute “last”. The first two input tags use the familiar text type attribute while the third one uses the new html type email.
( Note : if you don’t remember all the different types of input element check out https://www.w3schools.com/html/html_form_input_types.asp )- The form also uses the textarea element to allow several lines of text to be input
( again if you need to revise form elements https://www.w3schools.com/html/html_form_elements.asp is a good resource).- The entire form is enclosed by the form tag. This takes two attributes an action – which is the name of the file containing the script to process the form and a method – in this case ‘post’ which details how the information is to be passed to the script.
(see https://www.w3schools.com/tags/att_form_method.asp to revise the different form-data methods) -
<form action="processInput.php" method="post">
  <label for="first">Enter your first name:</label>
  <input type="text" name="first" id="first" required/>
  <label for="last">Enter your surname name:</label>
  <input type="text" name="last" id="last" required/>
  <label for="email">Enter your email address:</label>
  <input type="email" name="email" id="email" />
  <label for="message">Enter your message:</label>
  <textarea name="message" id="message">Enter your question here and we will get back to you as soon as possible </textarea>
 <input type="submit" name="submit" id="submit" value="Submit" />
 </form>
- When a user submits the data by clicking on the "Submit" button, the form data is sent to the file specified in the action attribute of the <form> tag. This form will be stored on a server. The file defined in the action attribute is the file that processes the received input.
- Exactly how the information is sent depends on the value of the second attribute the method. Ths specifies the HTTP method used to transmit the data. The Hypertext Transfer Protocol (HTTP) is designed to enable communications between clients and servers. It works as a request-response protocol between a client and server. In this situation the web browser is the client and an application on a computer that hosts the web site is the server. When a client (browser) submits an HTTP request to the server the server returns a response to the client. The response contains status information about the request and may also contain the requested content. Two commonly used methods for a request-response between a client and server are: GET and POST.
- GET - Requests data from a specified resource, the input values are passed as part of the URL
- POST - Submits data to be processed to a specified resource. Information is sent to the server as part of the data body and will not be visible in the URL in the user's browser.
- In this case the method specified in the form tag is post. So data from the form is passed to the php file on the server using the post protocol.
- The super global variable $_POST is used to collect the value of the input fields. There are several predefined variables in PHP which are "superglobals". They are always accessible, regardless of scope and can be used without any additional code being written.
- $_POST is widely used to collect form data after submitting an HTML form with method="post". The HTTP POST method passes an associative array of variables the php script. It is indexed by form element NAME (not ID. One way to think of it is: attribute "id=" is for CSS, while e attribute "name=" is for PHP). You access a value from a form by using the syntax $_POST[‘something ‘]; where something is the name of the input element or textarea element in the form.
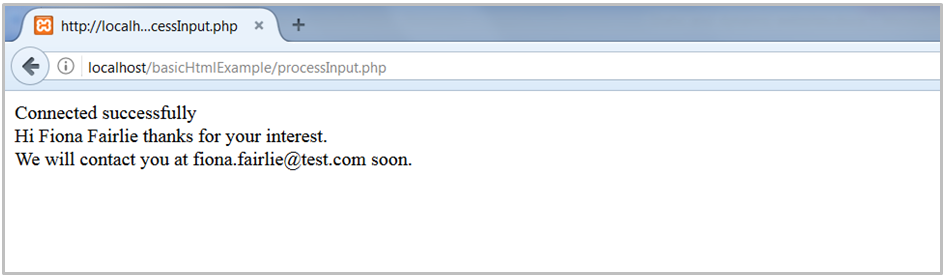
<?php echo 'Hi '.$_POST['first'].' ' .$_POST['last'] .' thanks for your interest.</br>'; echo 'We will contact you at '. $_POST['email'].' soon.</br>'; ?>- The code above would take the text entered into the first three text input boxes and incorporate them into a statement to be output in the browser window

- This certainly gives some feedback to users but the input is not saved anywhere and as soon as the user moves away from the page the information will be lost.
-
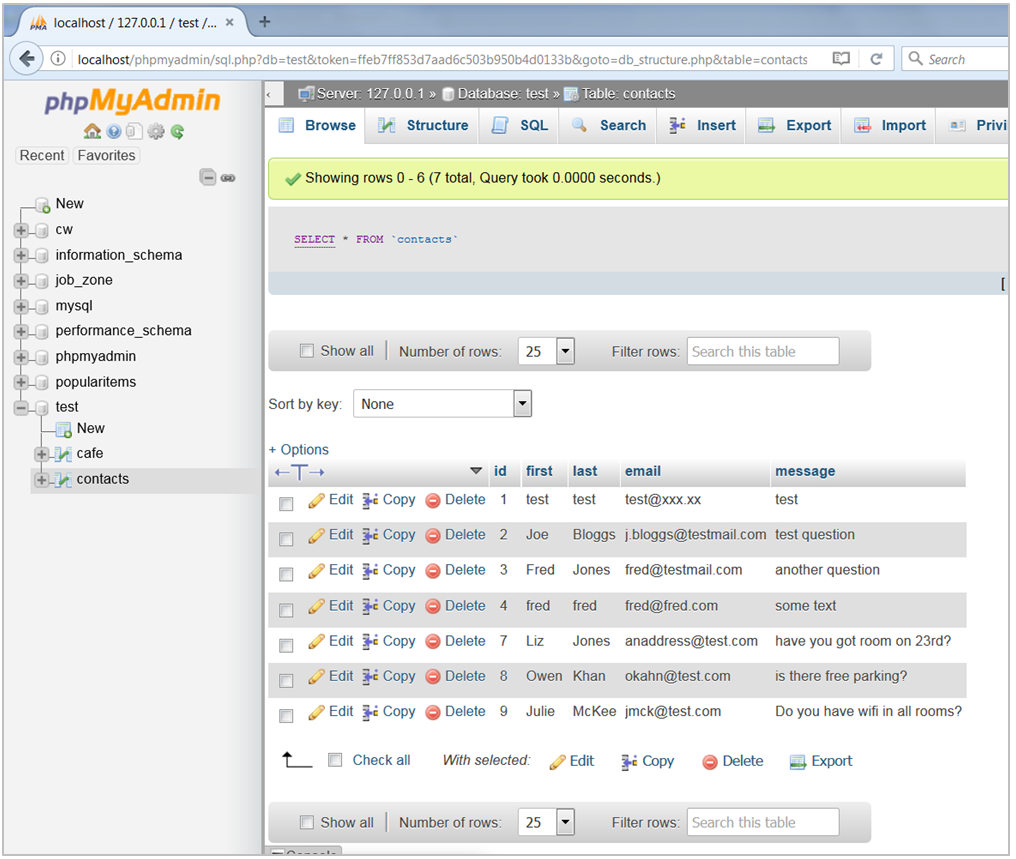
- If you want the data to be saved you need to add some additional complexity to the solution. Instead of simply outputting information using echo statements you will need to set up a database with an appropriate table structure and use php scripts (or similar) to connect to the database, save the information and disconnect from the database.
<?php $servername = "localhost"; $username = "root"; $password = ""; $dbname = "test"; try { $conn = new PDO("mysql:host=$servername;dbname=$dbname", $username, $password); $conn->setAttribute(PDO::ATTR_ERRMODE, PDO::ERRMODE_EXCEPTION); echo "Connected successfully <br />"; } catch(PDOException $e) { echo "Connection failed: " . $e->getMessage(); } $query=$conn->prepare("INSERT INTO contacts (first, last, email, message) VALUES (?,?,?,?)"); $query->bindParam(1, $first); $query->bindParam(2, $last); $query->bindParam(3, $email); $query->bindParam(4, $message); $first=$_POST['first']; $last=$_POST['last']; $email=$_POST['email']; $message=$_POST['message']; $query->execute(); $conn = null; echo 'Hi '.$_POST['first'].' ' .$_POST['last'] .' thanks for your interest.</br>'; echo 'We will contact you at '. $_POST['email'].' soon.</br>'; ?> -
- The first part of this script specifies the name of the server (localhost in this case), any username and password required( in the default installation of xampp and in our examples the default password is root and there is no password so $password=”” i.e. an empty string) and the name of the database to connect to (in this example the database is called test)
- Once these values have been set up the script tries to connect to the database using a PHP Data Object wrapped in a try/catch statement and uses the exception mechanism to handle errors.
- Exception handling is used to change the normal flow of the code execution if a specified error (exceptional) condition occurs. This condition is called an exception. A try/catch statement is a way of handling exceptions. A function using an exception should be in a "try" block. If the exception does not trigger, the code will continue as normal. However if the exception triggers, an exception is "thrown" .When an exception is thrown, the code following it will not be executed, and PHP will try to find the matching "catch" block to deal with the error.
- In this case the try block uses a PDO statement to try to connect to a specified database on a named server with a given username and password. If it succeeds the programme outputs a confirmation message (Connected successfully) and moves on to interact with the database. If not it executes the catch block (which outputs an error message) and then stops.
- "PDO - PHP Data Objects - is a database access layer providing a uniform method of access to multiple databases."
- PDO work on many different database systems. So, if a project may need to move to another database system in future using PDO is a good idea as they simplify the process. You only have to change the connection string and a few queries. PDO also support Prepared Statements. Prepared Statements protect from SQL injection, and are very important for web application security. A prepared statement is a precompiled SQL statement that can be executed multiple times by sending just the data to the server.
- Inserting new data, or updating existing data is one of the more common database operations. Using PDO, this takes several steps.
- prepare -> [bind]-> execute
- In our example, once a connection with the database has been established an INSERT statement template is prepared. The SQL statement template is created and sent to the database. Certain values called parameters (labeled "?") are left unspecified.
- The database parses, compiles, and performs query optimization on the SQL statement template, and stores the result without executing it. This is the ‘prepare’ stage.
-
- Next, the application binds the values to the parameters (e.g. $query->bindParam(1, $first); ) , then it assigns values to the parameters (e.g. $first=$_POST['first'];). In our example the first parameter will take the value of the first text input box in the form, the second will take the value input into the text box with the name last, the third will be the value from the email input box and the last will be the contents of the message entered into the textarea.
- The database is then instructed to execute the statement. (The application may execute the statement as many times as it wants with different values.)
- Finally the script disconnects from the database and outputs a message to the screen letting the user know that their form has been processed.
- If you then check in the database it should be possible to see that the information has been added to the appropriate table.
-
php and code reuse
- Look at the markup for the hostel website.
- index.html
<!DOCTYPE HTML> <html> <head> <!-- page information start --> <!-- link to stylesheets, page title etc --> <!-- this information does not display on page --> <meta http-equiv="Content-Type" content="text/html; charset=utf-8"> <title>Hostel Site</title> <link href="css/hostelStyle3.css" rel="stylesheet" type="text/css"> </head> <body> <header> <h1 class="mainHeading"> Backpacker's Hostel</h1> <img src='images/banners/banner.jpg' alt='images of Highlands' /> </header> <!--banner end--> <!--navigation start--> <nav> <!-- add and style menus etc --> <ul> <li><a href="index.html" >Home Page</a></li> <li><a href="facilities.html" >Facilities</a> </li> <li><a href="cafe.html" >Cafe</a></li> <li><a href="gettingHere.html" >Getting Here</a></li> <li><a href="contactUs.html" >Contact Us</a></li> </ul> </nav> <!--navigation end--> <!--main content area start--> <main> <div class="col-1"> <img src="images/hostel/outside.jpg" alt="image of hostel" /> </div> <div class="col-2"> <p> The Hostel has one of the best locations in Scotland. From the attractive loch-side garden, the views across to mountain range are breathtaking. Good facilities mean the hostel is popular with walkers and tourist alike.</p> <p>There are otters, badgers and pine martins in the area. Red deer are numerous, and on the mountains ravens, ptarmigan, golden eagles and mountain hares can be seen on occasion</p> <p>... well situated for walking and exploring some of Scotland's most celebrated scenery"!</p> <p>With no mobile phone reception the emphasis here is on tranquillity and relaxation! </p> </div> </main> <!--main content area end--> <!--sidebar start--> <aside> <table> <tr><th colspan="3">Proposed Prices for 2017 Season</th></tr> <tr> <td>Dormitory</td> <td>£9.50</td> <td>per bed per night</td> </tr> <tr> <td>Group room</td> <td>£12 </td> <td>per bed per night (min. group size 4, maximum 6)</td> </tr> <tr> <td>Double room</td> <td>£25</td> <td>per room</td> </tr> </table> <p>Purchasable Extras Towel £4</p> </aside> <!--sidebar end--> </body> </html> -
- There are a number of sections which will be repeated on most pages of the site – for example the main navigation section will be the same for every page on the site, the header and footer are the same and the aside is included on most pages of the site. It would clearly be more efficient to write the code once and then include it on each page when it was needed. Not only would this prevent the need for a lot of repetitive typing or a lot of ‘cutting and pasting’ while developing a site it would also make marinating a site much easier. If an extra page is added, instead of having to edit the navigation on every single page of the site we would only need to go to one piece of code and alter it the navigation there. This is much quicker and easier and also cuts down on the likelihood of mistakes being made. This is true for a small site of five or six pages but is even more useful when you start dealing with large site containing hundreds of pages.
- It is very easy to do this using php . You can simply move a section of markup into a separate file, save it with a .php extension and the use the php include statement to include the markup from the file at the appropriate point in your original document. Note: you should also save the original document with a .php extension.
- The following example show how the navigation could be moved out of the file shown at the start of this section and into a separate file.
- navigation.php
<nav> <!-- add and style menus etc --> <ul> <li><a href="index.html" >Home Page</a></li> <li><a href="facilities.html" >Facilities</a> </li> <li><a href="cafe.html" >Cafe</a></li> <li><a href="gettingHere.html" >Getting Here</a></li> <li><a href="contactUs.html" >Contact Us</a></li> </ul> </nav> -
- index_v2.php
<!DOCTYPE HTML> <html> <head> <!-- page information start --> <!-- link to stylesheets, page title etc --> <!-- this information does not display on page --> <meta http-equiv="Content-Type" content="text/html; charset=utf-8"> <title>Hostel Site</title> <link href="css/hostelStyle3.css" rel="stylesheet" type="text/css"> </head> <body> <!--banner start--> <header> <h1 class="mainHeading"> Backpacker's Hostel</h1> <img src='images/banners/banner.jpg' alt='images of Highlands' /> </header> <!--banner end--> <?php include "includes/navigation.php" ?> <!--main content area start--> <main> <div class="col-1"> <img src="images/hostel/outside.jpg" alt="image of hostel" /> </div> <div class="col-2"> <p> The Hostel has one of the best locations in Scotland. From the attractive loch-side garden, the views across to mountain range are breathtaking. Good facilities mean the hostel is popular with walkers and tourist alike.</p> <p>There are otters, badgers and pine martins in the area. Red deer are numerous, and on the mountains ravens, ptarmigan, golden eagles and mountain hares can be seen on occasion</p> <p>... well situated for walking and exploring some of Scotland's most celebrated scenery"!</p> <p>With no mobile phone reception the emphasis here is on tranquillity and relaxation! </p> </div> </main> <!--main content area end--> <!--sidebar start--> <aside> <table> <tr><th colspan="3">Proposed Prices for 2017 Season</th></tr> <tr> <td>Dormitory</td> <td>£9.50</td> <td>per bed per night</td> </tr> <tr> <td>Group room</td> <td>£12 </td> <td>per bed per night (min. group size 4, maximum 6)</td> </tr> <tr> <td>Double room</td> <td>£25</td> <td>per room</td> </tr> </table> <p>Purchasable Extras Towel £4</p> </aside> <!--sidebar end--> </body> </html> -
- Remember that in order for php to work the files will need to be running on a server.
- It is possible to move all of the duplicate code into separate files of that the index page becomes
- index_v3.php
<!DOCTYPE HTML>
<html>
<head>
<!--  page information start				        -->
<!--  link to stylesheets, page title etc			-->
<!--  this information does not display on page  	-->
<meta http-equiv="Content-Type" content="text/html; charset=utf-8">
<title>Hostel Site</title>
<link href="css/hostelStyle3.css" rel="stylesheet" type="text/css">
</head>
<body>

<?php include "includes/header.php" ?>
<?php include "includes/navigation.php" ?>

<main>
	<div class="col-1">
    <img src="images/hostel/outside.jpg" alt="image of hostel" />
     </div>
  <div class="col-2">
    <p> The Hostel has one of the best locations in Scotland. From the attractive loch-side garden, the views across to mountain range are breathtaking. Good facilities mean the hostel is popular with walkers and tourist alike.</p>
    <p>There are otters, badgers and pine martins in the area. Red deer are numerous, and on the mountains ravens, ptarmigan, golden eagles and mountain hares can be seen on occasion</p>
    <p>... well situated for walking and exploring some of Scotland's most celebrated scenery"!</p>
    <p>With no mobile phone reception the emphasis here is on tranquillity and relaxation! </p>
  </div>
</main>

<?php include "includes/aside.php" ?>

</body>
</html>