03
-
- Client-side scripting doesn’t need round-trips to the server to process every user-event. The structure of the document being displayed are made available via the document object model (DOM) . Scripts can then add and remove page content, change the position and colour of elements ... JavaScript is currently the most commonly used scripting language
- ⇓ Download Week 3 Resources
DOM
- W3C (World Wide Web Consortium) defines a standard for accessing documents:
"The W3C Document Object Model (DOM) is a platform and language-neutral interface that allows programs and scripts to dynamically access and update the content, structure, and style of a document.“- HTML DOM is the standard for how to get at parts of an HTML page and change, add, or delete elements
Basic Page Structure
- A very simple html page might look this:
<!DOCTYPE HTML>
<html>
<head>
<title>Simple page</title>
</head>
<body>
<h1>Bannerheading</h1>
<p id="textStyle">Original text</p>
<body>
<html>
- It consists of a document type, a root element: the html tag and then two main parts : the head and the body. The head contains a single element : title and title contains a single text element. It is possible to break the entire page down into a series of elements in this way. The body in the example contains two elements an h1 tag and a p tag. The h1 tag is a simple element which contains a text element. The p tag is slightly more complex because the tag has an attribute: id as well as containing a text element. The entire structure of the page can be shown graphically as follows

- When you are working with the Document Object Model and with scripts to modify it, it is essential that you have a clear idea of a page’s structure. This is because a lot of the code depends on knowing where one element on the page sits in relation to other elements in the page
-
DOM Programming Interface
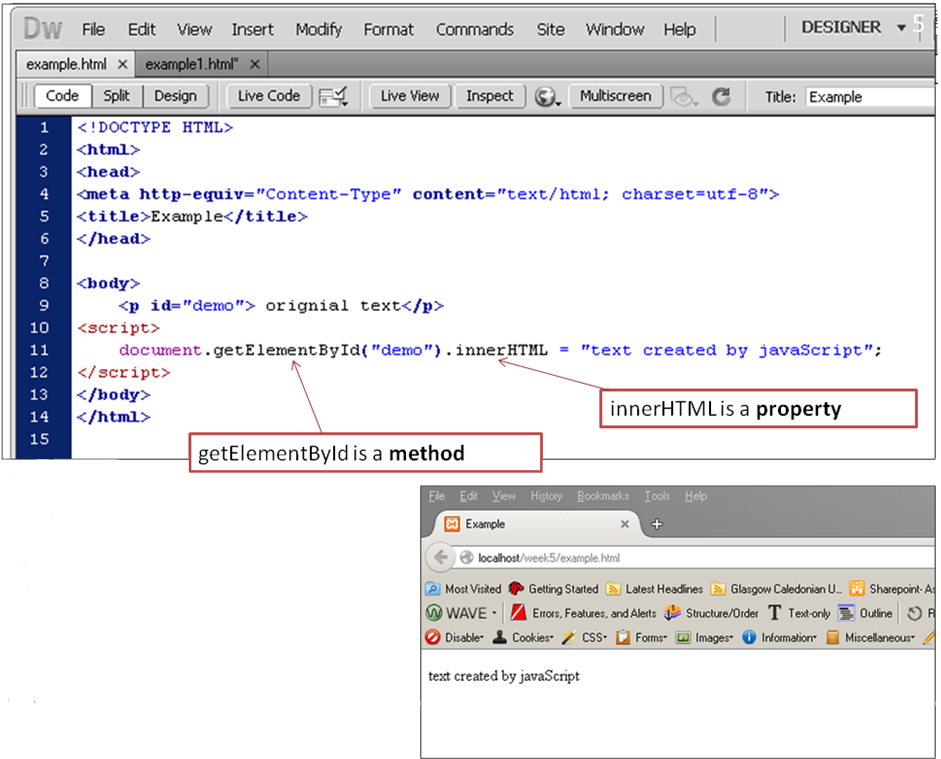
- Each HTML element on a page is defined as an object. Objects have properties and methods. A property is a value that you can get or set e.g. the text inside innerHtml is a property which can be altered using javaScript. A method is an action you can do e.g. adding an extra div tag to the page
-
Finding HTML Elements
- There are different ways you can access an individual element on a page.
- The simplest way, assuming an element has been assigned an id, is to use this to get at an individual element.
- To use the getElementById() method simply add the words document.getElementById() to the code, put the id of the element you want to access in double quote marks within the round brackets and then use dot notation to get at a particular property e.g. innerHtml to change text, style to change the look of an element .
- For example adding the script document.getElementById(“dynamicText”).innerHTML = “New text created by javaScript” to a page which contains the tag <p id= “dynamicText”></p> would create the text New text to be created by javaScript and cause it to be displayed in the paragraph tag with id dynamic text when the page is rendered.
- If the script was changed to document.getElementById(“dynamicText”).innerHTML = “different text” then the words different text would show when the page is displayed.
- More usefully if you have a page with a form and a blank paragraph placeholder
<form> <input id= “textTyped” type=”text” /> </form> <p id= “showText”></p>- you can use a simple script to display the text that has been input
<html> <head> </head> <body> <form> <input id= "textTyped" type="text" /> <button id="btn1" type="button" onclick="showInput()">Click</button> </form> <p id= "showText"></p> <script> function showInput(){ document.getElementById("showText").innerHTML = document.getElementById("textTyped").value; } </script> </body> </html>- In addition to the getElementById() method , it is possible to get a list of all elements of a given class on a page using getElementsByClassName() and to get all elements of a particular kind by using document.getElementsByTagName(). There is more information about this later.
-
Changing HTML Elements
- Once you have identified an element you want to work with you may want to do different things depending upon what kind of element it is.
Changing Text
- If you are dealing with text one of the commonest things you may wish to do is to change the words that are being displayed. This is such a common action there is a specialized property innerHTML to deal with the situation : the statement document.getElementById("header").innerHTML = "New Header"; causes the words New Header to be added to the page element with id = “header” when the script is run.
- If the statement is changed to
- document.getElementById("header").innerHTML = “some sample text”; and then the script is run again the words New Header will be replaced by the words some sample text.
- You can also use innerHTML to add text to an existing piece of text.
- Going back to our earlier example changing the line document.getElementById("showText").innerHTML = document.getElementById("textTyped").value;
- to document.getElementById("showText").innerHTML += document.getElementById("textTyped").value;
- will change the behavior of the script so that the text that is added via the form will now be added to the display paragraph rather than replacing/overwriting it. The only difference between the two lines is that += is used instead of just an equals sign =. The += operator is shorthand for “add the value on the right of the operator to whatever is on the left of the operator ( so i=2 ;i+=5; means that i will end with a value of 7;)
- If we run the following script and type in aaa the first time the button is clicked, bbb the second time and ccc the third time the output will be aaabbbccc i.e. the innerHTML property is being used to add text to the current contents of the showText paragraph rather than overwrite the contents.
<html> <head> </head> <body> <form> <input id= "textTyped" type="text" /> <button id="btn1" type="button" onclick="showInput()">Click</button> </form> <p id= "showText"></p> <script> function showInput(){ document.getElementById("showText").innerHTML += document.getElementById("textTyped").value; } </script> </body> </html>- Adding and amending text is just one way that you can alter a page using javaScript. You might also want to change the appearance of the text or to use code to change an image that is being displayed or move it on the screen.
Changing Styles
- To change the appearance of an element on the page you use the style object. It takes the form element.style.property
- e.g the statement document.getElementById("p2").style.color = "blue"; would change the color of text in paragraph p2 to blue
- while document.getElementById("showText").style.backgroundColor = "rgba(120,0,120,0.3)"; would set the background colour of the paragraph to pink.
- The style object lets you change the appearance of elements in many different ways see 🔗 http://www.w3schools.com/jsref/dom_obj_style.asp for more details.
-
Changing Images
- Another common use for DOM scripting is to change the image that is being displayed.
- If you start with a simple piece of code which displays an image
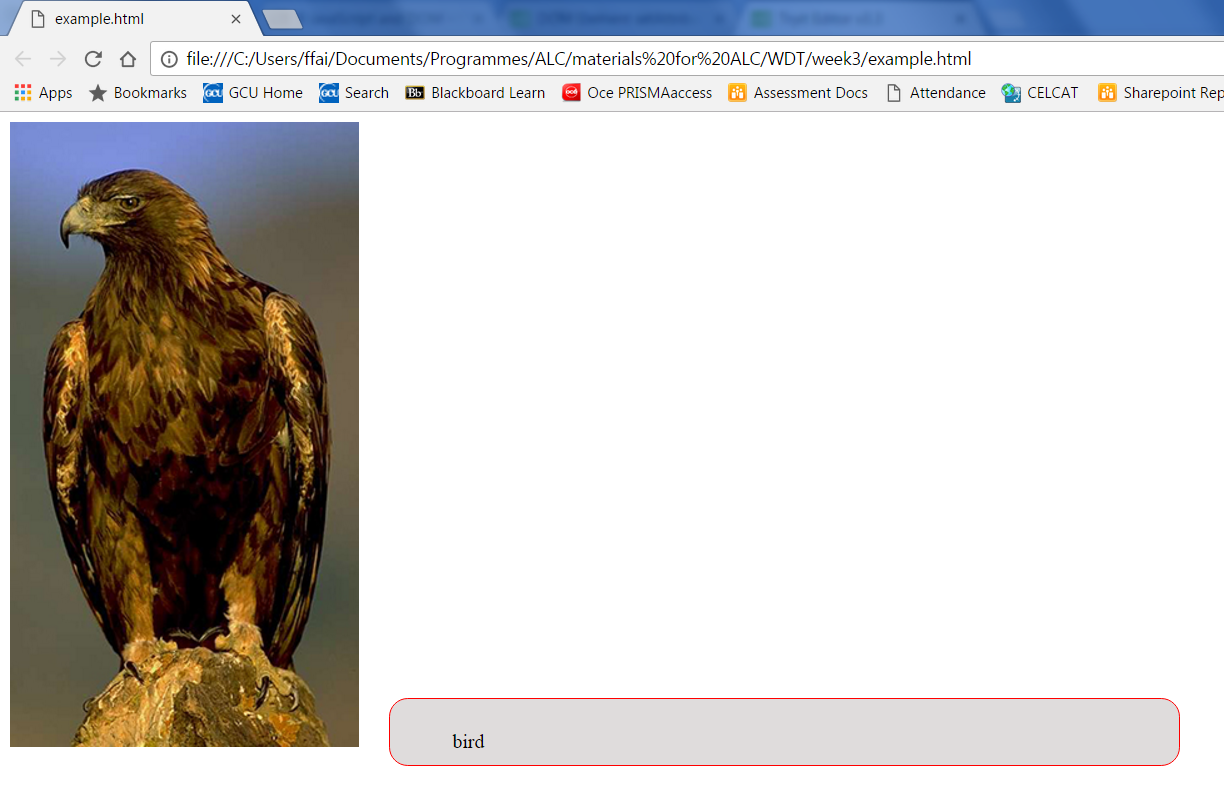
<html> <head> </head> <body> <img id="wildlifePic" src="deer.jpg" width="500" height="332" /> </body> </html>- We can use the statement document.getElementById("wildlifePic").src = "bird.jpg"; to change the image. The following example shows this working in a programme which changes the picture when a button is clicked.
<html> <head> </head> <body> <img id="wildlifePic" src="deer.jpg" width="500" height="332" /> <button id="btn1"type="button">Click</button> <script> btn1.addEventListener("click", changePicture); function changePicture(){ document.getElementById("wildlifePic").src = "bird.jpg"; } </script> </body> </html>- alternatively we could write the code so that the image changes when the picture itself is clicked
<html> <head> </head> <body> <img id="wildlifePic" src="deer.jpg" width="500" height="332" /> <script> wildlifePic.addEventListener("click", changePicture); function changePicture(){ document.getElementById("wildlifePic").src = "bird.jpg"; } </script> </body> </html>- If we want the image to change back and forth between the images as it is clicked we need to add code to test which image is currently being displayed then if the image named deer is currently showing change the image to bird or if the image of a bird is showing change the image to a deer.
- To test which image is being displayed we first need to identify which image is currently being displayed. We can do this using the document.getElementById("wildlifePic").src; statement. However this statement gives the full current pathname of the image. This can vary from computer to computer so we have to use javaScript string handling techniques to extract the name of the file i.e. bird or deer from the long name given by document.getElementById("wildlifePic").src;
- In the example below when the picture is clicked the changePicture function is called, it then uses the function getName() to examine the name of the current image source file and return either the word deer or bird to the changePicture( )function. Once the name is known the code checks to see if it equals deer, if it does it changes the picture being displayed to the bird otherwise it displays the picture of a deer. The string handling methods in javaScript are very useful. If you want to find out more about them go to 🔗 http://www.w3schools.com/js/js_string_methods.asp
<html> <head> </head> <body> <img id="wildlifePic" src="deer.jpg" width="500" height="332" /> <script> wildlifePic.addEventListener("click", changePicture); function changePicture(){ if (getName()=="deer"){ document.getElementById("wildlifePic").src = "bird.jpg"; }else{ document.getElementById("wildlifePic").src = "deer.jpg"; } } function getName(){ var str = document.getElementById("wildlifePic").src; var pos1 = str.lastIndexOf("/"); var pos2 = str.lastIndexOf("."); str=str.slice(pos1+1,pos2); return str; } </script> </body> </html> -
Changing Attributes
- The src attribute of an image is just one kind of attribute you may wish to change. There are many other. The more general way of setting an attribute is to use the element.setAttribute(attribute,value) method. For example you could change the class assignment to an element by using the following statement document.getElementById("showText").setAttribute("class", "democlass");
- This could allow you to change the entire “look & feel” of an element in one click. The code below changes how the text in the showText paragraph is displayed when the text is clicked
<html> <head> <link href="simpleStyle.css" rel="stylesheet" type="text/css"/> </head> <body> <img id="wildlifePic" src="deer.jpg" /> <p id= "showText"></p> <script> wildlifePic.addEventListener("click", changePicture); showText.addEventListener("click", changeTextDisplay); function changePicture(){ if (getName()=="deer"){ document.getElementById("wildlifePic").src = "bird.jpg"; }else{ document.getElementById("wildlifePic").src = "deer.jpg"; } document.getElementById("showText").innerHTML = getName(); } function getName(){ var str = document.getElementById("wildlifePic").src; var pos1 = str.lastIndexOf("/"); var pos2 = str.lastIndexOf("."); str=str.slice(pos1+1,pos2); return str; } function changeTextDisplay(){ document.getElementById("showText").setAttribute("class", "democlass"); } </script> </body> </html>- It works with the external stylesheet simpleStyle.ccs which has democlass defined as follows
.democlass { display:inline-block; margin-bottom:30px; margin-left:20px; margin-top:10px; padding:25px 50px 10px; width:40%; background-color:#DFDCDC; border:1px solid red; border-radius:15px 15px 15px 15px; }- The code uses document.getElementById("…") with the src attribute of an image to change the picture being displayed when a user clicks on the image; document.getElementById("…") with innerHTML and the getName() function to change the text displayed in the paragraph with id showText at the same time and document.getElementById("…") with the setAttribute method to add the class demoClass to the showText paragraph. This will change the way the paragraph is styled when the user clicks on the text.
- Changing the event handler from showText.addEventListener("click", changeTextDisplay); to wildlifePic.addEventListener("mouseover", changeTextDisplay); would mean that the text would change how it is displayed when the cursor moves over the picture instead of changing when the text is clicked.
-
Accessing Different Elements On The Page
- So far we have been using the getElementById() method to identify specific elements of a page. It can sometimes be useful to get a list of all elements of a given class on a page using getElementsByClassName() or even to get all elements of a particular kind by using document.getElementsByTagName(). These methods are particularly useful if you want to set up interactivity like dropdown menus or other features which apply to several different elements of a given type.
- The follow example displays the text inside each li element in turn and then changes the text colour of the element blue when someone clicks anywhere on the unordered list.
<html> <head> </head> <body> <ul id="changingList"> <li> a </li> <li> b </li> <li> c </li> <li> d </li> <li> e </li> </ul> <script> changingList.addEventListener("click", changeColor); function changeColor() { // get nodelist of all li elements on page var liList = document.getElementsByTagName("li"); for (var i=0;i<liList.length;i++){ //pop up box with the text in the current list element alert(liList[i].innerHTML); //change the text colour of the current element to blue liList[i].style.color = "blue"; } } </script> </body> </html> -
Events
- The Document Object Model essentially uses an event driven approach to programming. The page and scripts are loaded into the browser, the page waits until an event occurs and then reacts by running a script or scripts. There are many different kinds of event that a page can react to some of the most common are:
- user clicks the mouse
- web page has loaded
- an image has been loaded
- mouse moves over an element
- an input field is changed
- an HTML form is submitted
- a user hits a key
Handling Events
- It is worth looking at the different ways javaScript allows events to be handled. There are several different types of syntax that can be used and they are all in regular use so you should be aware of all of them.
- The most basic and old fashioned way is to use onclick (or the equivalent for each event) to an element. One of the early examples in this section used this format:
<button id= “btn1” onclick=“showInput()">Click</button>
- This simply adds the name of the event and the name of the function which contains the code to deal with the event directly to the tag where is will be used.
- A more modern way to add interactivity to elements is to use document.getElementById(id).onclick = function(){code}
- So we could write
<button id= “btn1”> Click</button>
- and then later have the code
<script>
   document.getElementById(“btn1").onclick = showInput;
</script>
- which links the event with the code to handle it.
- Currently the preferred way of adding interactivity to elements and of handling events is to use event handlers. These are not added directly to tags but are written in the script part of the file. This means that it easy to find and modify code if you ever want to update the file and provides a more flexible and scalable way to handler events. The general form of an event handler is element.addEventListener(event, function);
<html> <head> </head> <body> <form> <input id= "textTyped" type="text" /> <button id="btn1" type="button" >Click</button> </form> <p id= "showText"></p> <script> btn1.addEventListener("click", showInput); function showInput(){ document.getElementById("showText").innerHTML = document.getElementById("textTyped").value; } </script> </body> </html> -
Adding and Deleting Elements
- In addition to modifying existing elements javaScript can also be used to add and remove element to the page.
- This can be quite a fiddly process as a) it takes a number of steps and b) you need to know where in the page hierarchy the element is going to be added.
- The steps that are required are firstly you have to create the element, then add content to it, (possibly style it) and then finally actually add the element to the page.
- When you add the element to the page you need to understand the overall page structure in order to decide which of the existing elements to append the new element to. This involves understanding the parent/child and sibling relationship between elements. Going back to the simple html page we looked at earlier the page structure was as follows:
- After the DOCTYPE declaration, the document begins by opening an html tag. All the other elements of the web page are contained within this element, we say that the html element is a parent. All the other elements are inside the html tag so this tag has no parent. There are no other elements at the same level so it has no siblings. We call this all enclosing html element the root element.
- Moving one level deeper, we find two branches: head and body. They exist at the same level, which makes them siblings. They share the same parent, html , but they also contain children, so they are parents themselves. The head element in this example has a single child title and the body element has two children h1 and p. h1 and p are siblings.
- All tag elements can have children. These children can be elements, text or comments. Elements can also have attributes.
- The DOM relates all of the elements of a document to each other in terms of a tree of relationships called a node tree.
- The term node comes from networking where it used to denote a point of connection in a network.
- In the HTML Document Object Model, everything is a node:
- the document itself is a node
- all HTML tags are element nodes
- HTML attributes are attribute nodes
- text inside HTML elements are text nodes
- comments are comment nodes
-
- There are a number of properties and methods which can be used on all HTLM elements. For example : the appendChild() method
- When an HTML document is loaded into a web browser, it becomes a document object. The document object provides properties and methods to access node objects, from within JavaScript. These can be used in conjunction with the element methods and properties to change the contents of a webpage.
- For example: we can use the HTML DOM createElement(),createText() and appendChild() methods to add a new item to a list.
// Create a <li> node var node = document.createElement("li"); // Create a text node var textnode = document.createTextNode("Water"); // Append the text to the <li> node node.appendChild(textnode); // Append the list item <li> to the unordered list <ul> with id="myList" document.getElementById("myList").appendChild(node);- This illustrates that using the DOM to amend a document can be quite a laborious process. However it is also very powerful and the technique can be used to build sophisticated effects, graphs and charts and interactivity.
- Building up code we can add an input box and then use a short script to add the text that has been entered to the end of a list on the webpage.
<!DOCTYPE html> <html> <body> <label for="inputText">Enter drink </label> <input type="text" id="inputText"> <button id="btn1">Click</button> <p>Enter the name of a drink and click the button to append it to the end of the list.</p> <ul id="drinksList"> <li>Coffee</li> <li>Tea</li> </ul> <script> btn1.addEventListener("click", addItem); function addItem() { var newItem = document.getElementById("inputText").value; var textnode = document.createTextNode(newItem); var node = document.createElement("li"); node.appendChild(textnode); document.getElementById("drinksList").appendChild(node); } </script> </body> </html>- This code results in the following 📷 output
X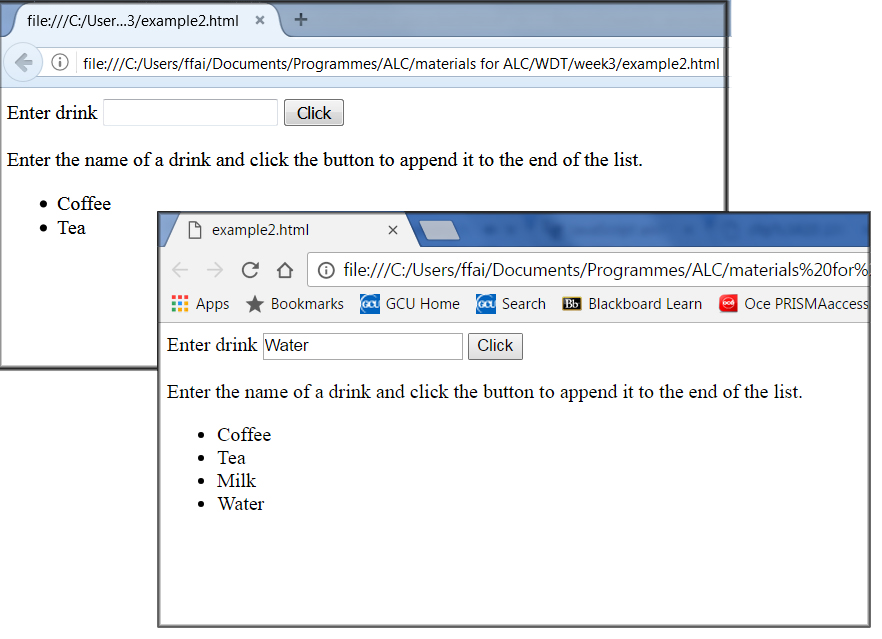
- This code works if you click the button, if you want to script to be activated when the cursor leaves the text input box you would need to change the code as follows
<!DOCTYPE html> <html> <body> <label for="inputText">Enter drink </label> <input type="text" id="inputText"> <p>Enter the name of a drink and click out of the box to append it to the end of the list.</p> <ul id="drinksList"> <li>Coffee</li> <li>Tea</li> </ul> <script> inputText.addEventListener("blur", addItem); function addItem() { var newItem = document.getElementById("inputText").value; var textnode = document.createTextNode(newItem); var node = document.createElement("li"); node.appendChild(textnode); document.getElementById("drinksList").appendChild(node); } </script> </body> </html>- Notice that the first line of javaScript now reads
inputText.addEventListener("blur", addItem);- The event listener is now attached to the text input box instead of the button and reacts to the blur event instead of the click event.
- For lists of relevant properties and methods see
- 🔗 https://www.w3schools.com/jsref/dom_obj_all.asp and
- 🔗 https://www.w3schools.com/jsref/dom_obj_document.asp
- Sections 4, 5 and 6 of the Lynda.com course JavaScript Essential Training has a good explanation of how to work with the DOM to access, change and create elements using the DOM.
-
Using DOM Scripting to Create Graphs
- We can use DOM scripting techniques along with the HTML5 canvas tag to draw graphs onto a page. The HTML5 <canvas> tag is used to enable the drawing of graphics via scripting. It has no drawing abilities of its own but is simply a container for graphics. A canvas is a region defined in HTML code with height and width attributes, you need to write scripts to actually draw graphics. Before doing this you need to specify a context. The 2D Context provides the objects, methods, and properties to draw and manipulate two dimensional graphics on a canvas drawing surface. There is also a 3D context. The getContext() method returns an object that provides methods and properties for drawing on the canvas. getContext("2d") can be used to draw text, lines, boxes, circles on the canvas.
- Canvas elements can be created using the normal DOM scripting techniques
var node = document.createElement("canvas");- attributes can be added
var att = node.setAttribute("id", "first"); var att2 = node.setAttribute("width","800"); var att3 = node.setAttribute("height","25");- and then the node can be added to the page
document.getElementById("chart").appendChild(node);- to give <canvas id="first" width="800" height="25"></canvas> i.e. to set up an area 800 by 25 pixels on the page which can be used to draw graphics using scripting techniques.
- In order to draw a rectangle more code is needed
var drawingSpace=document.getElementById("first"); var bar=drawingSpace.getContext("2d"); bar.fillStyle = "#ADD9EC"; bar.rect(1,1,50,20); bar.fill(); bar.stroke();- This code identifies the canvas element, specifies the 2D context then sets the style of how the shape will be coloured (solid light blue in this case), draws a rectangle, fills/colours the shape as previously specified and then outlines it.
- The fillStyle property can be a hexadecimal color, a gradient, or a pattern, the default fillStyle is black. The rect(x,y,width,height) method draws a rectangle, on the canvas. The upper-left corner of the canvas has the coordinates (0,0) so our example draws a rectangle with a width 50 pixels and a height of 20 pixel starting from the top left of the canvas. 🔗 https://www.w3schools.com/tags/ref_canvas.asp gives details of the different properties and methods that can be used to draw on a canvas.
- So far the code described will draw a single rectangle on screen, to draw a graph we need to add a data source with the values we want to include in the graph and then go through each data element in turn setting up a canvas, calculating the size of rectangle to be drawn and then drawing the rectangle. The code below show how all of this can be put together.
<!doctype html>
<html>
<head>
<meta charset="utf-8">
<title>Bar Chart</title>
</head>

<body>
<div id="chart">
</div>
<script>
var data = [{"name":"first", "score":50},{"name":"second", "score":73},{"name":"third", "score":26},{"name":"fourth", "score":13},{"name":"fifth", "score":63}];
	var element;
	for (element in data) {

	var names = data[element].name;
	var values = data[element].score;

	var node = document.createElement("canvas");

	var att  = node.setAttribute("id",names);
	var att2 = node.setAttribute("width","800");
	var att3 = node.setAttribute("height","25");

	document.getElementById("chart").appendChild(node);

	var drawingSpace=document.getElementById(names);
        var bar=drawingSpace.getContext("2d");
        var length = values;

		bar.fillStyle = "#ADD9EC";//"blue";
        bar.rect(1,1,length,20);
        bar.fill();
        bar.stroke()

	}
</script>
</body>
</html>