04
-
Adding Client-Side Interactivity
- To build webpages which incorporate client-side interactivity we need to use a number of different technologies : CSS to provide style information, DOM to access elements on the page and javaScript to change elements in reaction to an event.
- Look at 🌐 example 4_1 for a simple example of how to create a basic drop down menu.
- We first create the menu using html. The menu is set up as an unordered list with each top level menu item consisting of a list item containing a hyperlink.
- The sub-menu is created by embedding another unordered list within the <li> tag for the menu item with subsections.
<ul id="mainMenu"> <li><a href="#">menu item 1 </a></li> <li id='openMenu'><a href="#">menu item 2</a> <ul id="subMenu"> <li class="subMenuItem" id="subMenuItem1"><a href="#">sub menu item 1</a></li> <li class="subMenuItem"><a href="#">sub menu item 2</a></li> <li class="subMenuItem"><a href="#">sub menu item 3</a></li> <li class="subMenuItem"><a href="#">sub menu item 4</a></li> </ul> </li> <li><a href="#">menu item 3</a></li> </ul>- Next we set up styles using css. Each hyperlink in the top level menu is styled to display a block with a blue background (#09F) and white writing. Any element with the subMenuItem class attached initially has its visibility set to hidden and so does not appear on the page.
@charset "utf-8"; /* CSS Document */ /*style the main menu*/ #mainMenu { margin:0; padding:0; } #mainMenu li { list-style:none; float:left; width:200px; } #mainMenu li a { display:block; text-decoration:none; background-color:#09F; padding: 0.5em 2em; border-right: 1px solid #fff; color:#fff; } #mainMenu li a:hover { background-color:#0CF; } /*style the sub menu*/ .subMenuItem { visibility:hidden; }- We can then add event handlers to the element with id ‘openMenu’, the element with this id is the list item with the submenu list embedded. The first event handler causes the function openSubMenu to be called when the cursor enters the area occupied by the identified list item on screen. The second causes the function closeSubMenu to be called when the cursor leaves that area.
openMenu.addEventListener('mouseover', openSubMenu); openMenu.addEventListener('mouseout', closeSubMenu); function openSubMenu() { var x = document.getElementsByClassName("subMenuItem"); var i; for (i = 0; i < x.length; i++) { x[i].style.visibility = 'visible'; } }; function closeSubMenu() { var x = document.getElementsByClassName("subMenuItem"); var i; for (i = 0; i < x.length; i++) { x[i].style.visibility = 'hidden'; } };- openSubMenu stores all elements with the class name subMenuItem i.e. all the items on the submenu in an array. It then uses a loop to access each element in this array and set the visibility property to visible i.e. make each element in the submenu show on screen.
- closeSubMenu works in a similar way to set the visible property of each member of the sub menu back to being hidden when the cursor leaves the top level menu item.
- The three pieces of code work together to produce a drop-down menu
- 📷 Menu Item Example 1
- 📷 Menu Item Example 2
x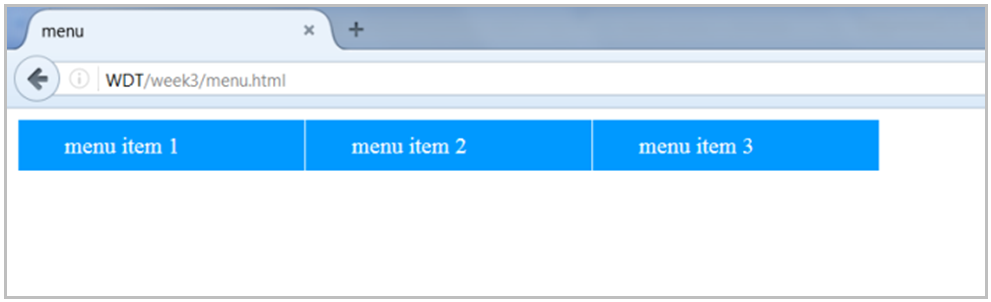 x
x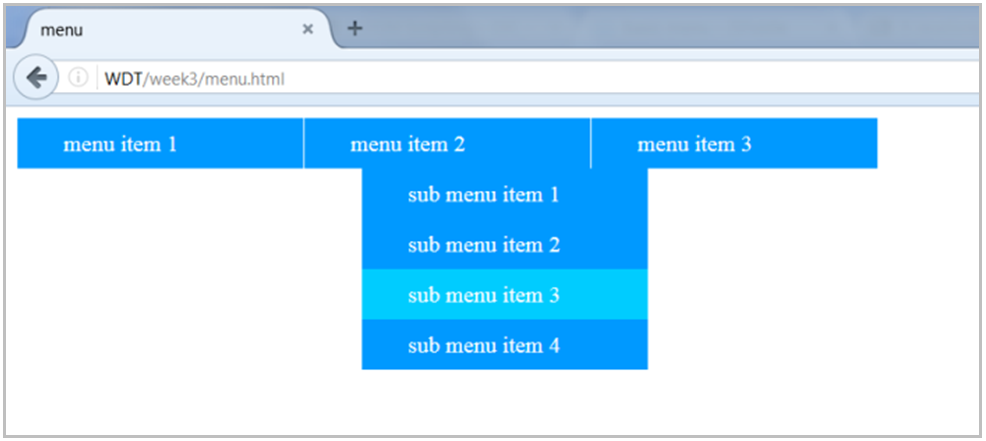
- This idea of the three different types of code working together is typical of the way that client-side interactivity is added to websites.
-
JavaScript Interactivity
- Client side interactivity can be used in many ways to enhance the user experience: drop-down menu, accordion menus, image galleries, slide shows, drag & drop interactions, animated graphs and charts …
- In the following sections we will look at how some of these effects can be created using simple DOM scripting techniques and then in later weeks we will compare this to using code libraries to create similar effects.
- Interactivity is usually produced by reacting to user generated events. JavaScript uses events to detect when a certain action has been performed by the user, e.g. hovering over an element, clicking a link, scrolling the page, resizing the window, dragging an object or any other activity. JavaScript code can be written which will be executed when specific events occur. This code will carry out actions such as animating an element, making an Ajax call, or preventing the browser’s default action. The modern way to connect the event and the code to handle an event is to register an event listener function which is triggered when a particular event occurs. The listener will contain information on the actions to take in response to the event. Most browsers pass a single object to the function which contains information about the event, i.e. what keys were pressed, the position of the cursor, etc. to the listener.
- When you register an event listener, the handler function executes within the context of the element object the event fired on. In JavaScript, we can use the this keyword as a shortcut to refer to this element object; that is, to refer to the subject of the executing code. this is usually the element which fired the event so when this is used inside a function it contains the value of the object that invoked the function. The this keyword is very commonly used when creating interactivity.
-
Accordion
- A common way of presenting large volume of information on a single web page is to use an accordion. Accordions allow sections of content to be shown or hidden by clicking on a section heading . Collapsing sections of content and revealing them only when requested by the user is a useful technique to organise content and avoid overwhelming users.
- The logic behind the code for an accordion is very similar to that used by the drop-down menu in example 4_1.
- Basically a page is set up with a number of sections. Each section has a heading and a content area. Initially all of the content areas are styled so that they do not display. When the heading for a section is clicked the section will be displayed, when the heading is clicked on again the section will disappear. There are many variations on this theme, some use transitions to make the sections appear to slide up and down others allow users to click on a +/- icon rather than the section title and there are many other variations. However the interaction always depends on the html code having the correct structure with the appropriate classes attached, styles being set up to hide the appropriate sections and JavaScript being used to set up access elements and change them in response to a user generated event.
- example4_2.html has an example of this. 🌐 Download this file and look at the code.
- The first step is to set up the html
<div class="accordionSection">Section 1</div>
<div class="content">
  <p>Content for first section</p>
</div>

<div class="accordionSection">Section 2</div>
<div class="content">
  <p>Content for second section</p>
</div>

<div class="accordionSection">Section 3</div>
<div class="content">
  <p>Content for third section</p>
</div>
- The important point here is for each section to have a heading and a content area with the correct classes applied. The correct operation of the interactivity depends upon the html being structured in a specific way and on each element having the correct classes attached.
- Next we need to create the styles which hide the content areas by default
body { font-family:Verdana, Geneva, sans-serif; font-size: 0.8em; } .accordionSection { background-color: #0066a6; color: #cccccc; cursor: pointer; padding: 2%; width: 60%; font-size: 1em; } .accordionSection.active, .accordionSection:hover { background-color: #006ba6; color:ffffff; } .content { display: none; padding: 2%; width: 60%; border:#006ba6 thin solid; } -
- We can then turn our attention to the JavaScript
- The first thing that the JavaScript needs to do is to identify all of the section heading elements
var secn = document.getElementsByClassName("accordionSection");- The statement above does this and stores the results in an array called secn.
- Next, we need to register event listeners for all of these elements
for (var i = 0; i < secn.length; i++) { secn[i].addEventListener("click", handleAccordion); }- This is done using a for loop. The code iterates through all the section heading elements and calls the addEventListener() method on each element. It passes click as the event and the handleAccordion() function as the handler in each case.
- The actual interactivity is handled in the handleAccordion function.
function handleAccordion(){ this.classList.toggle("active"); var content = this.nextElementSibling; if (content.style.display === "block") { content.style.display = "none"; } else { content.style.display = "block"; } }- The code makes use of the this keyword to identify the current object.
- >On the first line the function uses this in conjunction with the classList property. The classList property returns the class name(s) of an element and some other information in the form of a DOMTokenList object . In this case it returns the classname accordionSection and active , a class which is added by the browser to an element which is currently selected.
- toggle() is used to add or remove a class depending on whether it’s already in the list. Since the current item is active the toggle statement removes the active class from the element.
- The next line uses this and the nextElementSibling property to access the element after the currently selected element on the page and store this value in a variable called block. As long as the html has been set up correctly the value stored will be one of the content elements.
- The subsequent lines set style properties for this element. If the content area is currently displayed on screen the display property is changed to that the section is no longer displayed. If, on the other hand, the content is not currently displayed changing the display property to block will cause the section to be displayed on screen.
- Note: remember that difference between display:none; and visibility:hidden;
- Hiding an element can be done by setting the display property to none. The element will be hidden, and the page will be displayed as if the element is not there. Elements can also be hidden by using the visibility property. If visibility:hidden; is used the element will not be shown on screen but the element will still take up the same space as before. The element will not show, but there will be space left for it on the page. Accordions usually make use of display: block ; this has the effect of causing items which come after it move up and down on the page. Drop down menus often use visibility and allow space in the page design for the menu items to appear and disappear without affecting the display of other parts of the page.
-
Drag-And-Drop
- Drag-and-drop is another commonly used type of interaction which allows website users to trigger an event by dragging an element from one part of the screen to another. There are many applicable scenarios: categorizing and organizing content (e.g. Pinterest boards), dragging items from a catalogue into a shopping cart…
- The basic idea in each case is to allow a user to select an item and then move it to a designated area of the screen. If the item is dropped on the designated area it will trigger an action.
- Html 5 has built in functionality to facilitate drag and drop interactivity. Any element can be made to be draggable.
- To make an element draggable you simply set the draggable attribute to true e.g. <div id="box1" draggable="true" ></div> .
- To set up a drop (or target) area you use the data‐drop‐target attribute. When this is set to true it identifies an element as an area onto which elements can be dropped.
- The code in example 4_3 demonstrates a basic drag and drop interaction. 🌐 example4_3.html.
- It consists of two drop targets which are coloured grey to distinguish them from other areas of the page. They are styled in the CSS by utilising the data‐drop‐target attribute :
[data-drop-target] { height: 400px; width: 200px; margin: 2px; background-color: #dedede; float: left; }- The first drop target area contains two draggable elements box1 and box2. Both use the box CSS class to set their height and width, but box1 uses the pink CSS class, while box2 uses the blue class to set their colour. These elements also each have an id attribute to distinguish them from each other when we refer to them in the javascript code.
.box { width: 200px; height: 200px; } .pink { background-color: #FFCCFF; } .blue { background-color: #CCFFFF; }- We can use JavaScript to access the built in Html5 drag and drop properties and retrieve two groups of elements—those that are draggable
var draggable = document.querySelectorAll("[draggable]");- and those that are drop targets
var targets = document.querySelectorAll("[data-drop-target]"); -
- Next, we need to register event listeners for all the draggable elements:
for (var i = 0; i < draggable.length; i++) { draggable[i].addEventListener("dragstart", handleDragStart); }- This is done using a for loop. The code iterates through all the draggable elements and calls the addEventListener() method on each draggable object. It passes dragstart as the event and the handleDragStart() function object as the handler in each case.
- A similar process is used to attach event listeners to the target (or drop) elements:
for (i = 0; i < targets.length; i++) { targets[i].addEventListener("dragover", handleOverDrop); targets[i].addEventListener("drop", handleOverDrop); }- This time a for loop is used to loop through each of the drop target areas and register event handlers for the dragover and drop events. The handleOverDrop() function contains code to handle both the the dragover and the drop events,
- The handleDragStart() function contains a single line of code:
function handleDragStart(e) { e.dataTransfer.setData("text", this.id); }- The dataTransfer.setData() method sets the data type and the value of the dragged data. Its purpose is to store the id of the draggable element.
- Notice the use of this in this.id. As discussed above, when you register an event listener, the handler function executes within the context of the element object the event was fired on. In this case, the dragstart event will be fired when one of the draggable elements is moved; so this will refer to the element which has moved which will be either box1 or box2.
- The next function is the handleDrop function which contains the main functionality. It carries out a number of tasks :
- Firstly it calls preventDefault() . This prevents the browser performing its default handling of the data. By default, data/elements cannot be dropped in other elements. So to allow a drop, it is necessary to prevent the default handling of the element.
e.preventDefault();
- If the event is not a drop event the function can then simply exit.
if (e.type != "drop") { return; }- If, on the other hand, the code is dealing with a drop event it gets information about the dragged data using the dataTransfer.getData() method. This method will return any data that was set to the same type in the setData() method. In this case this was the name of the item which was being dragged.
var draggedId = e.dataTransfer.getData("text");- It then retrieves the draggable element’s object with document.getElementById() and stores it in the draggedEl variable.
var draggedEl = document.getElementById(draggedId);
- There are two places that an element can be dropped. Either it can be dropped on the target it’s currently in, or it can be dropped on the other target. If dropped in its current location, it is not necessary to write any code and you can leave the function.
if (draggedEl.parentNode == this) { return; }- Otherwise, the dragged element node needs to be moved from its old parent/drop target to its new parent/drop target: this is done with the following two lines of code
draggedEl.parentNode.removeChild(draggedEl);

this.appendChild(draggedEl);
- Run example4_3.html in a browser and look at how the code works. Try adding a test box to show which drop area box 1 and box2 are currently located in.
-
Creating an Image Gallery
- Slideshow, carousel and image galleries are all very popular forms of interaction in modern websites and there are many libraries and plugin which have been written to provide attractive interfaces. There are seemingly endless variations on how images can be displayed and there are some very sophisticated designs available to use. However even if you anticipate using plug-in to implement galleries, lightboxes etc it is useful to understand the basic principles behind how they work. This will make it much easier to understand how to integrate library widgets and plug-in into you own designs and to customize them (always assuming that licensing arrangements allow this)
- The basic principle behind most image galleries and lightboxes is that the user clicks on a small “thumbnail” version of an image and a larger version of the image is then displayed on screen. Galleries may use a designated area of the screen to display the larger image while lightboxes tend to dim the main content of the page and display the image over the top of it but a larger image is displayed when the user clicks on a thumbnail. There may be a close button supplied or users may click on the larger image to close it, arrow to navigate through the images may be supplied, captions can be added … The next few example start with a very basic version of a lightbox and then add features to illustrate how DOM scripting techniques can be used to create interactivity events.
Basic Lightbox
- Note: the full code listing for this example is available for download as 🌐 example4_4a.html
- This starts by setting up the html for some small thumbnail images of some food items. The image files are all named with the food type and underscore and the word thumb( to show that they are the small thumbnail images) There are a set of corresponding larger images. So we have a food folder containing the files coffee_thumb.jpg and coffee_large.jpg,cake_thumb.jpg and cake_large.jpg and so on.
<a href="#" class="open"><img src="food/beans_thumb.jpg" width="40" height="40" /></a>
<a href="#" class="open"><img src="food/cake_thumb.jpg" width="40" height="40" /></a>
<a href="#" class="open"><img src="food/coffee_thumb.jpg" width="40" height="40" /></a>
<a href="#" class="open"><img src="food/pizza_thumb.jpg" width="40" height="40" /></a>
- There is also code for the lightbox area which will be used to display the large image
<div id="lightbox" >
  <div id="overlay"> </div>
  <img id="largeImg" src="" alt="" />
</div>
- The lightbox initially contains the background overlay and an image element. However the image element does not have a source file specified and so would not display an image.
- CSS rules are used to hide the lightbox when the page loads.
#lightbox { display: none; position: fixed; top: 0px; left: 0px; margin: 0 auto; width: 100%; height: 100%; }- This particular lightbox will take up the entire screen. It has a slightly transparent black background which will obscure the page content and will display the large image against this backdrop.
#overlay { background-color: black; opacity: 0.6; width: 100%; height: 100%; }- The intention is that the lightbox will remain hidden until a user clicks on one of the thumbnail images. So we need to set up event listeners for each thumbnail
var gallery = document.getElementsByClassName("open"); for (var i = 0; i < gallery.length; i++) { gallery[i].addEventListener("click", displayGallery); }- and then write code to handle the event of a user clicking on a thumbnail
function displayGallery(){ var thumbnail = String(this.firstChild.src); var image = thumbnail.replace("thumb", "large"); document.getElementById('largeImg').src = image; document.getElementById('lightbox').style.display='block'; } -
- The code used to display the image depends upon the image files being correctly named. This is a very common occurrence in all types of image galleries, slide shows etc.
- The first line uses the keyword this to identify the element that has been clicked on. In this case it will be one of the small thumbnail images. It then makes use of the HTML DOM firstChild property to access the img element and the src attribute to find the name of the image. This information is converted to a string of text using the javaScript String() method and stored in a variable called thumbnail.
- The code then makes use of the string manipulation method replace() to change the string to a filename ending in large instead of thumb.
- The replace() method searches a string for a specified value and returns a new string where that value has been replaced by a new one. The method takes two parameters : the value to search for and the value to replace it with string.replace(searchvalue, newvalue). It is a useful method which can be used to search for regular expressions as well as strings.
- Once the new string has been constructed, we use document.getElementById to identify the image area within the lightbox and set is source file to the newly constructed file name. This will be a file with the same name as the thumbnail but with the subscript large instead of thumb (coffee_large.jpg instead of coffee_thumb.jpg) i.e. it will be a larger version of the thumbnail image.
- Once this has been set, the lightbox area is displayed on screen by changing the ‘display’ style property from none to block.
- The look and feel of the lightbox is all styled using CSS as normal.
- To close the lightbox we need to add another event listener and function.
document.getElementById('largeImg').addEventListener('click', function(){ document.getElementById('lightbox').style.display='none'; });- In this example we use an anonymous function to handle the closure of the lightbox. An anonymous function allows a developer to create a function that has no name. Anonymous functions are declared using the function operator instead of the function declaration. You can use the function operator to create a new function wherever it’s valid to put an expression. For example you could declare a new function as a parameter to a function call or to assign a property of another object. They can be used to store a bit of functionality in a variable and pass that piece of functionality around. Anonymous functions are commonly used in JavaScript, most notably for callbacks which are regularly used by javaScript frameworks so u=you will see them a lot when we start working with frameworks.
- In this case the function causes the lightbox to disappear when the large image is clicked.
Lightbox with Captions
- The previous example provided the basic functionality of clicking on an image , seeing a larger version on a semi-transparent black background and being able to close the image/lightbox by clicking on the image.
- However many galleries also provide captions for the images. Adding these features provides a further example of how javaScript string manipulation methods can be used.
- As far as the html is concerned , it is simply a case of adding a placeholder for the text <span id="caption"> Image caption.</span> within the lightbox area
<div id="lightbox" >
  <div id="overlay"> </div>
  <img id="largeImg" src="" alt="" />
  <span id="caption"> Image caption.</span>
  <span id="close">×</span>
</div>
- This can then be styled using CSS
#caption { position:fixed; top:5%; left:10%; color:#FFF; }- Captions could be added manually but often they are generated from information within the data being considered. In this case the name of the file is used to give a one word description of the image.
- To create the caption we need to look at the file name and extract the relevant word from the pathname.
- The following code is already included in the displayGallery function
var thumbnail = String(this.firstChild.src); var image = thumbnail.replace("thumb", "large"); document.getElementById('largeImg').src = image;- So the variable ‘image’ stores the full filename, including the pathname,pathname of the main image file being displayed in the lightbox. We can make further use of JavaScript’s string handling utilities to extract the descriptive part of that file name and display this as a caption for each image. Again this code depends on files being appropriately named. The convention the code is expecting is that thumbnail images will be called ……_thumb.jpg and the larger images ……._large.jpg
- We can use the split() method to take the full current filename(including the path name) and ,using / as the delimiter, split it into an array of words (e.g. ["WDT", "week4","food","cake_large.jpg"]). The last word will be the file name which consists of a descriptive word, an underscore, a number and the file extension.
- Then we can use the split method again but using an underscore as the delimiter to generate an array with the different parts of the filename (e.g. ["cake", "large.jpg"] ), finally we can identify the descriptive word, store it in the variable ‘title’ and make use of theHTML DOM innerHTML Property to set the content of the caption element to that value
var imagePath = image.split("/"); var name = imagePath[imagePath.length -1].split("_"); var title = name[name.length -2]; document.getElementById('caption').innerHTML = title;- The full code can be found in 🌐 example4_4b.html
- A similar technique can be used to add alt tags to the image currently being displayed in the lightbox.
-
Lightbox with Back and Forward Arrows (Slide Show Functionality)
- The next refinement to our basic lightbox is to add some navigation controls. A close button will give users an additional way to exit the lightbox. Users are used to seeing a cross in the top corner of a window and failing to provide this may leave them feeling anxious and so decrease the usability of your site. Back and forward arrows allow users to move through the gallery as if it were a slide show.
- Providing a close button requires very little additional code. We can simply add a cross to the html lightbox
<div id="lightbox" >
  <div id="overlay"> </div>
  <img id="largeImg" src="" alt="" />
  <span id="caption"> Image caption.</span>
  <span id="close">×</span>
</div>
- style it
#close { color: white; position: absolute; top: 10px; right: 25px; font-size: 35px; font-weight: bold; } #close:hover, #close.focus { cursor:pointer; }- (Note the use of cursor:pointer to change the cursor when a user moves over the cross. This type of feedback to users greatly increases the usability and therefore the quality of interactive website)
- and add an event handler which uses the same code as that used to close the window by clicking on the large image.
document.getElementById('largeImg').addEventListener('click', closeGallery); document.getElementById('close').addEventListener('click', closeGallery); function closeGallery(){ document.getElementById('lightbox').style.display='none'; }- Adding the functionality for the back and forward buttons starts in the same way but the logic for the javascript takes a little more effort.
- First add the arrows to the html lightbox
<div id="lightbox" >
  <div id="overlay"> </div>
  <img id="largeImg" src="" alt="" />
  <span id="caption"> Image caption.</span>
  <span id="close">×</span>
  <a id="prev">❮</a>
  <a id="next">❯</a>
</div>
- style them
#prev, #next { cursor: pointer; position: absolute; top: 50%; width: auto; padding: 16px; margin-top: -50px; color: white; font-weight: bold; font-size: 18px; border-radius: 0 3px 3px 0; user-select: none; } /* Position the "next button" to the right */ #next { right: 0; border-radius: 3px 0 0 3px; } -
- Note the use of the user-select property. This specifies whether the text of an element can be selected if a user double-clicks on it. The user-select property is used to prevent a user being able to select the text-based arrow keys.
- And add event handlers
document.getElementById('next').addEventListener('click', moveSlideForward); document.getElementById('prev').addEventListener('click', moveSlideBack);- The code for the forward arrow key requires a bit more analysis.
- It starts by identifying the image currently being displayed in the lightbox and then finds the name of the corresponding thumbnail.
var currentImg = document.getElementById('largeImg').src; var thumbnail = currentImg.replace("large", "thumb");- It then compares this to a list of all the thumbnails displayed on the page. Once this position of the current thumbnail has been identified , if it is not the last item in the list the code replaces the currently displayed large image with the image corresponding to that of the next thumbnail in the list.
for (var i = 0; i < gallery.length; i++) { if (thumbnail==gallery[i].firstChild.src){ if ( i+1 < gallery.length){ newThumb=gallery[i+1].firstChild.src; var image = newThumb.replace("thumb", "large"); } } document.getElementById('largeImg').src = image;- Note the use of the DOM traversal method firstChild to access the img elements in the gallery.
- If the current thumbnail is the last one in the list the code replaces the current large image with the image corresponding to the first thumbnail in the gallery.
if (thumbnail==gallery[i].firstChild.src){ if ( i+1 < gallery.length){ newThumb=gallery[i+1].firstChild.src; var image = newThumb.replace("thumb", "large"); } else { newThumb=gallery[0].firstChild.src; image = newThumb.replace("thumb", "large"); }- Once the new image is displayed, the caption can be updated.
var imagePath = image.split("/"); var name = imagePath[imagePath.length -1].split("_"); var title = name[name.length -2]; document.getElementById('caption').innerHTML = title- Putting all of the above code together
function moveSlideForward() { var currentImg = document.getElementById('largeImg').src; var thumbnail = currentImg.replace("large", "thumb"); for (var i = 0; i < gallery.length; i++) { if (thumbnail==gallery[i].firstChild.src){ if ( i+1 < gallery.length){ newThumb=gallery[i+1].firstChild.src; var image = newThumb.replace("thumb", "large"); } else { newThumb=gallery[0].firstChild.src; image = newThumb.replace("thumb", "large"); } } } document.getElementById('largeImg').src = image; var imagePath = image.split("/"); var name = imagePath[imagePath.length -1].split("_"); var title = name[name.length -2]; document.getElementById('caption').innerHTML = title; }- The code for the back button is very similar but this time it replaces the currently displayed large image with the image corresponding to that of the previous thumbnail in the list
function moveSlideBack() { var currentImg = document.getElementById('largeImg').src; var thumbnail = currentImg.replace("large", "thumb"); console.log(gallery.length); for (var i = 0; i < gallery.length; i++) { if (thumbnail==gallery[i].firstChild.src){ if ( i >0){ newThumb=gallery[i-1].firstChild.src; var image = newThumb.replace("thumb", "large"); } else { newThumb=gallery[gallery.length-1].firstChild.src; image = newThumb.replace("thumb", "large"); } } } document.getElementById('largeImg').src = image; var imagePath = image.split("/"); var name = imagePath[imagePath.length -1].split("_"); var title = name[name.length -2]; document.getElementById('caption').innerHTML = title; }- The code for the full lightbox can be found in 🌐 example4_4c.html.
- It should be noted that this is just one of many ways that a gallery with lightbox and slideshow features can be implemented. There are many others but this weeks presentation should serve to illustrate how interactivity can be implemented using straightforward JavaScript programming techniques.