05
-
Using Code Libraries
- Drawing graphs and charts is a common task and serves to illustrate the convenience of using pre-written code libraries. In week 3 we used DOM scripting techniques along with the HTML5 canvas tag to draw graphs onto a page. The process required a number of steps ,each bar required code to
- set up a canvas tag
- create canvas elements using DOM scripting techniques including adding attributes to the elements
- add the node to the page
- drawing anything on the canvas requires several more lines of code to set the colour, specify coordinates etc.
- A bar chart required all of these steps to be performed for each bar. Adding text to the graph then needs a significant amount of code
for (element in data.summary) { var names = data.summary[element].name; var node = document.createElement("tr"); var subnode1 = document.createElement("td"); var textnode1 = document.createTextNode(names); subnode1.appendChild(textnode1); node.appendChild(subnode1); document.getElementById("chart").appendChild(node); }- The full code for the basic bar chart can be found in the materials for week 3.
If you want to use data from external sources more code will be required to link to the external source ( database, json file, xml etc), select the data, format it in correct way and then draw the table.- Using a code library can dramatically cut the amount of code that you need to write.
Libraries such as jQuery have many core methods that can be used and also have many plugin. jQuery, like any other JavaScript library, is simply a collection of JavaScript code that provides simple solutions to many of the mundane, day-to-day tasks interface designer want to carry out. It is a collection of prewritten JavaScript objects that can be added to a web page. These make it easy to complete common tasks.
A plugin is a method that can be used to extend the core jQuery.- The idea of a plugin is to do something with a collection of elements. Each method that comes with the jQuery core.fadeOut() or .addClass() performs an action but plugin are useful for more extensive and specialised tasks. There are a range of jQuery plugin for most common interface layout tasks : bar charts , line graphs, image galleries, lightboxes, slides shows etc.
- You can write your own plugins and use them privately in your code or you can make use of plugin other people have written and published.
- Plugin can be used to develop interfaces quickly but can be quite limited in how much they can be customised.
-
Using plugin
- An example of a bar chart which has been developed using a plugin is available in the try it yourself : barchart using plugin example later on the page.
- The example sets up a div tag called dataChart with a height of 250px and width of 350px. It then has a script tag to include the code require to set up the chart. The amount of html included on the page is minimal.
- Inside the script element the code calls a number of jQuery methods. The jQuery library is simply a collection of JavaScript code in an external file. So in order to access jQuery methods it is necessary to include the JavaScript files with the library source code in the page. This is usually done in the head section of a file by including links to the core jQuery library (unfortunately this does not show up in the main sections of jsfiddle examples – but you can check the left hand section of a fiddle to see which files have been included)
<script src="https://ajax.googleapis.com/ajax/libs/jquery/1.10.2/jquery.min.js"></script>
- It also has links to the code required for the specific bar chart plugin being used
<script src="//cdnjs.cloudflare.com/ajax/libs/raphael/2.1.0/raphael-min.js"></script>
<script src="//cdnjs.cloudflare.com/ajax/libs/morris.js/0.5.1/morris.min.js"></script>
- and to the stylesheet used by the plugin
<link rel="stylesheet" href="//cdnjs.cloudflare.com/ajax/libs/morris.js/0.5.1/morris.css">
- Once the appropriate files have been included it is possible to can access some of jQuery’s functionality to create the chart.
To do this we include a <script> tag and start to write code using jQuery and javaScript. (see the js section of the fiddle)
The first jQuery statement used is the ready statement. This checks that the document has loaded and is ready to be manipulated before attempting to run any code. Generally when working with jQuery most code will be added within a function of this type.$(document).ready(function(){ // Your code here });- In this instance the code inside the ready event is going to access the plugin code to set up the bar chart. The plugin being used is called Morris and can be used to produce different type of chart - new Morris.Bar sets up a Morris bar chart. The plugin code then identifies the element on the page that will be used to display the chart (in this case the div element with id dataChart). It then gets the data to be displayed. The data used is in the same (json) format as was used in the earlier pure JavaScript example (Note: we will look at json in more detail in later weeks).
- The other fields specify how the data is to be used to create the graph: the data for each of the x and y axes, the labels for the y axis and that the elements on the x-axis should be treated as an equally-spaced series. Any plugin will have options of this type which can be configured for a given situation and successful use depends on reading the documentation that is supplied. The documentation for the Morris bar chart can be found at 🔗 https://morrisjs.github.io/morris.js/bars.html
new Morris.Bar({ element: 'dataChart', data: [{ "name": "first", "hits": 5 }, { "name": "second", "hits": 7 }, { "name": "third", "hits": 2 }, { "name": "fourth", "hits": 13 }, { "name": "fifth", "hits": 3 }], xkey: 'name', ykeys: ['hits'], labels: ['hits'], parseTime: false });- Using the plugin results in a bar chart which look like 📷 this.
x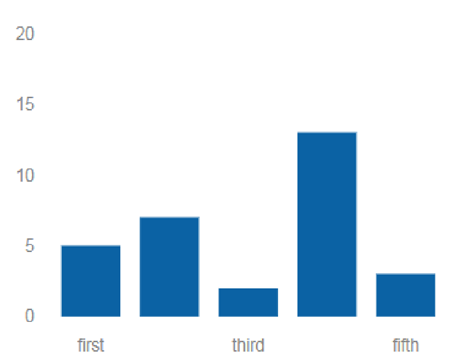
-
Common code libraries
- Some javaScript libraries that are currently in use include
- jQuery - 🔗 http://jquery.com/
- DHTMLX - 🔗 http://dhtmlx.com/
- Dojo - 🔗 http://dojotoolkit.org/
- Echo3 - 🔗 http://echo.nextapp.com/site/echo3
- Ext JS - 🔗 http://www.sencha.com/products/js/
- Google Web Toolkit - 🔗 http://code.google.com/webtoolkit/
- Midori - 🔗 http://www.midorijs.com/
- MooTools - 🔗 http://mootools.net/
- Prototype - 🔗 http://prototypejs.org/
- Spry - 🔗 http://labs.adobe.com/technologies/spry/home.html
- YUI - 🔗 http://developer.yahoo.com/yui/
- ZK - 🔗 http://www.zkoss.org/
- Source : 🔗 http://en.wikipedia.org/wiki/Comparison_of_JavaScript_frameworks
- The choice of library will depend on the specifics of a given project as different libraries have different strengths
- jQuery
- light weight
- wide range of plugin available for specific needs
- easy to learn
- uses familiar CSS syntax
- dojo good for
- charts
- graphs
- animation
- jQuery is currently one of the most popular JavaScript libraries. It is particularly good for the following tasks
- HTML/DOM manipulation
- CSS manipulation
- HTML event methods
- Effects and animations
- AJAX
- Code libraries like jQuery are structured to be very fast and enable only necessary code to be included in order to keep file sizes down. iI is necessary to write some code to utilise libraries fully but reasonably good documentation is available. JQuery is particularly good in this respect although the quality of documentation for plugin varies. There are many tutorials available online but the quality of these can vary.
- Successful use of code libraries depend upon
- all necessary js files being included
- all necessary style sheets being linked
- html elements being correctly named
- correct scripting being written to link elements together
- The libraries and accompanying stylesheets can either be downloaded or stored locally or you can link to a copy of the code on a CDN or content distribution network. If you use a CDN another website hosts the jQuery file and sends it out to anyone who requests it. There are some benefits to this approach: it can save your own web server some time (in the order of milliseconds) since the CDN –e.g. Google, Microsoft, or jQuery handle the distribution of the file to your site’s visitors. Using CDNs also have the benefit of servers located around the world which can speed up delivery of the pages. Additional advantages optimized caching settings and the chance that the user has already cached the file from the CDN on their computer and so will not need to download it again – which can cause the site to run faster.
However there are potentially some security concerns as you are allowing the CDN additional information into your site's traffic profile. This may, in some circumstances, mean that you would choose to host the library files locally. There are also situations when developing a site which will be used on an intranet or from behind a firewall where it is necessary to work with local versions of the libraries.- To use a CDN include a link to the URL of the appropriate code library in a script tag before adding any JQuery commands to your page.
<script src="//ajax.googleapis.com/ajax/libs/jquery/1.11.0/jquery.min.js"> </script >
-
- Once the jQuery file and necessary style sheet are included on a page you can start to write scripts which utilise jQuery’s functionality.
- The next step is to add the document ready function
$(document).ready(function(){ // Your code here });- This is a built-in jQuery function that waits until the HTML for a page loads before it run the scripts within it.
- jQuery offers very powerful techniques for selecting and working with CSS selectors. You can select one or more elements using a the jQuery object.
- The basic syntax is $('selector').action. This selects an HTML element or elements and performs an action on the element(s).
- $ sign to define/access jQuery
- (selector) to "query (or find)" HTML elements
- jQuery action() to be performed on the element(s)
- Some simple examples include
- $(this).hide()
- hides the current element.
- $("p").hide()
- hides all <p> elements.
- $(".test").hide()
- hides all elements with class="test".
- $("#test").hide()
- hides the element with id="test".
- Other simple examples are available from 🔗 https://www.tutorialrepublic.com/jquery-examples.php
- These examples include an illustration of a very useful feature which makes jQuery easy to work with: chaining
Chaining
- Chaining allows a series of operations on an element or selection of elements one after the other. Chaining is built into jQuery. Each function is connected to the next by a period, and operates on the same jQuery element (or collection of elements) as the previous function.
$(".box") .show() .animate({width: "70%"}) .animate({height: "300px"}) .animate({padding: "10px"}) .animate({marginLeft: "150px"}) .animate({opacity: 0.9},function(){alert("here");});- So the code above animates the width of the element with id box, then its height, then the padding,the left margin and finally the opacity of the box;
Chaining jQuery functions lets you carry out a large number of actions concisely. Notice that chaining is not a regular part of JavaScript, so you can’t add non-jQuery functions (either ones you create or built-in JavaScript functions) in the chain, without some specific programming on your part.- A long line of chained jQuery functions can be hard to read, so some programmers break it up over multiple lines. As long as you only add a semicolon on the last line of the chain, the JavaScript interpreter treats the lines as a single statement.
-
jQuery Selections
- Successful use of jQuery depends upon being able to correctly identify the correct elements on the page. For example, there are several div tags with content that has been hidden; jQuery can find them and then make them visible using $('div:hidden').show(); This line of code has no effect on div tags that are currently visible on the page. To use jQuery well you need to be completely clear which elements need to be acted upon and to be able to identify them. This means being very clear about how to select different elements on a page. 🔗 https://www.w3schools.com/jquery/trysel.asp provides a useful interactive example of the syntax which can be used to select different elements
- When you select one or more elements using the jQuery object—for example, $('#navBar a')—you don’t end up with exactly the same list of DOM nodes as you get if you use getElementById() or getElementsByTagName().Instead, you get a special jQuery-only selection of elements. These elements don’t react to traditional DOM methods. However nearly all of the properties and methods of a normal DOM node have jQuery equivalents, so you can do anything the traditional DOM can do—only usually faster and with fewer lines of code.
Callback
- JavaScript statements are executed line by line. However, when effects are being displayed, the next line of code can be run even though the effect is not finished. This can create errors.
- jQuery effects take some time to finish and the next line code may execute while the previous effect is still running. To prevent this from happening jQuery provides a callback function for each effect method.
- A callback function is a function that is executed once an effect is complete. The callback function is passed as an argument to the effect methods, typically as the last argument of the method. It can contain code which should only happen after the effect has been completed
- Functions usually work by taking input in the form of arguments and returning a value using a return statement, callbacks work differently. Rather than waiting for a function to finish by returning a value, callbacks work asynchronously. The browser continues doing other things while waiting for the callback to be called. When the effect finishes it will then call the callback function
- In the following example there is no callback parameter and the alert box will be displayed before the hide effect is completed
$("button").click(function(){ $("p").hide(1000); alert("The paragraph is now hidden"); });- When a callback is added
$("button").click(function(){ $("p").hide("slow", function(){ alert("The paragraph is now hidden"); }); }); -
Automatic Loops
- Another powerful feature of jQuery is that most of its functions automatically loop through each item in a jQuery selection. For example, to make every img on a page fade out, you only need one line of JavaScript code: $('img').fadeOut(); The .fadeOut() function causes an element to disappear slowly, and when attached to a jQuery selection containing multiple elements, the function loops through the selection and fades out each element.
- Normally, when you’re using the DOM and you select a set of page elements, you then need to create a loop to go through each selected node and then do something to that node. For example, if you want to select all the images in a page and then hide them—something you might do if you want to create a JavaScript- driven slideshow—you must first select the images and then create a loop to go through the list of images. Because looping through a collection of elements is so common, jQuery functions have that feature built in. In other words, when you apply a jQuery function to a selection of elements, you don’t need to create a loop yourself, since the function does it automatically. For example, to select all images inside a div tag with an ID of slideshow and then hide those images, you write this in jQuery: $('#slideshow img').hide(); The list of elements created with $('#slideshow img') might include 50 images. The hide() function automatically loops through the list, hiding each image individually.
Anonymous Functions
- In order to work with multiple actions you can group them together into a function. Jquery allows you to work with normal functions. It also allows you to work with anonymous functions. The example below uses an anonymous function. This is simply a function containing the steps that you wish to perform on each selected element. Unlike a conventional function it does not have a name.
$(document).ready(function(){ $("a").click(function(event){ alert("As you can see, the link no longer took you to jquery.com"); event.preventDefault(); }); });- The basic structure of an anonymous function is
function() { //code goes here }- because there’s no name, the function is not called in the same way as an ordinary function. Instead, you use the anonymous function as an argument that you pass to another function. In the example
$("a").click(function(event){
   //code goes here
});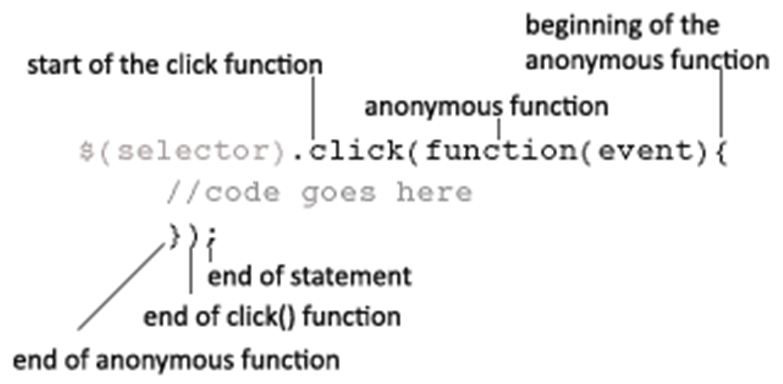
-
Basic jQuery Examples
- Note: the code for the following examples is available on jsFiddle. Please make sure that you go to the these interactive fiddles and spend some time changing elements and working with the code to make sure you fully understand what each individual line of code does.
- Basic iteration : if you have an unordered list on a page
<ul>
  <li>one</li>
  <li>two</li>
  <li>three</li>
</ul>
- you can use the each method along with an anonymous function and the this keyword to select the list items and iterate over them
$( "li" ).each(function( index ) { console.log( index + ": " + $( this ).text() ); });- When using the each() method, you often want to access or set attributes of each element in a series in turn—for example, to change the styling of each element in a list. To access the current element through each loop, you use a special keyword this. The this keyword refers to whatever element is calling the anonymous function at the time. So the first time through the loop in the example , this refers to the first li tag in the unordered list, the second time through the loop, this refers to the second element and so on.
- The following example uses each along with anonymous functions to change the background colour and the text of each element in an unordered list when a button is pressed.
$("button").click(function() { $("li").each(function() { $(this).css( "backgroundColor", "lightblue" ); $(this).text("Now blue"); }); });- The next example give an idea of how jQuery can be used to test selectors and also demonstrates how to exit an each loop using return false
$( "button" ).click(function() {
    $( "li" ).each(function(index) {
    $(this).css( "backgroundColor", "lightblue" );
    if ( $(this).is( "#stop" ) ) {
        $( "p" ).text( "Stopped at li index " + index +" remenber that index starts counting from 0");
        return false;
    }
  });
});