08
-
Displaying Data
- Data can be brought into webpages in many different formats : json, xml and plain text being three common formats. Once loaded the data then needs to be formatted.
- The basic principles of laying data out do not vary: you need to identify the relevant piece of information, decide how you want it displayed and then either add the data to the appropriate on screen element or set up a new element, associate it with the data and then add the element to the screen. CSS can then be used to style the data. This can be done either within the stylesheet or by adding CSS styling when the page is generated using javaScript or jQuery.
- Identifying the element to be displayed can vary from one data type to another.
XML Traversal
- Traversing means "move through"
- used to "find" (or select) HTML or XML elements based on their relationship to other elements.
- start with one selection and move through the document from that point until you reach the elements you desire.
- HTML and XML pages can be represented using a DOM tree
- move up (ancestors), down (descendants) and sideways (siblings) through the tree, starting from the selected (current) element.
- this movement is called traversing the DOM tree.
- jQuery provides a number of methods which facilitate traversing DOM trees
XML DOM tree
- The XML DOM is the standard for accessing, changing, adding or deleting XML elements. All modern browsers support the W3C DOM specification.
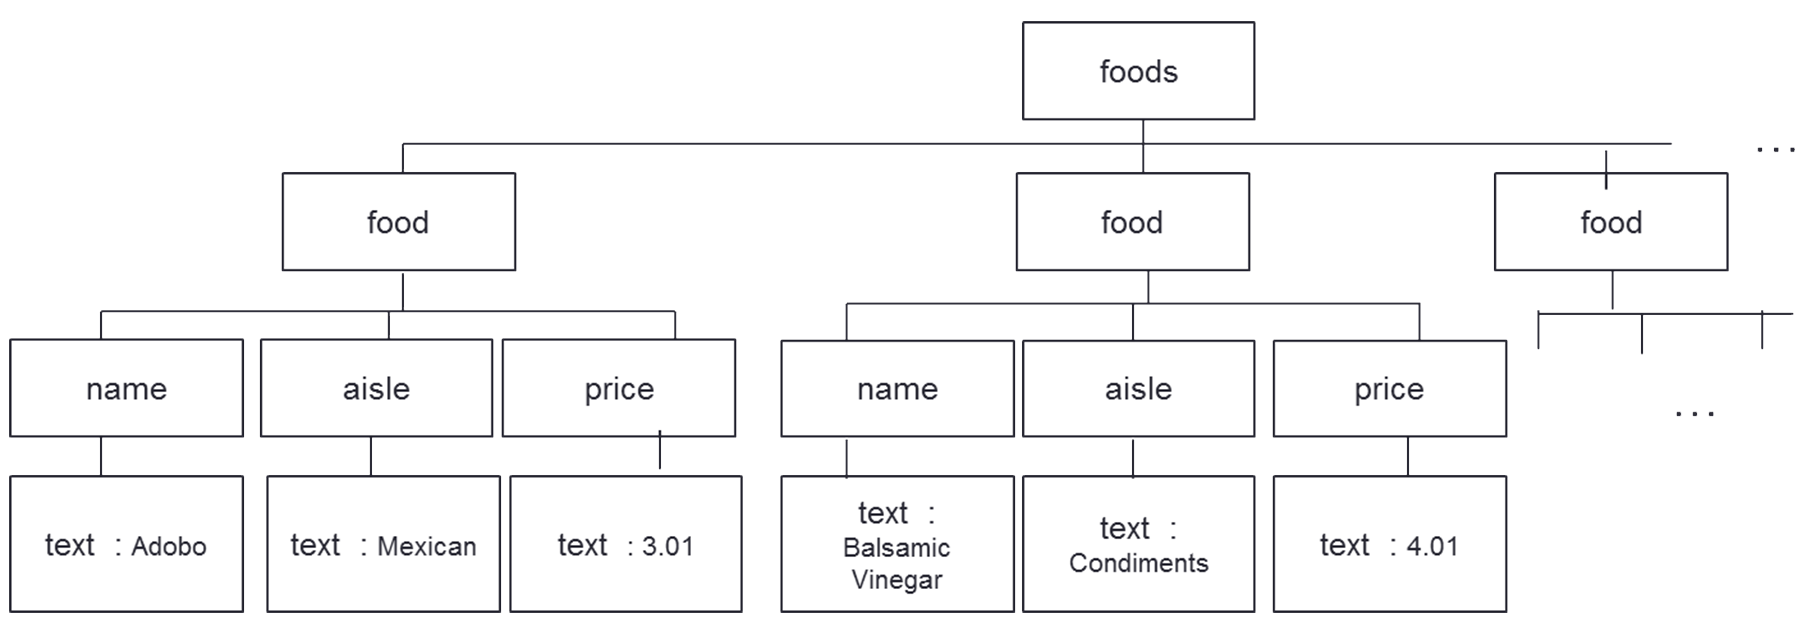
- The <food> elements are the parent of <name> <aisle> <price> elements, and a child of <foods>
- The left <name> child of the left <food> and a descendant of <foods>
- The <name> <aisle> <price> elements are siblings (they share the same parent)
- An ancestor is a parent, grandparent, great-grandparent, and so on.
- A descendant is a child, grandchild, great-grandchild, and so on.
- Siblings share the same parent.
-
Issues with Identifying elements from xml files using basic DOM traversal
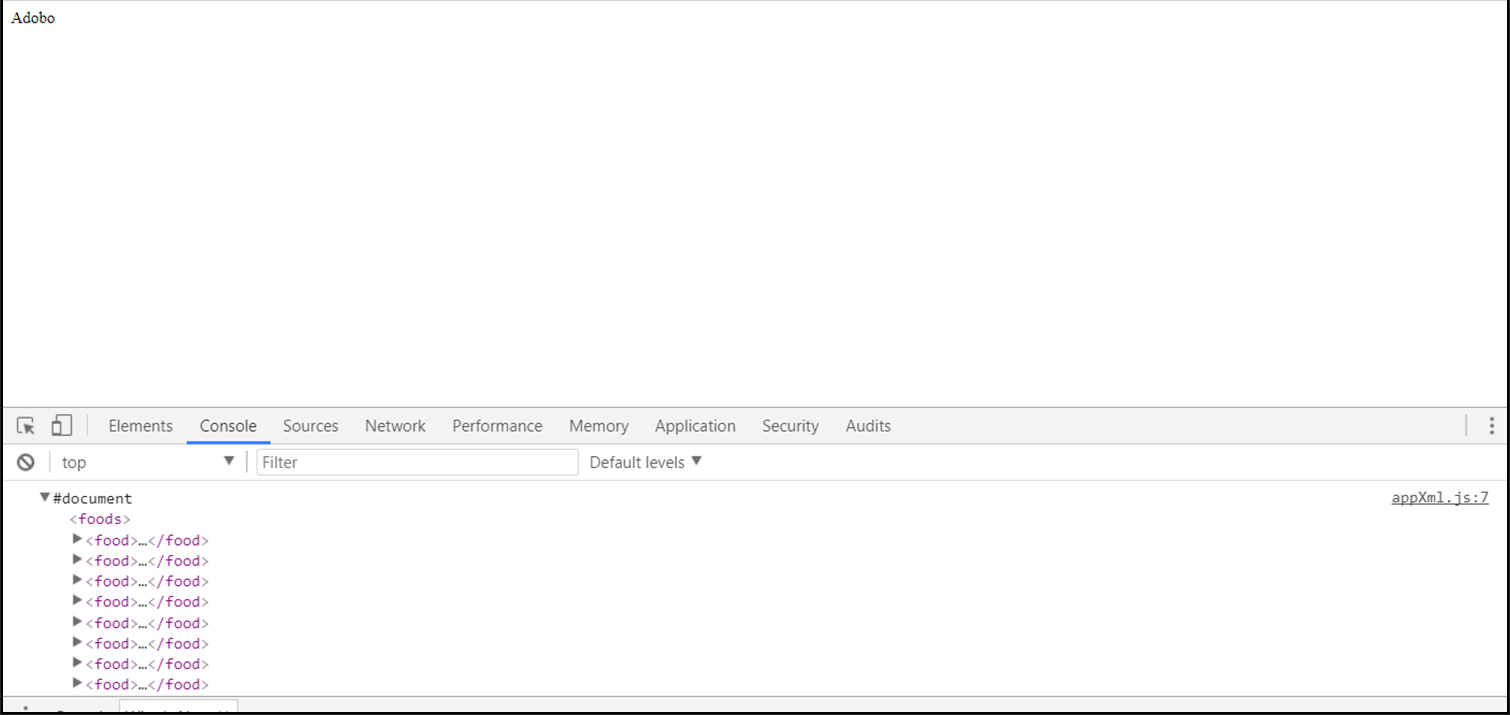
- Although all modern browsers support the W3c specification there are some differences between browsers one area where browsers vary is in how they handle white space and carriage returns. Chrome, Firefox, and some other browsers, will treat empty white-spaces or new lines as text nodes so to get to the first food element “Adobo” you need to move to the firstChild.firstChild.nextSibling.firstChild.nextSibling.firstChild of the root element
- Internet Explorer does not treat white space and returns in the same way.. . this can cause problems when using the properties: firstChild, lastChild, nextSibling, previousSibling. To avoid navigating to empty text nodes (spaces and new-line characters between element nodes) it is often necessary to write custom code to deal with the different browsers. Using firstElementChild (which ignores text and comment nodes) instead of the standard firstChild can help.
- 👁 View AppXml.js
- Click on the image to enlarge.
- Fortunately jQuery provides a number of utilities which can make xml DOM traversal more convenient.
X$(function() { $.ajax({ "url": "foods.xml", "type": "get", "dataType": "xml", "success": function(data) { console.log(data); console.log(data.firstChild.firstChild.nextSibling.firstChild.nextSibling.firstChild); $("body").append(data.firstElementChild.firstElementChild.firstElementChild.firstChild); } }); }); -
jQuery traversal methods
- . children()
- children() method returns all direct children of the selected element. It only traverses a single level down the DOM tree.
- .find()
- this method returns descendant elements of the selected element, all the way down to the last descendant.
- Basic filtering methods allow you to select a specific element based on position in a group of elements
- first()
- last()
- eq() returns the element with a specific index number filter() and not() allow you to select elements that match, or do not match, certain criteria
- each() executes a function for each matched element
- 🔗 https://www.w3schools.com/jquery/jquery_ref_traversing.asp has a full list of methods
- 👁 View foods.xml
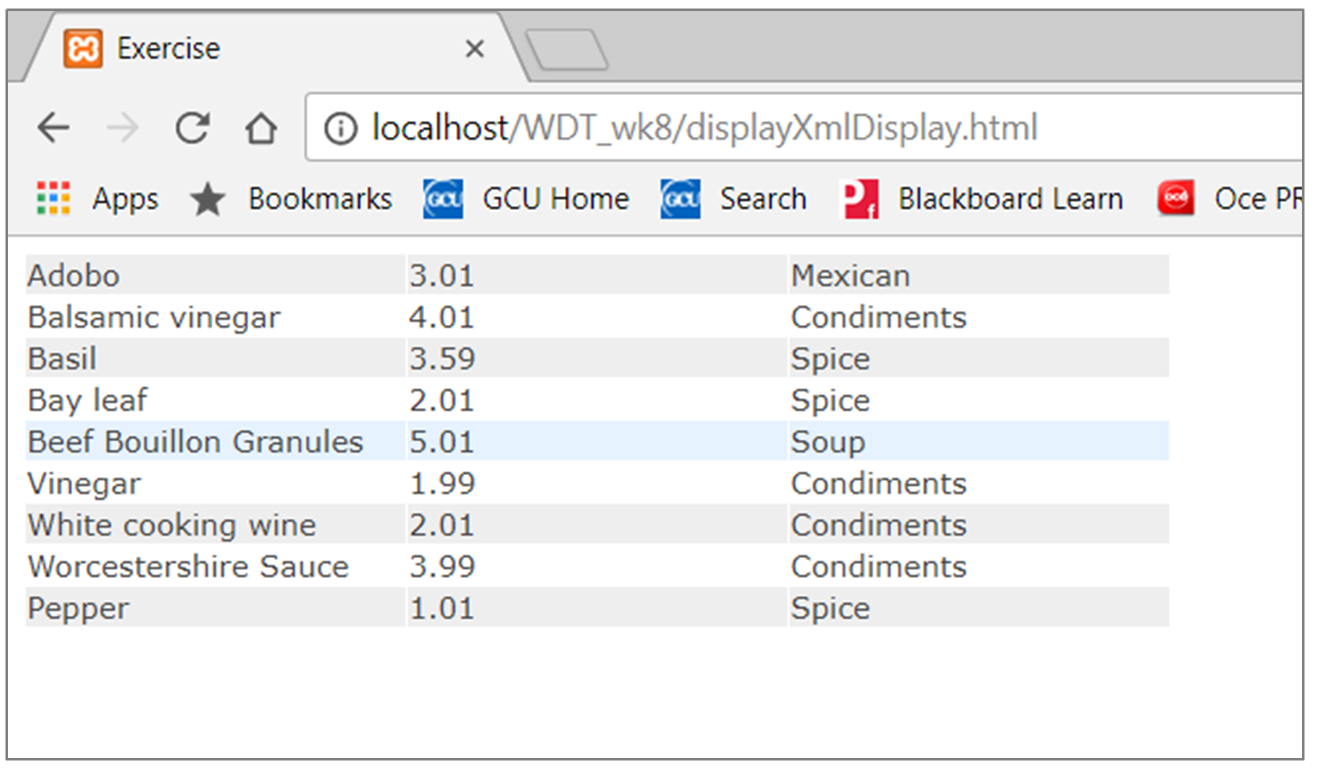
- In the example below .find() and each() are used to select each food element in turn
$(data).find('food').each()- and then
var name =$(this).find("name").text();- is used to access the value of the text in the name element,
var aisle =$(this).find("aisle").text(); // to get the value of the text in the aisle element and var price =$(this).find("price").text(); //to get the value of the text in the price element.- Standard jQuery DOM scripting techniques are then used to format the text - into a table in this case- and to output the text onto the page.
- 👁 View displayXML2.js
X<?xml version="1.0" encoding="utf-8"?> <foods> <food> <name>Adobo</name> <aisle> Mexican</aisle> <price>3.01</price> </food> <food> <name>Balsamic vinegar</name> <aisle> Condiments</aisle> <price> 4.01</price> </food> <food> <name>Basil</name> <aisle> Spice </aisle> <price>3.59</price> </food> <food> <name>Bay leaf</name> <aisle> Spice</aisle> <price>2.01</price> </food> <food> <name>Beef Bouillon Granules </name> <aisle>Soup</aisle> <price>5.01</price> </food> <food> <name>Vinegar</name> <aisle>Condiments </aisle> <price>1.99</price> </food> <food> <name>White cooking wine</name> <aisle> Condiments</aisle> <price> 2.01</price> </food> <food> <name>Worcestershire Sauce</name> <aisle>Condiments </aisle> <price>3.99</price> </food> <food> <name>Pepper </name> <aisle>Spice</aisle> <price> 1.01</price> </food> </foods>X$(function() { $.ajax({ "url": "foods.xml", "type": "get", "dataType": "xml", "success": function(data) { console.log(data); var table = $("<table />"); $(data).find('food').each(function(){ var row = $("<tr />"); var name =$(this).find("name").text(); var aisle =$(this).find("aisle").text(); var price =$(this).find("price").text(); var cell1 = $("<td />", { text:name }); var cell2 = $("<td />", { text:price }); var cell3 = $("<td />", { text:aisle }); row.append(cell1).append(cell2).append(cell3); table.append(row); }); $("body").append(table); $(table).css({fontFamily:"Verdana"}) $("tr").css({"color": "#454545", "border": "1px solid #cccccc"}); $("tr:even" ).css( "background-color", "#eee" ); $("td").css({ "width": "30%", "padding":"2px"}); $("body").on("click","td", function(){alert(this.innerHTML);}); $("body").on("mouseover","tr", function(){$(this).css( "background-color", "#e6f2ff" );}); $("body").on("mouseout","tr:even", function(){$(this).css( "background-color", "#eee" );}); $("body").on("mouseout","tr:odd", function(){$(this).css( "background-color", "#ffffff" );}); } }); }); -
jQuery traversal methods cont...
- displayXML2.js
$(function() { $.ajax({ "url": "foods.xml", "type": "get", "dataType": "xml", "success": function(data) { console.log(data); var table = $("<table />"); $(data).find('food').each(function(){ var row = $("<tr />"); var name =$(this).find("name").text(); var aisle =$(this).find("aisle").text(); var price =$(this).find("price").text(); var cell1 = $("<td />", { text:name }); var cell2 = $("<td />", { text:price }); var cell3 = $("<td />", { text:aisle }); row.append(cell1).append(cell2).append(cell3); table.append(row); }); $("body").append(table); $(table).css({fontFamily:"Verdana"}) $("tr").css({"color": "#454545", "border": "1px solid #cccccc"}); $("tr:even" ).css( "background-color", "#eee" ); $("td").css({ "width": "30%", "padding":"2px"}); $("body").on("click","td", function(){alert(this.innerHTML);}); $("body").on("mouseover","tr", function(){$(this).css( "background-color", "#e6f2ff" );}); $("body").on("mouseout","tr:even", function(){$(this).css( "background-color", "#eee" );}); $("body").on("mouseout","tr:odd", function(){$(this).css( "background-color", "#ffffff" );}); } }); });- Once the basic table has been constructed we can use jQuery selector to style the elements e.g.
$("tr:even" ).css( "background-color", "#eee" );- We can then use jQuery again to add interactivity
$("body").on("click","td", function(){ alert(this.innerHTML); });- will cause an alert box to pop-up whenever a user clicks on one of the cells in the table. The box will contain the innerHTML i.e. the text content of that cell. The content varies depending on the current element clicked.
- This is achieved by using the .on()method. The method can take a number of parameters.
.on( events [, selector ] [, data ], handler )
- Events in this case is "click”.
- Selector : the selector is a string which is used to filter the descendants of the selected elements that trigger the event. So although the method is attached to the body of the document the element that triggers the event is td (a table cell)
- Data is not specified in this case (but you could choose to pass data to the handler when the event is triggered.)
- Handler : this is the function to execute when the event is triggered. Inside the handler the the this keyword refers to the element which is triggering the event/ calling the function so $(this) refers to the table cell that has been clicked and innerHTML refers to the information within that cell. Alert causes an alert box to be displayed in the page.
$("body").on("mouseover","tr", function(){ $(this).css( "background-color", "#e6f2ff" ); });- Events in this case is "mouseover” so the event is triggered when the cursor rolls over an item
- Selector : the selector is tr (a row in the table) so the event is triggered when the cursor rolls over a row in the table.
- In this case the handler interprets this as the current row in the table and changes the background colour of that row to #e6f2ff a light blue creating a roll-over effect.
$("body").on("mouseout","tr:even", function(){ $(this).css( "background-color", "#eee" ); });- The third example is executed when the mouse leaves an element, in this case an even numbered row in the table, in this case the function sets the background colour of the row that have just been left to light grey.
-
Using ready written widgets to format external data
- Displaying data from external sources is a very common task. Many readymade ‘widgets’ exist to facilitate displaying the data. These can be very useful and can speed up the development process but the can also be quite large files and can difficult to customise. The choice of whether or not to use them will depend on the nature of individual projects, sometimes they can speed up production significantly.
- JQuery has many such widgets. The different widgets vary enormously in terms of ease of use, quality of documentation, functionality provided and so on. Licencing arrangements and cost also vary with some being freely available will others cost a fee to use or distribute. Before using any plug in you should make sure that you are aware of what is allowed under the terms of the licence and also how much the plugin may cost to use.
A simple example using the jqGrid.
- Before attempting to use any plugin you should read the documentation and check the licencing arrangements. The documentation for jqGrid can be found at 🔗 http://www.trirand.com/jqgridwiki/doku.php. You should also look at any demos provided 🔗 http://www.guriddo.net/demo/guriddojs/ and ensure that you know exactly which support files are required. Once you are satisfied that the plugin is appropriate you could then download the files or decide to use hosted versions of the files , if these are available.
- JQGrid can be found at 🔗 http://guriddo.net/ and can be downloaded.
- The level of functionality will vary from widget to widget. Some will simply display preloaded data will others will load data, format it, display the information and allow users to interact with it – adding and deleting the information displayed highlighting area, reordering columns etc. In the case of jqGrid the plugin does all of the work of importing data from an external source so there is no need to have a separate ajax statement to import the data.
- At a basic level all that is required is for the data to be in an appropriate format (be aware that the formatting of external data is one of the most common causes of problems when using widgets) and then to match the column headings you wat to display to column fields in the table and then the column fields to the parts of the external data that you want to display. This will produce a basic table which will display the imported information but will not allow users much interaction.
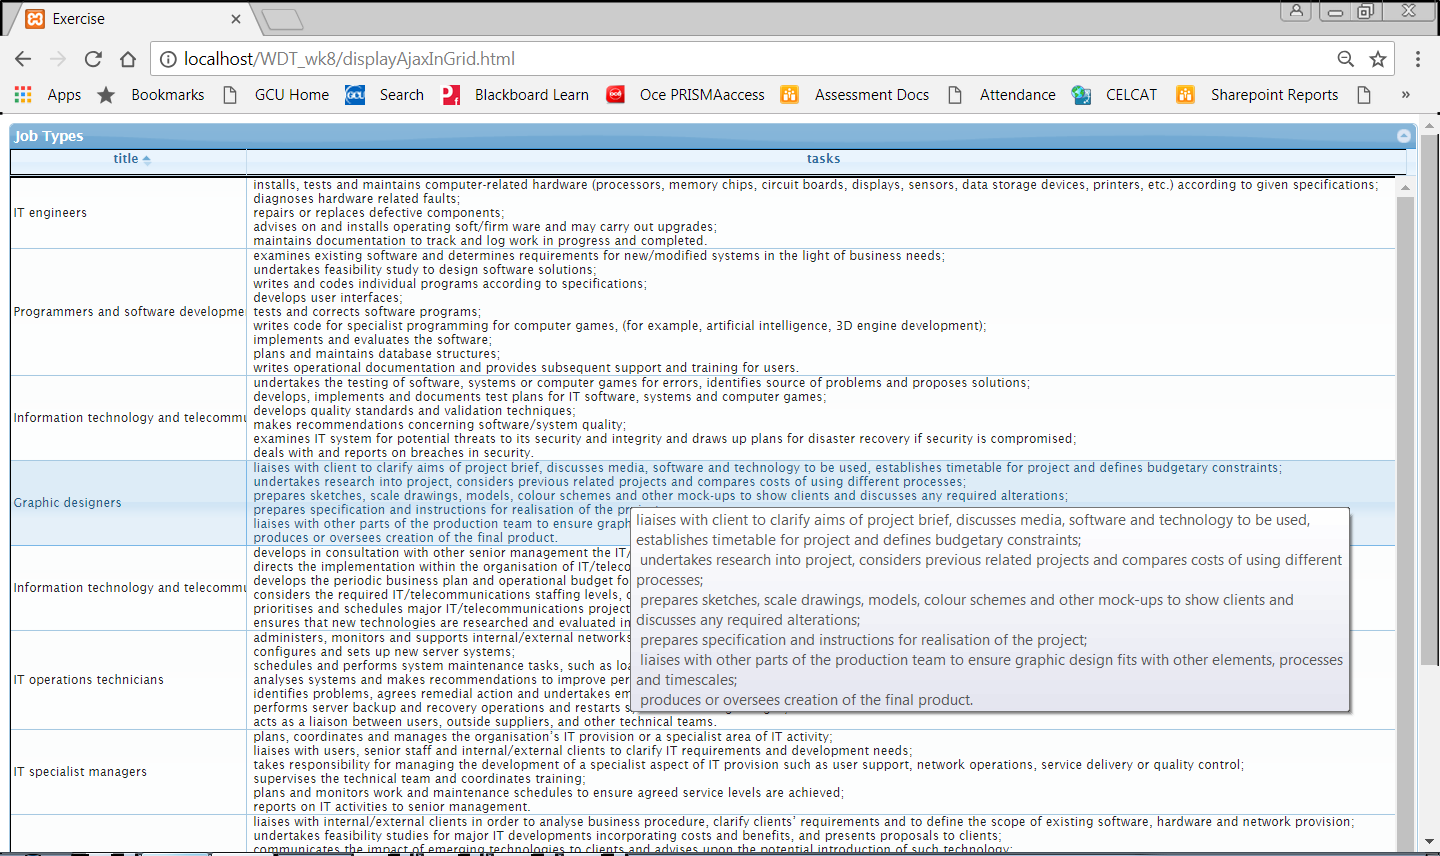
- You should read the Introduction, features and documentation pages at 🔗 http://www.trirand.com/jqgridwiki/doku.php?id=start and then look at the code example below.
- 👁 View displayAjaxInGrid.html
- 👁 appGrid.js
- Click on the image to enlarge
 X
X<!DOCTYPE html> <html> <head> <title>Exercise</title> <link rel="stylesheet" href="http://ajax.googleapis.com/ajax/libs/jqueryui/1.8.14/themes/redmond/jquery-ui.css" type="text/css" /> <link rel="stylesheet" href="jqgrid/css/ui.jqgrid.css" type="text/css" /> <script type="text/javascript" src="http://code.jquery.com/jquery-1.10.2.min.js"></script> <script type="text/javascript" src="http://code.jquery.com/ui/1.10.3/jquery-ui.min.js"></script> <script type="text/javascript" src="jqgrid/js/i18n/grid.locale-en.js"></script> <script type="text/javascript" src="jqgrid/js/jquery.jqGrid.src.js" ></script> <script src="appGrid.js"></script> <link rel="stylesheet" href="styles.css"> </head> <body> <table id="theGrid" ></table> </body> </html>
X$(document).ready(function (){ $("#theGrid").jqGrid({ url: "http://api.lmiforall.org.uk/api/v1/soc/search?q=computer", datatype: "jsonp", loadonce:true, mtype: "GET", colNames: ['title', 'tasks'], colModel: [ {id: "title", name: "title", field: "title",width:200}, {id: "tasks", name: "tasks", field: "tasks",width:1000, } ], viewrecords: true, height:800, width:1250, gridview: true, caption: 'Job Types' }); }); -
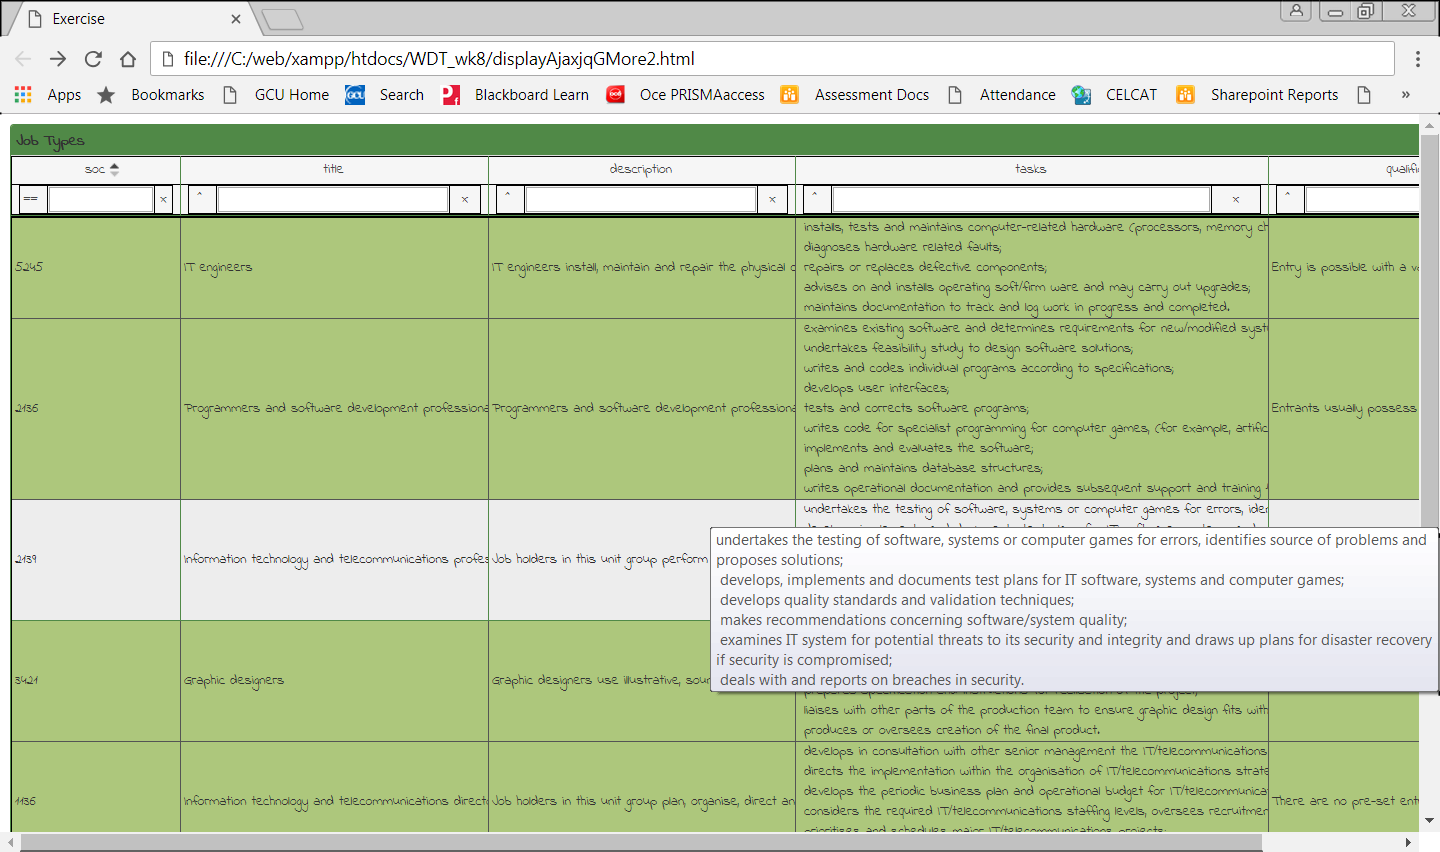
- The basic grid displays information in tabular form, with the specified data shown in columns which can be reordered by clicking on the title bar . To provide more interaction you need to set additional attributes of the grid.
- The following code demonstrates
- how different parts of the external data can be displayed,
- how a search facility can be added
jQuery('#theGrid').jqGrid('filterToolbar', {searchOperators:true});- adds a search filter at the top of each column
sorttype:'integer', searchoptions:{sopt:['eq','ne','le','lt','gt','ge']}},- specifies the search options available for the column. The default option is just to match letters from the beginning of a string but there are other options available see 📎 http://www.trirand.com/jqgridwiki/doku.php?id=wiki:search_config
- and how columns can be reordered by dragging and dropping them with the mouse. (Note : this option has additional dependencies so you need to be careful to download/link to all the necessary files. See 📎 http://www.trirand.com/jqgridwiki/doku.php?id=wiki:options for full details)
- 👁 View appGrid2.js
- The book chapter
- 📎 https://link-springer-com.gcu.idm.oclc.org/content/pdf/10.1007%2F978-1-4302-2710-6_9.pdf
- gives a number of different examples of using plugin.
X$(document).ready(function (){ $("#theGrid").jqGrid({ url: "http://api.lmiforall.org.uk/api/v1/soc/search?q=computer", datatype: "jsonp", loadonce:true, mtype: "GET", colNames: ['soc','title','description','qualifications','tasks'], colModel: [ {id: 'soc', name: 'soc', field: 'soc',width:60, sorttype:'integer', searchoptions:{sopt:['eq','ne','le','lt','gt','ge']}}, {id: 'title', name: 'title', field: 'title',width:100}, {id: 'description', name: 'description', field: 'description', width:150}, {id: 'qualifications', name: 'qualifications', field: 'qualifications',width:150}, {id: 'tasks', name: 'tasks', field: 'tasks',width:300 }, ], viewrecords: true, height:800, width:1250, gridview: true, caption: 'Job Types', sortable:true, }); jQuery('#theGrid').jqGrid('filterToolbar', {searchOperators:true}); }); -
Customising plugin and widgets
- Widgets are customized using normal CSS rules, however widgets and complex plugin such as datagrids have very long and complex stylesheets and tend to have a number of external dependencies e.g. jQuery UI. jQuery UI itself makes use of complex, interconnected styles based on themes. Whenever possible you should avoid modifying built-in stylesheets and core files. Usually pre-written artefacts such as widgets and plugin are customised by making use of one of the many pre-written jQuery UI theme available or by creating a custom theme. Custom themes are often generated themes using utilities such as 📎 https://jqueryui.com/themeroller/ rather than starting to write CSS from scratch.
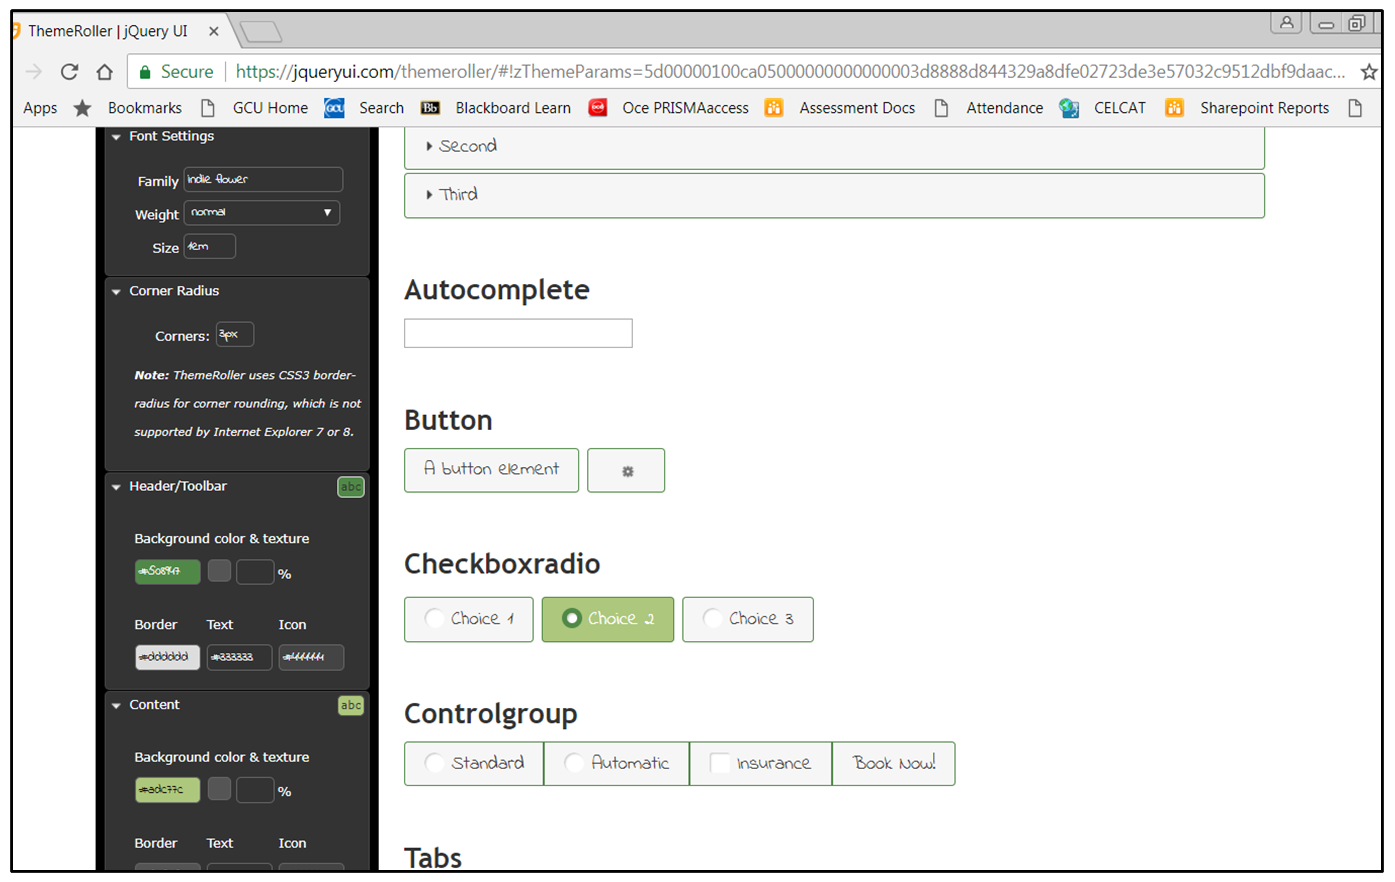
- Theme rollers simply generate custom CSS which can be downloaded and included in projects
- An example css is shown below
- ↓ jquery-ui.theme.css
- It could be included in a project by including a link to the file in the html document for the project.
- Note that the order in which files are included can matter the jQuery-UI css needs to be included before the custom css.
- 👁 View displayAjaxCustomTheme.html
- Click on the image to enlarge
 X
X<!DOCTYPE html> <html> <head> <title>Exercise</title> </head> <body> <table id="theGrid" ></table> <link rel="stylesheet" href="http://ajax.googleapis.com/ajax/libs/jqueryui/1.8.14/themes/redmond/jquery-ui.css" type="text/css" /> <link rel="stylesheet" href="jqgrid/css/ui.jqgrid.css" type="text/css" /> <link rel="stylesheet" href="jquery-ui-1.12.1.custom/jquery-ui.theme.css" type="text/css" /> <link rel="stylesheet" href="styles.css"> <script type="text/javascript" src="http://code.jquery.com/jquery-1.10.2.min.js"></script> <script type="text/javascript" src="http://code.jquery.com/ui/1.10.3/jquery-ui.min.js"></script> <script type="text/javascript" src="jqgrid/js/i18n/grid.locale-en.js"></script> <script type="text/javascript" src="jqgrid/js/jquery.jqGrid.src.js" ></script> <script src="appGrid2.js"></script> </body> </html>
-
- You should also notice the location of the linked files within the html document in the previous example : instead of including them in the head section of the document they have been included immediately before the closing body tag. This can help pages to load faster. This is because when the HTML page is fetched the browser starts to parse the HTML. It encounters a <script> tag referencing an external script file and requests the script file. Meanwhile, the parser stops parsing the page. After some time the script is downloaded and subsequently executed. The parser then continues parsing the rest of the HTML document. This can cause a poor user experience as the page basically stops loading until all external files are downloaded and so appears to load slowly.
- This happens because any script can insert HTML via DOM manipulations. This means that the parser has to wait until the script has been downloaded and executed before it can safely parse the rest of the document in case the script has inserted HTML in the document. (In fact, most javascript and jQuery developers do not manipulate the DOM while the document is loading. Instead, they wait until the document has been loaded before modifying it using techniques such as
$(document).ready(function (){ …} ).- One approach to solving this problem is to put <script> tags at the bottom of the <body>, because this ensures the parser isn't blocked until the very end. This does speed things up but the browser cannot start downloading the scripts until the entire document is parsed. which can also impact on performance. For larger websites with large scripts and stylesheets, being able to download the script as soon as possible can help optimise performance.
- In an optimal solution, the browser would start downloading scripts as soon as possible, while at the same time parsing the rest of your document. Today, modern browsers support the HTML5 attribute async and defer attributes on scripts. These attributes tell the browser it's safe to continue parsing while the scripts are being downloaded. Scripts with the async attribute are executed asynchronously, that is as soon as the script becomes available. If you are surer that a script does not inject anything using document.write() and has no dependencies that you could consider moving it to the head of the document and executing it asynchronously. This means that the script will be executed as soon as it's downloaded, without blocking the browser in the meantime and that the page will load quickly.
- Usage is
<script src="appGrid2.js" async></script>
- It is quite common to see this approach recommended in contemporary forum online but it also has disadvantages. An important one is that if an HTML file includes more than one script they will be executed in the order in which they become available. This can result in errors if a later file is dependent on something in an earlier one. A common scenario is that the first file is a CDN copy of jQuery that other, locally stored, files use . If a local file tries to use any jQuery method before it becomes available this will lead to errors ( or worse – the page simply failing without indication of why). Another significant drawback for the async approach is that it is not supported by all browsers yet – many do support async but there are still somewhere between 10 and 20% of browsers which do not support this approach.