02
-
Measurement of Internal Finishes
- Welcome to Week Two: the section on Measurement of Internal Finishes. In this section you will be introduced to the application of:
- Measurement conventions, covered earlier in week one
- Measurement rules in NRM2 for this section/work
- Here, you will later see an overview of the first portion of a typical measurement exercise, based on the construction project, known as the Facility for Acme Limited. Once you have worked your way through this presentation, you will be able to go on to view the entire take-off for finishes.
- Introduction
- We must refer to NRM2 – Section 28 (Floor, Wall, Ceiling and Roof Finishings), starting on 🔗 page 212.
- The measurement worked example, shown later, relates to the single-storey building known as the Facility for Acme Limited. Similar approaches would apply to the measurement of internal finishes to other similar buildings.
- There is, as always, a need for preparatory work to be done, in order to carry out the measurement (taking – off) exercise:
- The drawings must be scrutinized and fully understood
- The specification must be scrutinized and fully understood
- The rules set out in NRM2 – Section 28 must be followed
- A title page of dimension paper must be produced, to include the project name, the house/flat type, the floor level or phase to be measured
- Prepare a list of the relevant drawings, used for the take-off, and any schedules or specifications. A finishes schedule will assist the QS greatly. See later example and the measurement worked example
- It is usual, but not essential, to start with the floor finishes
- Waste calculations must be produced, to establish the lengths and widths of all rooms involved (unless obvious from the dimensions given on the drawings) – see conventions in earlier sections of the module. Waste calculations are always located to the right of the description column and are in metres to 3 decimal places (i.e. mm)
- Any areas to be either added to or deducted from room sizes must be established – refer to measurement conventions, covered in week 1, and NRM2
- Dimensions can then be entered in the dimension column for floor finishes in each room, keeping differing finishes separate, and with description starting level with the first set of dimensions for that item
- Remember that differing floor finishes may have differing thicknesses and, hence, a different thickness of screed/bed beneath!
- Dimensions must ALWAYS be entered in the correct order: length, width, height
- Item descriptions must be entered level with the relevant dimensions
- Use bracketing where appropriate (see conventions). This is often required, as it is usual for dimensions to be the same for screeds/beds, floor finishes, ceiling finishes and decoration to ceilings (see 🔗 NRM2 Section 29). Usually measurement will deal with finishes and decoration at the same time
- Because mostly the areas/dimensions for ceilings will match those of the floor coverings, it is usual to take off the ceilings next
- Follow the same procedures as for floor coverings, relating all to the provided specification notes
- Next, it may be necessary to carry out waste calculations for lengths, widths or heights, which have not been previously calculated (if not shown on the drawings)
- Floor to ceiling heights may be given on drawings or may need to be calculated. It is common not to deduct the thickness of the ceiling finish from structural floor/ceiling height, as the overall effect is minor
- For the measurement (taking off) of wall finishes, the procedure should start with calculating girths/perimeters of each room to be measured
- Where rooms have the same wall finish specification, one description only, with sets of dimensions bracketed together, is the accepted approach
- Remember NOT to continue onto a new sheet, without re-writing the description/s!! Similarly, DO NOT “And-On” at the top of a new sheet.
- Deductions and adjustments for door/window openings are measured with the doors and windows. Remember that this activity might well introduce (if there have been none already) “narrow widths” of the various finishes. An example is to the reveals or heads of openings. There is a later section in this module to deal with doors and windows
- PLEASE USE THESE NOTES, ALONG WITH THE DRAWINGS AND SPECIFICATION, TO NAVIGATE THROUGH THE WORKED EXAMPLE AND ANY WORKSHOP ACTIVITY ON THIS TOPIC
- The measurement conventions and general rules have been covered earlier in the module – Week 1.
- 🔗 Sample Finishes Schedule
-
- As is the case throughout NRM2, work section 28, page 212, starts off by telling us what information is required to carry out the measurement and to convey to those who use the bill of quantities, which will result from the measurement.
- It is important to note that any layout details are important, as they can affect methodology/cost of the work (e.g. patterned or moulded).
- Check which works or materials are deemed to be included, from the list given (1 – 12).
- Remember to comply with the measurement rules, top right, 📷 page 212 and 213 e.g.
- 1 – Area measured is net in contact with base
- 2 – Widths stated are the width of each finished face
- 3 – No deductions for voids not exceeding 1.00 square metres
- 4 – No allowance for laps, etc
- 5 – All work deemed internal
- Items or work to be measured
- This commences with 28.1 on 📷 page 214 – screeds, beds and toppings.
- Understand fully the vocabulary/terms used :- e.g.
- falls
- cross-falls
- underlays – see Note 2.
- Note the requirement in NRM2 to separate “narrow widths”: not exceeding 600 mm wide, from general areas :- exceeding 600 mm wide.
- Floor finishes follow similar rules to those for screeds/beds.
- Note also that NRM2 also caters for modern/ecological materials/methods :-
- See roof finishes, which includes sedum/grass. Such finishes are often referred to as green roofs. 📷 See 28.6. **
- In respect of wall finishes, the height is measured up to the ceiling finish and from floor, even if a skirting is used – note the exceptions to this!! See 28.7.*.*.*.2 in respect of skirtings.
- It is important to state if ceilings are over 3.50 metres above structural floor level, as NRM2 requires. 💡 Why is this?
- Response suggestion: this involves working at a relatively high level, which increases access problems and creates more difficult working, both affecting cost
- Close
- Consider some more definitions of terms used in NRM2:
- treads
- risers
- strings
- aprons
- raking
- ends
- angles
- outlets

- Now consider and discuss the various aspects and requirements of 📷 page 216 of NRM2.
- Coves and moulded work (see 28.17 – 22) may be seen at the abutment of wall and ceiling finish, for example: see below. Note that cornices might also be precast and later fixed on site (see 28.35)
- Insert illustration to follow
- 28.23 indicates how the QS deals with measuring surface dressings, sealers and polishes. A typical example of this would be the application of carborundum grains on a granolithic floor (anti-slip).
- Although items 28.24 – 28 are all commonly encountered, it is important to note that beads (especially angle beads and stop beads) are the most common ones.
- There follows a worked example, which shows a take-off of internal finishes to a small, single-storey building – Facility for Acme Limited. It should be studied thoroughly, with reference to all of the drawings and other information provided. It must be recognised that the example includes measurement of decoration also (work section 29). This is an accepted approach, as mentioned earlier, due to the close links between finishes and associated decoration work. Please study carefully the slides/voice-over for the initial part of the worked example (Rooms 1 and 4), prior to looking through the entire solution.
- Afterwards, the student may carry out his/her own take-off exercise, using standard dimension paper, for the Customs Building. See separate drawings and schedule.
x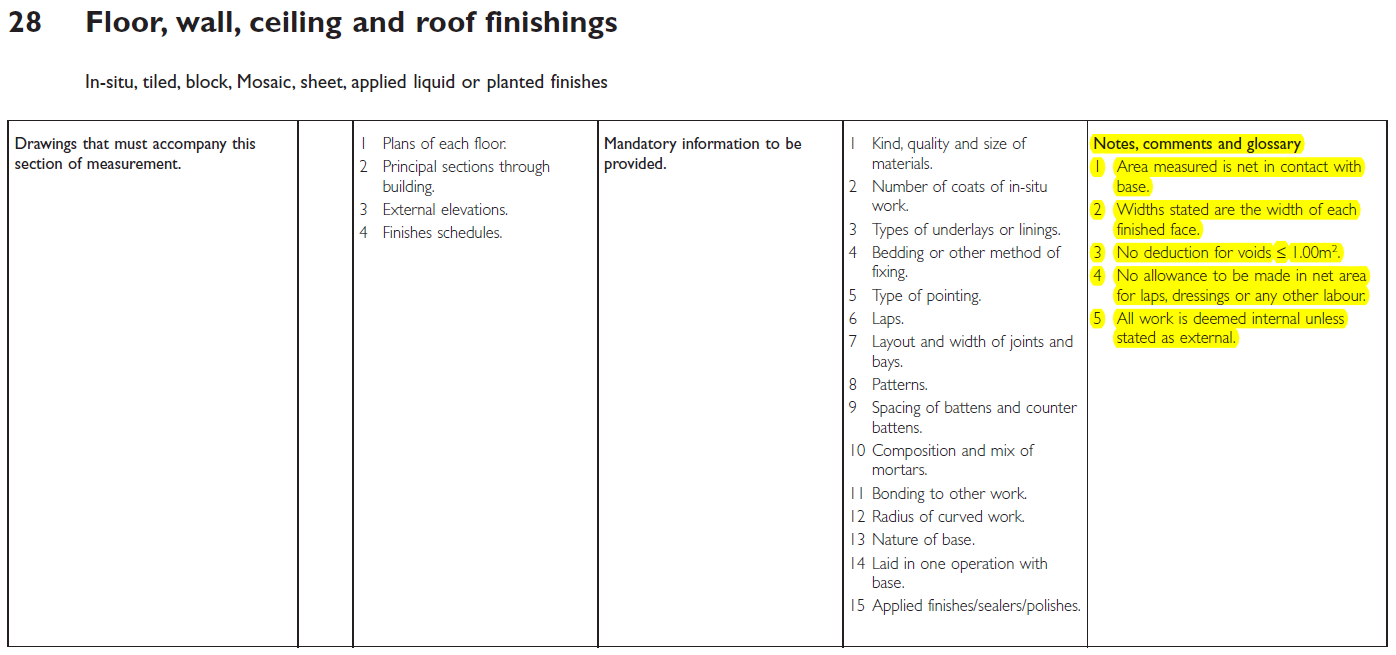 x
x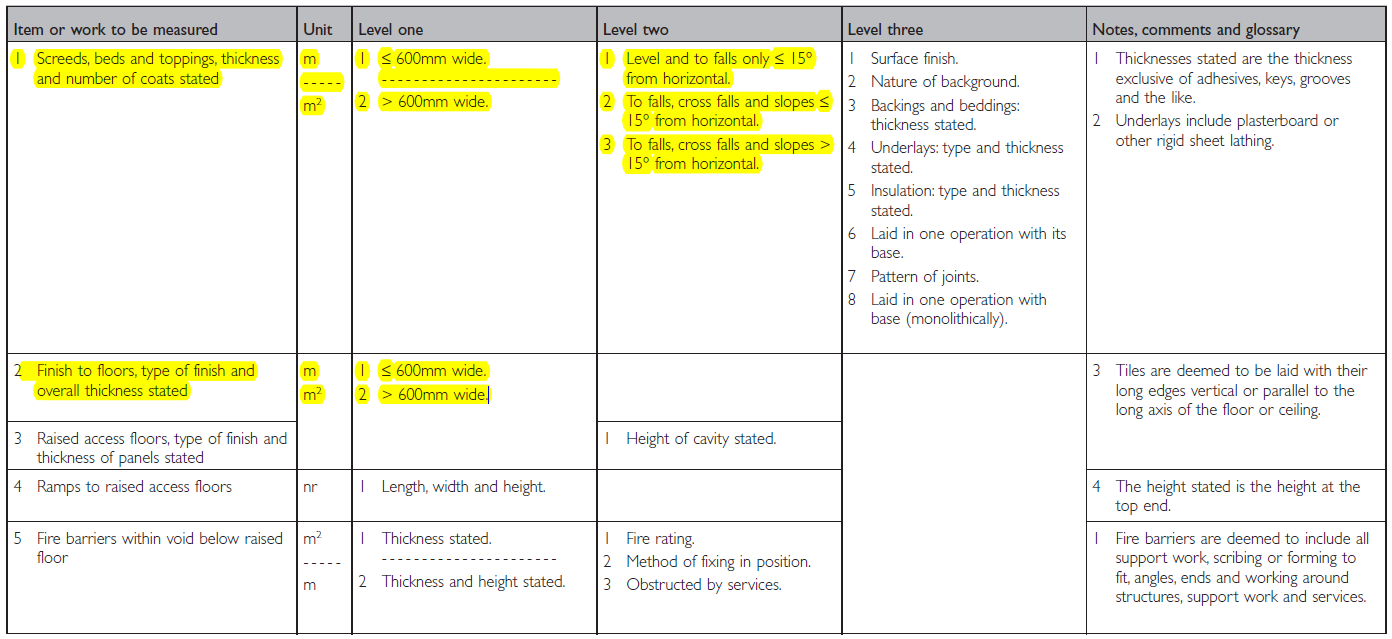 x
x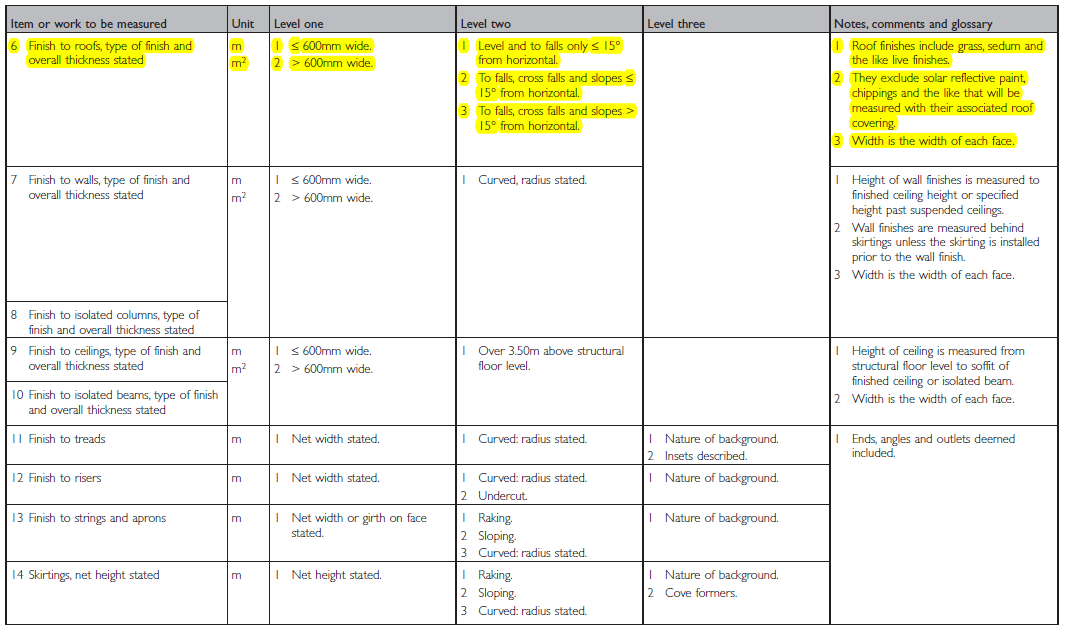 x
x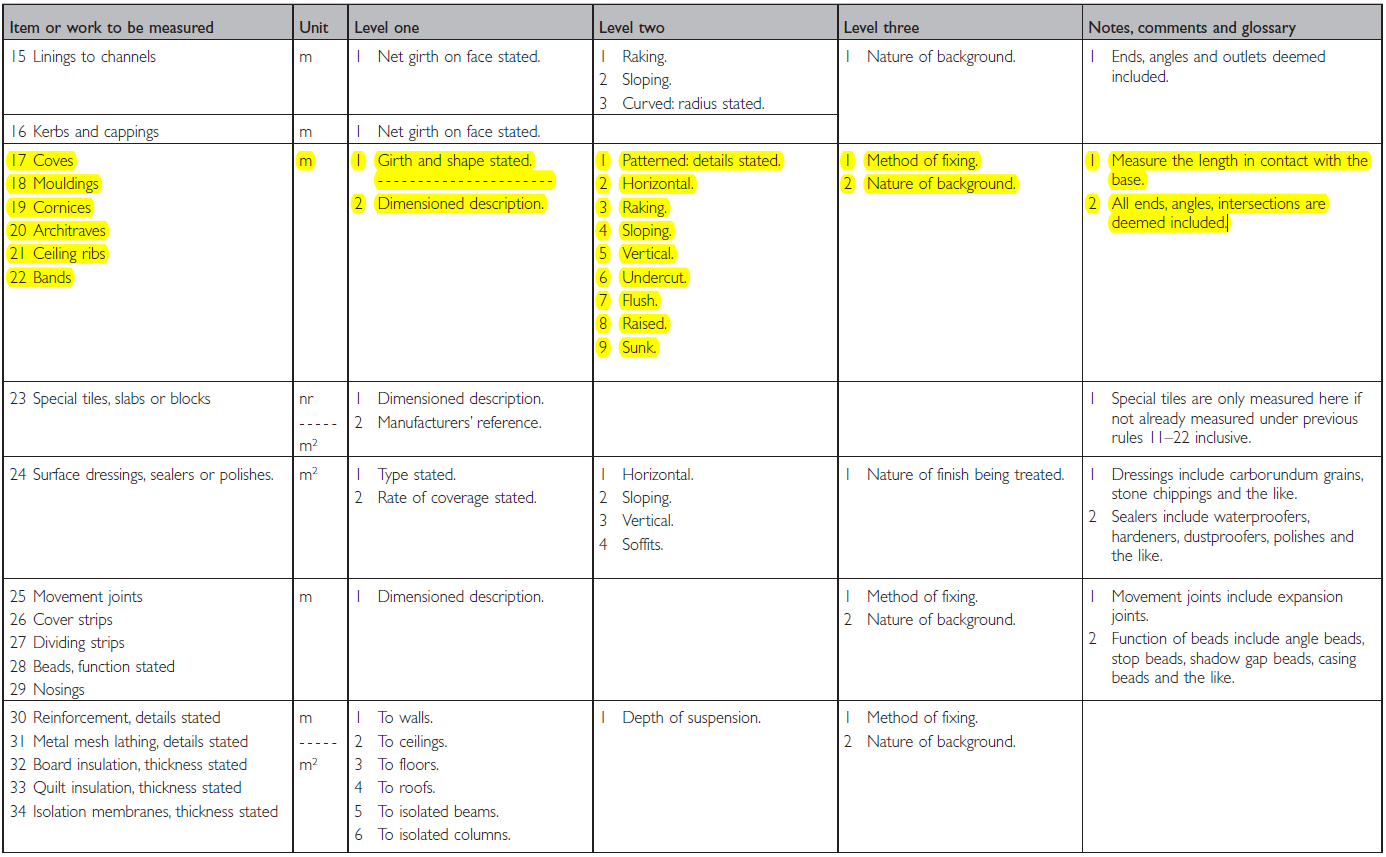
-
- 🔗 Drawings and Schedule for Facility for Acme Limited
- Worked Example Video
- Full Downloadable Worked 🔗 Example
-
- Further coverage of this section of the module can be gained by watching the video presentation by Duncan Cartlidge.
- Insert Content Here