-
Web Applications Architectures
Web applications typically have a three-tier architecture.
- In a three-tier architecture the functionality is distributed across 3 independent systems:
- Tier 1: the presentation tier, also often called the client, is responsible for the presentation of the user interface of the application and for user interaction. In web applications the UI runs in web browsers or user agents.
- Tier 2: the business logic tier, is responsible for application logic computations (or processes) running on remote application servers in conjunction with web servers.
- Tier 3: the data and resource tier, are responsible for persisting the data and resources and often run on data base servers or using data stores.
In web applications the client communicates with the server over a version of http, the Hyper Text Transfer Protocol.
Three-tier architecture

Within the three tier architecture there are many different ways to distribute the functionality of the application between the tiers.
Typical web application architectures include the ones:
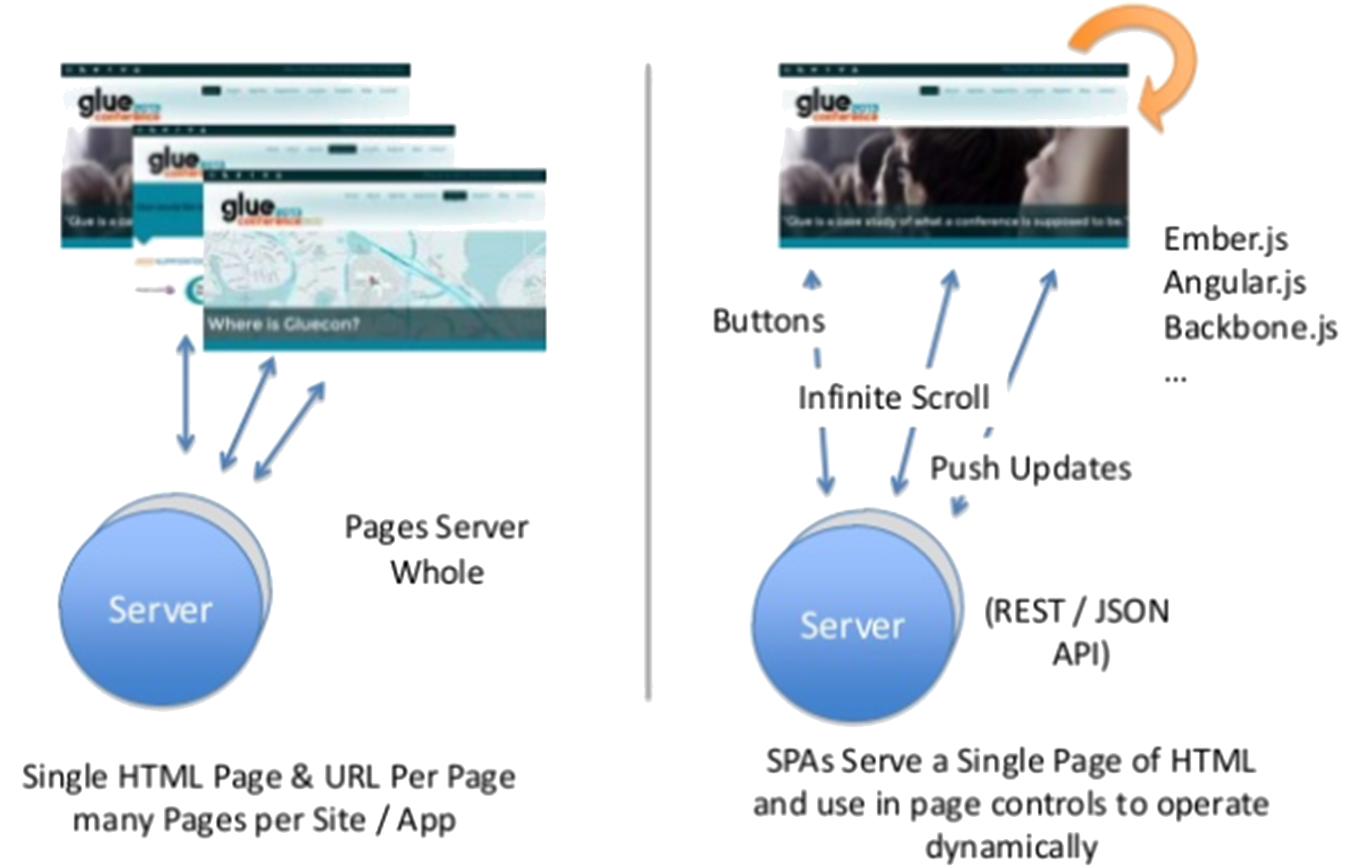
- Single Page Applications (SPA)
- Most of the user interface logic is processed on the client, i.e. in the web browser and not on the server.
- The communication between client and server occurs using APIs.
- Users typically stay on the same page, but update regions of the page as they interact with elements on the page, e.g. click buttons.
- Such applications can support rich client-side behaviours, such as drag-and-drop, better than traditional applications.
- They are very responsive to user interaction because updates to pages affect only parts of pages. As the user stays on the same page full page re-loads are rare.
- The complex JavaScript required is supported by frameworks, such as Angular.
- You can learn more about SPA in the module Client-side Web Development.
-
Traditional Web Apps (with back-end processing)
Most of the application logic is processed on the server.
The application has many different pages and users navigate between these.
- They are typically used when:
- Your application's client-side requirements are simple, e.g. a search engine or a blog.
- Your application needs to run in browsers without or with little JavaScript support.
- A lot of analytics is required.
This module is concerned with back-end processing applications.
Traditional (left) vs. Single Page (right) Applications
- REST (Representational State Transfer) APIs (Application Programming Interface)
- Provide access to resources (application data) via specific URL paths.
- Hence allowing applications to request data by providing a specific “supported” URLs.
- To use a REST API, an application makes an HTTP request and parses the response.
- The request typically consists of the endpoint URL and http method. Typical methods are GET (to retrieve resources), POST and PUT (idempotent) (to upload resources) and DELETE (to delete resources).
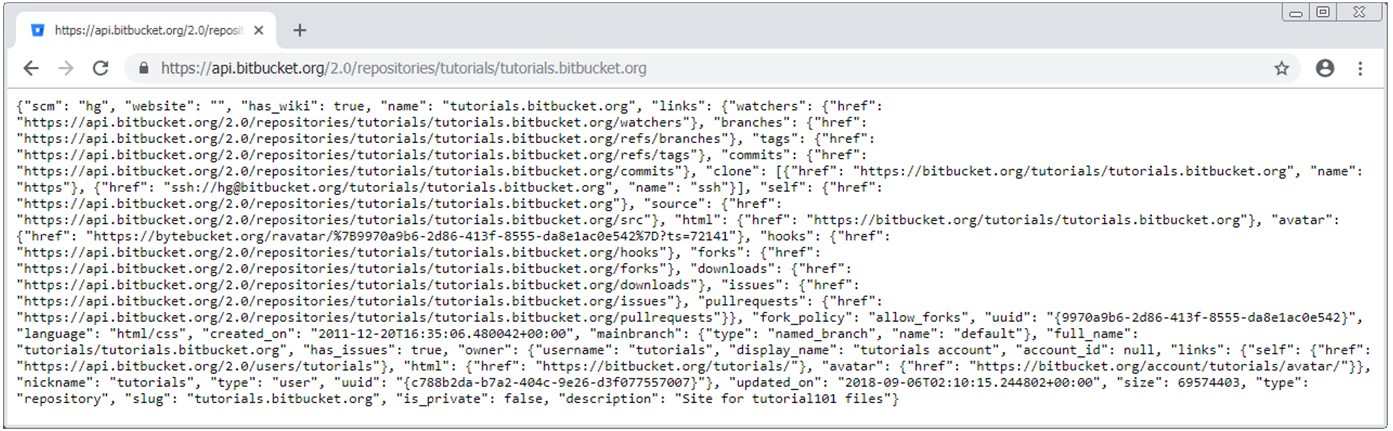
- The response is often provided by the application in JSON format.
- Example:
GET 🔗 https://api.bitbucket.org/2.0/repositories/tutorials/tutorials.bitbucket.org - The above request returns a JSON file containing all topics of the bitbucket tutorial.
- Web applications often provide data in response to REST requests as an additional feature.
- This allows developers to build applications on top of existing applications.
- You can learn more about REST APIs in the module Cloud Platform Development.
Recently a different trend towards micro services and serverless functions has emerged. More about that in week 10.
-
HTTP – based Communication
- In Web applications communication occurs over the HTTP protocol
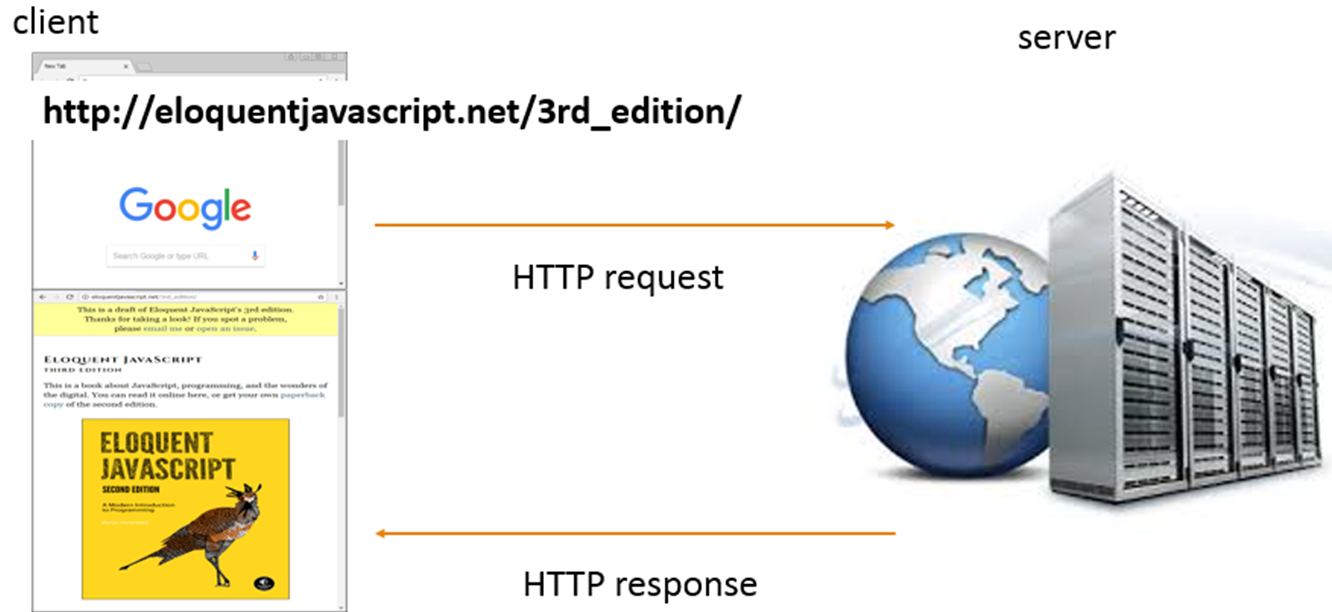 Activity: Access a page of your choice and observe the request and response in the web browser.
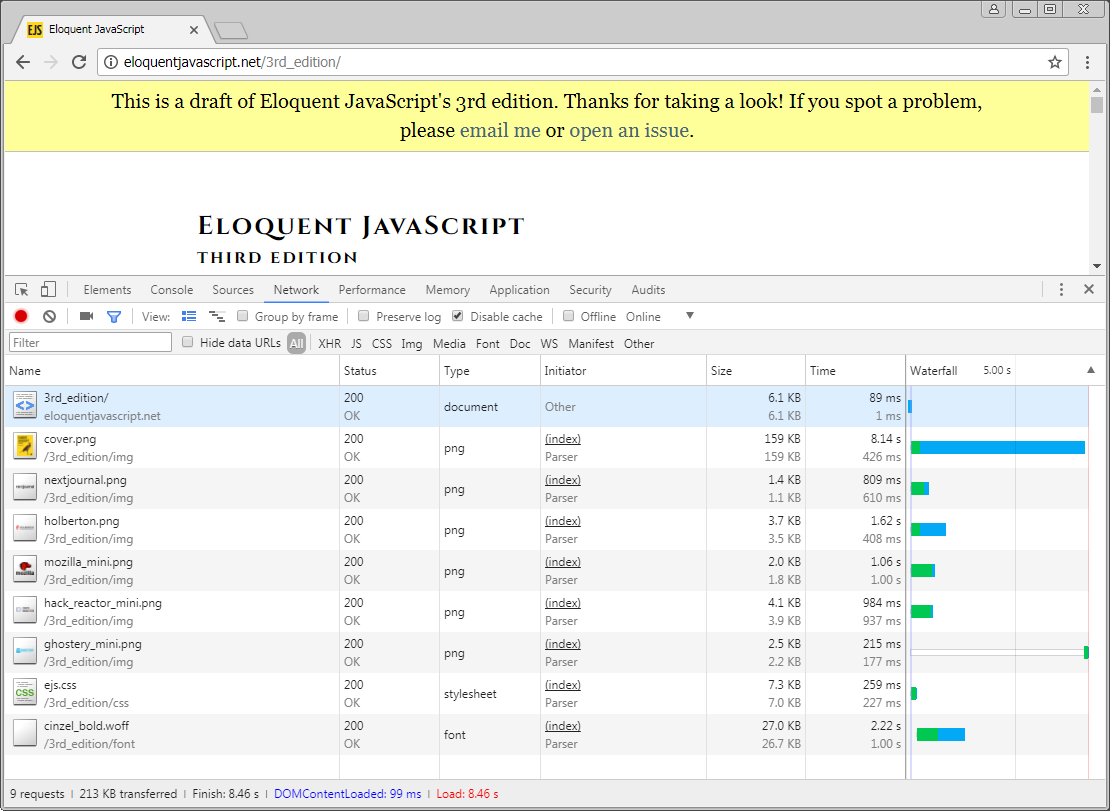
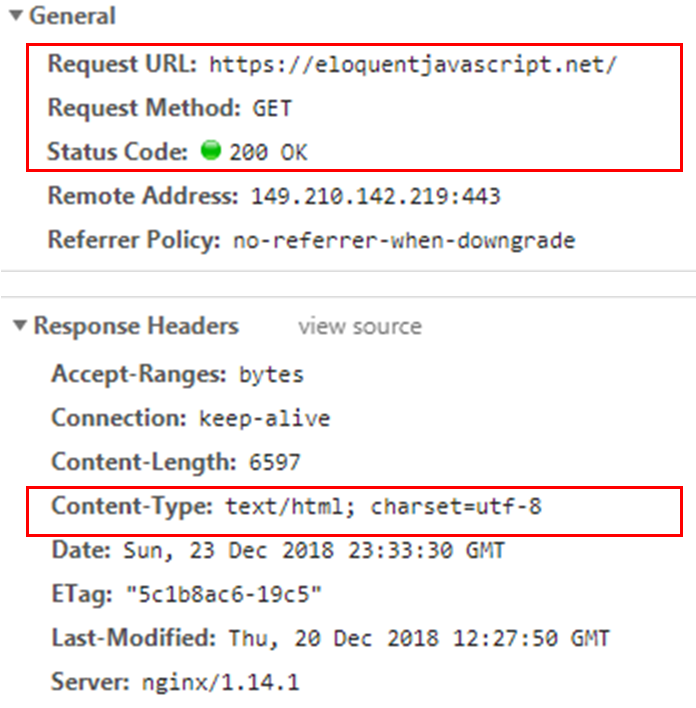
Key elements:
Request:
1. HTTP method, here GET
2. The URL of the page to be accessed, here 🔗 https://eloquentjavascript.net/
3. Possibly additional query parameters and data, here none.
Response:
1. Response code
2. Content-type
3. Charset
- HTTP Request Methods
- Also sometimes known as "HTTP verbs"
- Indicate the desired action to be performed for a given resource.
- GET - requests a resource (retrieves data)
- POST - sends data to the server, often used for sending form data to the server, not idempotent
- PUT - sends data to the server, creates a new resource or replaces the existing resource, idempotent
- DELETE - deletes the specified resource
- HEAD – sends a response only containing the request header ...
For traditional web applications GET and POST are the most relevant methods.
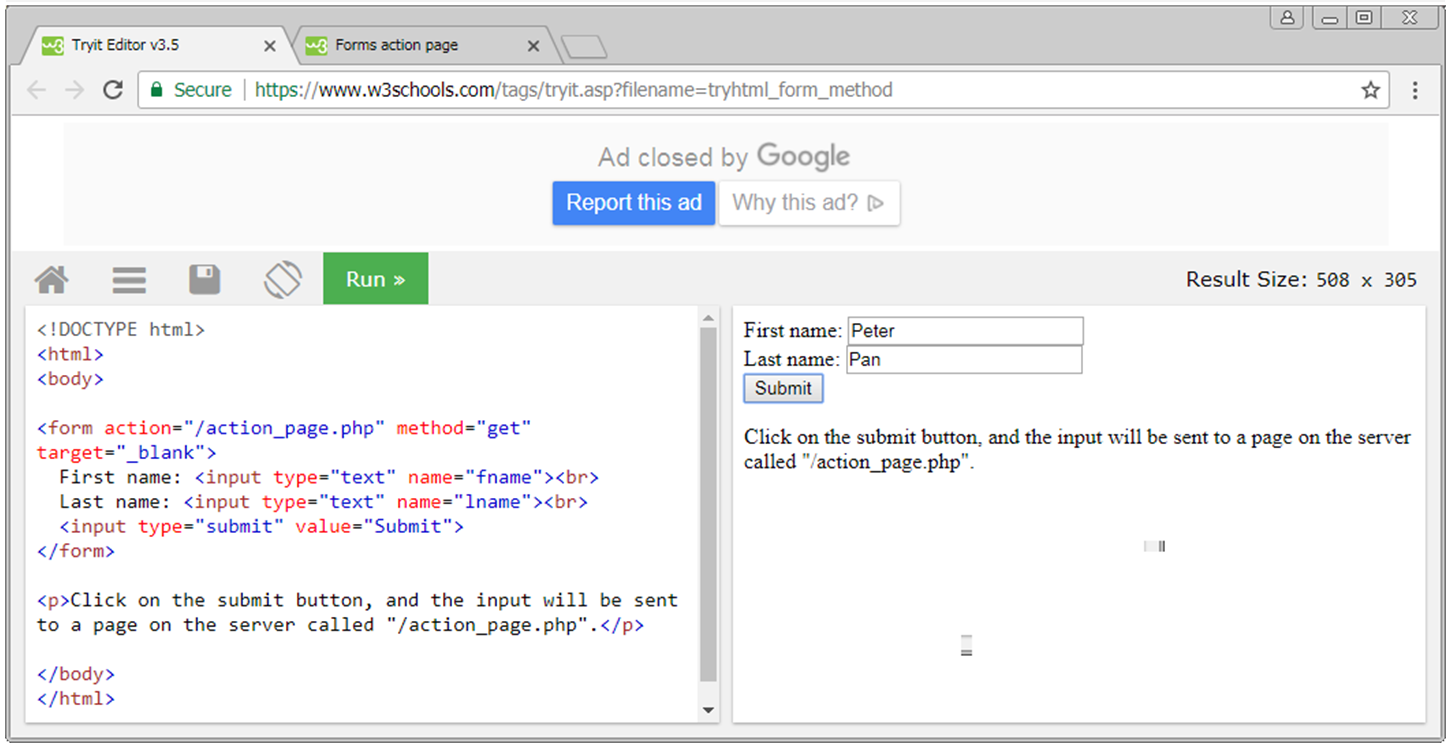
HTTP GET vs. HTTP POST
Using HTTP GET data (in name/value pairs) is transmitted in the URL of the request.
/test/demo_form.php?name1=value1&name2=value2
Using HTTP POST data is transmitted in the HTTP message body.
POST /test/demo_form.php HTTP/1.1
Host: w3schools.com
name1=value1&name2=value2
Observe the Transmission of Parameters in the URL query string (GET) and in the message body (POST)
-
Java Servlets
- Are Java programs that run on web servers,
- Provide a component-based, server and platform-independent API,
- for the development of Web-based applications,
- that is integrated with the other Java API.
- Every servlet must implement the javax.servlet.Servlet interface.
- The javax.servlet.Servlet interface provides lifecycle methods, such as init and destroy.
- Most servlets extend one of the following classes: javax.servlet.GenericServlet (for protocol-indepentent servlets) or javax.servlet.HttpServlet (for web applications).
- In the lab we will implement web applications, hence implement HttpServlets.
- Typical Http Servlet Tasks
- Produce a response to an incoming request originating from a web browser.
- Read the implicit HTTP request data sent by the clients (browsers).
- Read the explicit data sent by the clients.
- Process the data and generate the intended output.
- Send the HTTP response to the clients.
Request Handling by an Http Servlet
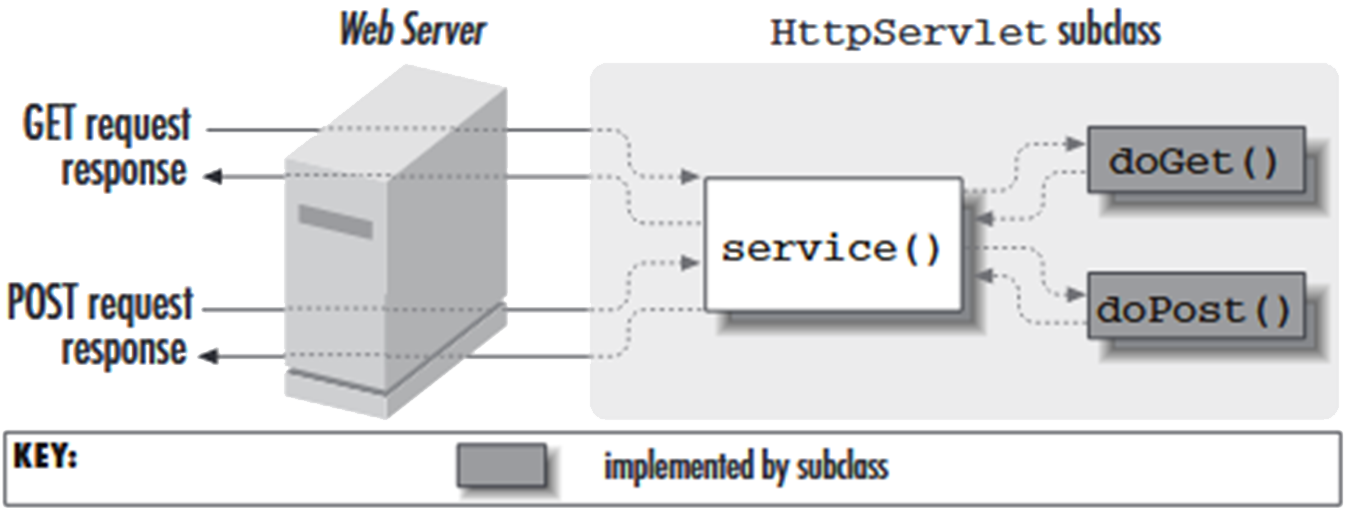
- The javax.servlet.http.HttpServlet class
- Provides an abstract class
- that is subclassed to create an HTTP servlet suitable for a Web site.
- A subclass of HttpServlet must override at least one following methods:
- The most typical methods are doGet() or doPost().
- doPost, for HTTP POST requests
- doPut, for HTTP PUT requests
- doDelete, for HTTP DELETE requests
- init and destroy, to manage resources that are held for the life of the servlet
- getServletInfo, which the servlet uses to provide information about itself.
- The most typical methods are doGet() or doPost().
Activity: Examine doGet() and doPost() methods of the javax.servlet.http.HttpServlet class.
What is the purpose of each method? A link to the Java Servlet API is in this week's folder on GCULearn. -
The doGet() Method
doGet
protected void doGet(HttpServletRequest req,
                     HttpServletResponse resp)
              throws ServletException,
                     java.io.IOException

Parameters:
    req - an HttpServletRequest object that contains the request the client has made of the servlet
    resp - an HttpServletResponse object that contains the response the servlet sends to the client
-
A First Servlet Application (see the practical exercise)
- Classes:
- Runner.java
- DefaultServlet.java
- DemoServlet.java extends BaseServlet
- BaseServlet.java extends HttpServlet
- Runner.java
- Starts the application (contains main()).
- Sets up the org.eclipse.jetty.server.Server server,
- the port this server listens to (here 9000),
- the document root (/) for this application (here: src/main/resources/webapp)
- For each servlet sets the request URL to which this servlet responds
- DefaultServlet responds by delivering static pages (or 404 responses) from the root
- DemoServlet implements a response
- Tip: Classes can be identified by their package (see import statements) and looked up in the API
- DefaultServlet
- Is part of the Jetty server, see import statement
(org.eclipse.jetty.servlet.DefaultServlet) - Provides the handling for static content (pages), OPTION and TRACE methods.
- Is normally mapped to / (root).
- For any receiving request it either returns the requested static page (see URL) or 404 if such a page doesn't exist.
- BaseServlet.Java
- Is a utility class
- Implements functionality that can be used by all servlets, such as
- Setting the mime type of the response
- Setting the response code of the response
- DemoServlet.java
- An example of a servlet with minimal processing.
- Visualizes the use of the doGet() method.
- Note the use request and response parameters in the signature of the doGet() method.
- Accesses the request URI of the request
- Provides a response by outputting the request URI (echoing).
- BaseServlet extends HttpServlet
- HttpServlet is an abstract class.
- It cannot be instantiated,
- but can be subclassed.
- Abstract classes can have abstract and concrete methods.
- When subclassing you need to provide implementations for the abstract methods.
- In the context of a web application mostly the doGet() and doPost() methods.
-
The Eclipse Jetty Server
- "Don’t deploy your application in Jetty, deploy Jetty in your application!"
- Jetty is designed to be a software component that can be instantiated and used in a Java program just like any POJO.
- This means that when the application is run this starts the server that serves it.
- In the example application you can observe that starting the server generates log information in the console.
- The server class is: org.eclipse.jetty.server.Server
- In the application it listens on port 9000 (but can be configured otherwise).
- org.eclipse.jetty.servlet.ServletContextHandler sets the context (where it looks for documents) to "/"
- This is mapped to the resources/webapp folder, i.e.: a request to localhost:9000/page.html returns the resources/webapp/page.html file.
-
DevOps
- DevOps (development and operations) is a combination of development practices and tools that...
- ...support a culture and environment where building, testing, and releasing software can happen rapidly, frequently, and more reliably.
- There is no single “DevOps Tool”...
- ...but a “DevOps toolchain” consisting of multiple tools used together.
- Gartner Market Trends: DevOps – Not a Market, but Tool-Centric Philosophy That supports a Continuous Delivery Value Chain (Report). Gartner. 18 February 2015.
Examples of DevOps Supporting Different Stages of the Software Development Life Cycle
- Code – Code development and review support tools, such as version control tools.
- Build – Continuous integration tools, e.g. import of libraries, project structure.
- Test – Test and results determine performance.
- Issue tracking.
- Deployment - automated deployment.
- Release – Change management, release approvals, release automation.
- Configure – Infrastructure configuration and management.
- Monitor – Applications performance monitoring, e.g. monitor end user experience.
-
Benefits of Version Control Systems
- Imagine a group of people is editing a word document together as a group.
- Person 1 writes a new section.
- Person 2 makes improvements to the existing sections.
- Persons 3 and 4 are writing another new section together.
- In the end you want to compile the whole document together by integrating all the above changes with the existing "old" version of the document.
- But: Person 1 made reference to an existing section.
- Person 2 removed that part of the section out.
- Persons 3 and 4 frequently need to see what the other co-author has written.
- In the past changes to the document were managed by manually adding versions to the ending of file names, such as “v1”, "final" or "latest“.
- Then it becomes difficult to add a new final version.
- The same happens with source code.
Version Control Systems keep track of modifications to the files over time as well as highlighting conflicts (incompatibilities).
- If a mistake has been made authors can revert back to any previous version.
- Conflicts are highlighted and need to be resolved.
- This helps software development teams:
- To manage changes to source code over time.
- To integrate collaborator’s work into our projects.
- To identify conflicts.
- It provides useful backups.
In this module we use the version control system Git.
And host the repositories online in a system called Bitbucket.
Scenarios for using Git
- Example 1
- A single developer is restructuring (re-writing) a program.
- He made numerous changes to several parts of the program but now the program has many errors and he is unable to get it to work.
- Because he made so many changes in different places of the source code it is difficult to make the changes undone manually and start again.
A version control system allows him to easily to revert back to a recognisable previous error-free state.
- Example 2
- A group of developers are maintaining a piece of software.
- One developer is working on a new feature while another developer fixes an unrelated bug by changing code.
- Each developer makes changes to several parts of the programme.
- But changes made in one part of the software can be incompatible with those made by another developer working at the same time.
A version control system discovers conflicts and supports resolving these in a controllable way without blocking the work of the rest of the team at the same time.
- Example 3
- A developer is working on a new feature.
- During the development of the new feature the code frequently has errors, may not compile for a while, fail tests etc. until development of the new feature is complete.
- This version of the software (including the new feature) is kept separate from the rest of the project until all testing has been completed and the feature is working safely.
- Then the new feature is integrated into the project and distributed to all other developers.
- The work of other developers is not affected by the new feature.
A version control system allows developers to work on separate “branches” of the same project (think of it as versions) and to switch between branches seamlessly without having to modify the code.
-
Centralised vs. Distributed VCS
- Centralised VCS
- Has a single “central” copy of the project.
- Programmers will “commit” their changes to this central copy.
- “Committing” a change means recording the change in the central system.
- Other programmers can then see this change.
- They can then "pull down" the changes.
- Distributed VCS
- Do not rely on a central server to store all the versions of a project’s files.
- Every developer “clones” a copy of a repository and has the full history of the project on their own hard drive.
- Git is a distributed VCS.
- There is no single “good” or "master" copy of the system.
- Instead each client fully mirrors all of the repository, i.e. all changes.
- Every checkout contains a full backup of the complete change history.
- If any server or computer fails any of the client repositories can be copied back up to the server to restore it.

-
Basic Git actions
Basic Git actions
1. Create a repository
a. Clone a repository
b. Initialise a repository2. Make changes to a repository
3. Add the changes to your local Git repo.
4. Commit the changes, i.e. create snapshots (milestones) of your project.
5. Push the changes to the remote repository
6. Set your local properties
- More advanced actions
1. Create branches within your project.
2. Merge branches or the work of others (pull).
3. Revert back to a previous version of the project.
4. Resolve conflicts. - Initially we carry out basic actions individually.
- Then we gradually enhance your abilities, first individually, then in teams.
- Don’t be taken in by some of the (quite complicated) things you can do until you are familiar with and confident about the basics.
Getting Help with Git Commands
- There are 3 ways to get the manual page (manpage) for any of the Git commands at the command prompt:
- > git help <verb>
- > git <verb> --help
- > man git-<verb>
- <verb> here means the git command that you need help with.
- Example: >git help config <- get help about the config command
- If you are unsure of how to use a Git command, from now on use the help.
- More advanced actions
-
Git vs. Bitbucket
- Git is a version control system.
- You create files, edit, save, edit, save, edit ... collaboratively.
- Git remembers who changed what when and why.
- Keeps a record of history, can bring sets of changes together (merge).
- Bitbucket is a cloud hosting service for Git (and other VC) projects.
- You can create private and public repositories (repos).
- Set up and manage teams.
- Generates typical Git commands for you.
- Provides additional tools for documentation and issue tracking.
- Remote and Local Repositories
- You will typically develop your project on your local computer. This is your local repository.
- The local repository can be uploaded to Bitbucket. Bitbucket hosts your remote (i.e. cloud-based) repository.
- In Bitbucket you can inspect its contents, such as:
- The address of this repository
- Command generation for typical actions, such as cloning.
- The code in your remote, down to being able to edit it.
- The commit history.
When first set up a remote repository and then clone your remote repository on to your computer, your "local" repository "knows" it's corresponding "remote".
-
Set up a new repository – by cloning a new remote repo.
- Using GitBash shell navigate to your local repository.
- In Bitbucket, select the git clone command from the left side bar
- Paste this command into your bash shell
- You should see the completion of this task reported in the shell
- Find this file on your file system
- A hidden folder .git shows that this folder is under git version control
- Start with a local repo
- [You may have to set local variables, such as user.name and user.email; if so, follow the instructions]
- Start with a local repo
- On your local computer create a directory (folder).
- In a text editor create a file readme.md and save it in this directory.
- This should look similar to the example on the right.
- This is NOT a Git repo yet.
- Using Git Bash on your local computer navigate to the folder, in which you have created your file and which you want to bring under version control.
- In this folder at the command prompt type:
git init - Your folder is now under Git version control.
- This has created a new .git subdirectory (a hidden folder).
- At this point, nothing in your project is tracked yet.
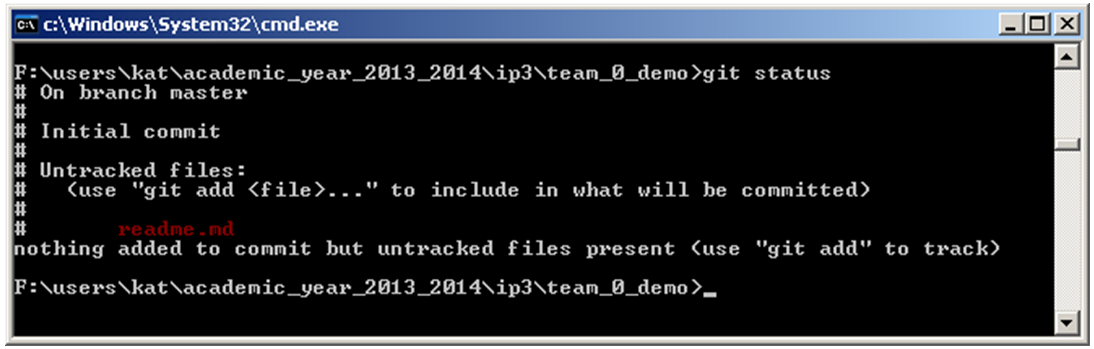
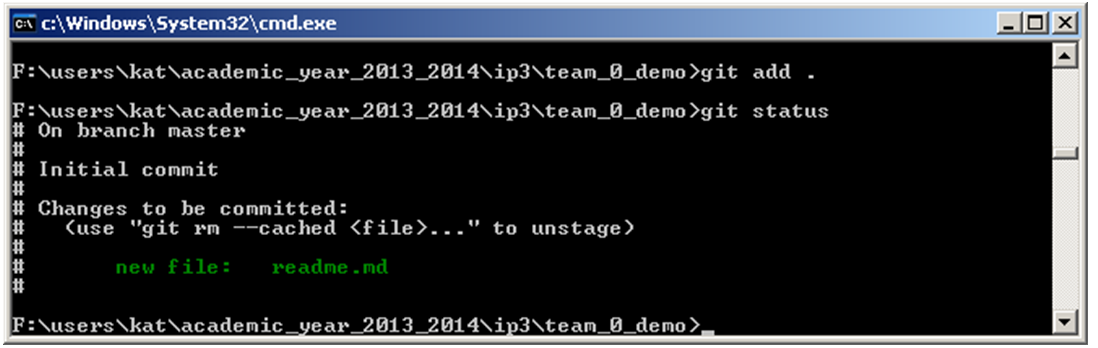
- Check the status of your repo by typing
git status - You should see the new readme.md file highlighted in red, indicating that this file is not yet under version control yet.
- Add the new file to your git repo by typing: add . (including the dot)
Tracking new file
- To begin tracking a new file use the git add command:
- > git add <file_name>
- Starts tracking the named file.
- > git add.
- Looks at the working directory and adds all paths to the staged changes if they are either changed or are new and not ignored.
- The dot (.) means “current directory (and everything underneath)”.
Status check - before and after adding files
- Committing Changes
> git commit –m “<comment identifying the change>” - Any files you have created or modified that you haven’t run git add on since you edited them — won’t go into this commit.
- You can type your commit message inline with the commit command by specifying it after a -m flag
- Every time you perform a commit, you’re recording a snapshot of your project that you can revert to or compare to later. Commit little and often.
- Any files you have created or modified that you haven’t run git add on since you edited them — won’t go into this commit.
- You can type your commit message inline with the commit command by specifying it after a -m flag
- Every time you perform a commit, you’re recording a snapshot of your project that you can revert to or compare to later. Commit little and often.
-
Local Operations
Files in the repo can be in 3 states:
1. Modified (the file has been changed but not been committed to database).
2. Staged (a marked modified file in its current version to go into your next commit snapshot)
3. Committed (data is safely stored in your local git database)
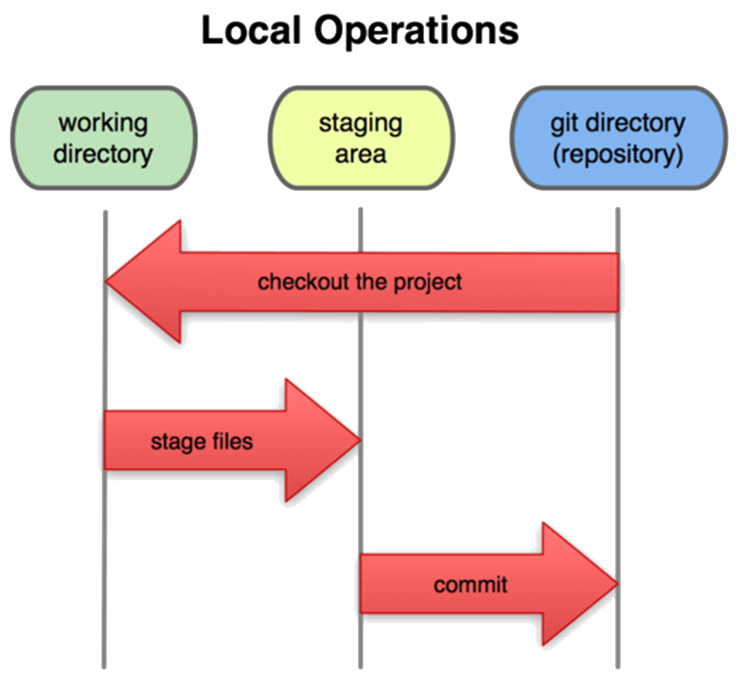
A Basic Git Workflow 1. You modify files in your working directory.
2. You stage the files, adding snapshots of them to your staging area.
3. You commit, which takes the files as they are in the staging area and stores that snapshot permanently to your Git directory.
- Working with Remotes
- Remote repositories are versions of your project that are hosted on the Internet / network.
- To see which remote servers you have configured: run the git remote command.
> git remote –v - Lists the shortnames and url (if used with flag –v)
- By convention, the default remote repository is called "origin“
- To add a "short name", such as origin (or any other alias to a URL):
> git remote add origin <url>
- Pushing to the Remote (Origin)
- When you want to share your project: push it upstream.
- Command:
- > git push [remote-name] [branch-name].
- > git push origin master