-
Graphical User Interfaces
As discussed on week 1 presentation part 2, the Android platform has been designed to run on a different types of device, screen sizes, and screen resolutions. This impose lots of challenges to android developers in terms of providing rich components of user interfaces (UI) in response to the need of the specific applications. To overcome this, Android provides a user interfaces(UI) toolkit that can be used by developers to customise UI components of an applications. Android developers relies heavily on using XML framework to create liquid layout that can adapt to these environmental changes.
- In this week, we are going to use practical ways to shape this framework to fit your specific development needs. There are two important classes in the construction of graphical user interfaces, these are:
- Views
- ViewGroups
Views
The View class represents the basic building block for user interface components. A View occupies a rectangular area on the screen and is responsible for drawing and event handling.
View is the base class for graphical components, which are used to create interactive UI components e.g. buttons, labels, edit boxes etc..
ViewGroup
The ViewGroup subclass is the base class for layouts, which are invisible containers that hold other Views (or other ViewGroups) and define their layout properties ViewGroups will be dealt with separately. For more discussion of Views and ViewGroups click 🔗 here 1
-
Graphical Components
Initial appearance as defined at Design time is defined in the xml file contained in the layout folder. This file is usually called main.xml. Changes to the appearance of the graphical components are achieved via Java Code at run time.
1 - 🔗 https://www.studytonight.com/android/introduction-to-views
Basic Building Blocks
- There are a number of basic components that can be used to make a good effect in a range of applications such as:
- TextView - a user interface element that displays text to the user and to provide user-editable text
- EditText - a user interface element for entering and modifying text.
- Button - used to instigate an “Action”
TextView
TextView is a user interface element that displays text to the user and to provide user-editable text.
The following code sample shows a typical use, with an XML layout and code to modify the contents of the text view:
<LinearLayout xmlns:android="http://schemas.android.com/apk/res/android"
      android:orientation="vertical"
      android:layout_width="fill_parent"
      android:layout_height="fill_parent"
    >

<TextView
    android:id="@+id/salutation"
    android:layout_width="fill_parent"
    android:layout_height="wrap_content"
    android:textSize="20sp"
    android:text="Welcome to Mobile Platform Development"
    />
So you should treat the TextView widget as a label and use it to “label” other objects. The initial appearance of the app is the same as the default background colour. There is no border.
In Java code, you can use setText(“This is some text”); to sets the text to be displayed and use getText() to retrieve the text that TextView is displaying. Here’s a sample code for it.
myTextView.setText(“Length”);
astring = myTextView.getText();
-
Basic Building Blocks
Other basic components for graphical user interface as outlined on tab 2.1 are EditText and button.
EditText
A user interface element for entering and modifying text. For example, for plain text input set inputType to "text": So EditText can be used to enter “data” for your application where’s “Visible” keypad can be customized i.e. numbers letters etc. and the default appearance includes a border.
Again here you can use getText() to retrieve the data entered, note that getText() returns an object of type Editable e.g.
Editable anItem= inputBox.getText();
stringLength = anItem.toString();
The toString method here is used to convert a string as required to say a numerical type, but in general, the toString method returns a string that "textually represents" this object.
Button
A user interface element when the user tap or click to perform an action. To display a button in an activity, add a button to the activity's layout XML file and a default appearance includes a border. Action is carried out in a “listener method” and the listener needs to be “attached” to object(s) of interest. So, to specify an action when the button is pressed, set a click listener on the button object in the corresponding activity code:
<Button
     android:id="@+id/button_id"
     android:layout_height="wrap_content"
     android:layout_width="wrap_content"
     android:text="@string/self_destruct" />
See separate handout in the footnote for this week for “Manipulating GUI Objects, Listeners, Event Handlers and a note on Debugging”
-
Controlling Data input
Every text field in android studio expects a certain type of text input, such as an email address, phone number, or just plain text. So it's important that you specify the input type of the text field and include an entry in the main.xml for each EditText that you require customised, input as can be seen in a sample code below.
<EditText
         …….
         android:inputType="textCapWords"
         …….
</EditText
Options for Input Type
textPersonName
textPostalAddress
textPassword
textVisiblePassword
textWebEditText
textFilter
textPhonetic
number
numberSigned
numberDecimal
phone
datetime
date
timetext
textCapCharacters
textCapWords
textCapSentences
textAutoCorrect
textAutoComplete
textMultiLine
textImeMultiLine
textNoSuggestions
textUri
textEmailAddress
textEmailSubject
textShortMessage
textLongMessageCustomising Appearance
customising appearance of the widgets can be done by first adding borders to the widgets. This can be achieved by adding XML code to create a border around a TextView object. The best approach to this is to define the border in an XML file and then “refer” to this in an “attribute” of the component. The sample code below shows xml code snippet on how to add a border around a TextView object in an xml file.
<TextView
    	android:layout_width="fill_parent"
    	android:layout_height="wrap_content"
    	android:text="@string/hello"
    	android:background="@drawable/theborder"
 />
The background attribute in the above code is “specified” by the xml file theborder
The border.xml
<shape xmlns:android="http://schemas.android.com/apk/res/android"> <stroke android:width="1dp" android:color="#55771B" /> <padding android:left="17dp" android:top="13dp" android:right="17dp" android:bottom="17dp" /> <corners android:radius="14dp" /> </shape> -
Changing the Background
Setting the background of your application to be something other than a “colour” can be achieved by using the background attribute as discussed before. The most efficient way to do this is again via an XML file as shown in 2 sample code below, the background patterns outline the layout then calls backrepeat.xml file to change the background.
Background Patterns
<?xml version="1.0" encoding="utf-8"?>
<LinearLayout
xmlns:android=http://schemas.android.com/apk/res/android
	android:id=“@+id/mainView”
    	android:orientation="vertical"
    	android:layout_width="fill_parent"
    	android:layout_height="fill_parent"
   	android:background="@drawable/backrepeat">

	………..

</LinearLayout>
backrepeat.xml
<bitmap
	xmlns:android="http://schemas.android.com/apk/res/android"
	android:src="@drawable/greenmarbled1"
	android:tileMode="repeat"
/>
Changing the value android:tileMode to mirror as shown below, produces a uniform appearance to the background.
android:tileMode="repeat"
X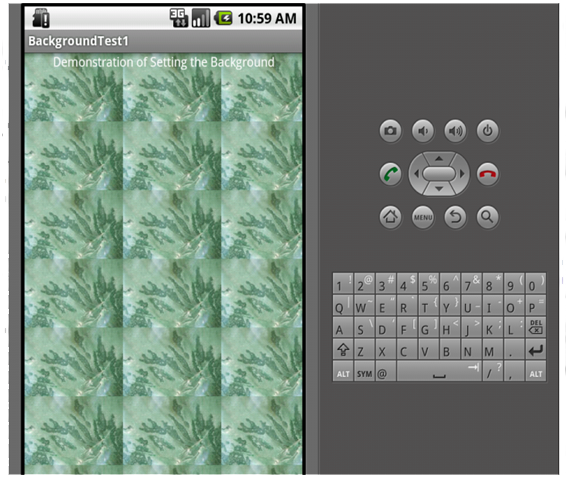 X
X
-
ViewGroup
The ViewGroup subclass is the base class for layouts, which are invisible containers that hold other Views (or other ViewGroups) and define their layout properties.
Layouts
There are a range of layouts that you can employ as an Android Developer. The available layouts in Android studio can be utilised in the construction of Graphical Interfaces are absolute, linear, relative, table and various others. These will be discussed in details.
Absolute
Absolute layout as the name suggests requires you to place the graphical components at specific locations on the screen of the Android device. So would add appropriate entries to your main.xml file.
In the Android world the top left hand corner of the screen is given the coordinates (0,0). So specifying a value for layout_x will move the graphical component to the right and specifying a value for layout_y will move the component down the screen.
In the XML text android:layout_x and android:layout_y specifies the absolute location of the top left corner of each graphical component that requires to be drawn.
Let’s look at the code for the method you called from BlueJ, speedUp in the class Rider. The full code for this is actually a bit complicated, so here’s a simpler version that shows how this interaction works more clearly (you’ll see how the full version works shortly).
Example
<AbsoluteLayout xmlns:android="http://schemas.android.com/apk/res/android" android:layout_width="fill_parent" android:layout_height="fill_parent"> <Button android:id="@+id/navigateBack" android:text="Back" android:layout_x="15px" android:layout_y="10px" android:layout_width="wrap_content" android:layout_height="wrap_content" /> </Absolutelayout> -
Frame
Frame Layout is intended to display a single item at a time. You can display multiple items in your display using Frame layout but they may overlap depending where you position them. This may be ok for some applications but not for others. This approach may be useful for a splash screen at the start of a game.
Linear
Linear Layout organises the components horizontally or vertically in terms of rows and columns. The android:orientation entry controls this aspect.
Linear Example
<LinearLayout xmlns:android="http://schemas.android.com/apk/res/android"
	android:orientation="vertical"
	android:layout_width="fill_parent"
    	android:layout_height="fill_parent">
     	<Button
    		android:id="@+id/navigateBack"
    		android:text="Back"
    		android:layout_width="wrap_content"
    		android:layout_height="wrap_content"
    	/>
    	<TextView
    		android:text="Home Telephone"
    		android:layout_width="wrap_content"
    		android:layout_height="wrap_content"
	/>
	...................

</Linearlayout>
Relative
With Relative layout the position of a graphical component can be specified in relation to another component.
Relative Layout Example
<RelativeLayout
	android:layout_width="fill_parent"
	android:layout_height="fill_parent"
	xmlns:android="http://schemas.android.com/apk/res/android">
	<Button
 		android:id="@+id/navigateBack"
 		android:text="Back"
 		android:textSize="20dip"
 		android:layout_width="wrap_content"
 		android:layout_height="wrap_content"
	/>
	<TextView
   		android:id="@+id/homeTelephoneLabel"
   		android:text="Home Telephone"
   		android:textSize="20dip"
   		android:layout_width="wrap_content"
   		android:layout_height="wrap_content"
   		android:layout_below="@id/navigateBack"
	/>
 …….
</RelativeLayout>
For a full list of Relative Layout Parameters see the link below.
-
Table
Table is another type of layout as the name suggests provides a way to lay graphical components out as rows and columns in a grid arrangement. The interface to some applications lends itself to this type of arrangement. The classic example here is the Dialer app in Android in which the keypad and the text pad is laid out in a grid format.
Example Table Layout
<TableLayout
android:layout_width="fill_parent"
android:layout_height="fill_parent"
xmlns:android="http://schemas.android.com/apk/res/android">
	<TableRow>
		……….
	</TableRow>
	<TableRow>
		<TextView
     			android:text="Home Telephone"
     			android:layout_width="wrap_content"
    			android:layout_height="wrap_content"
     			android:layout_column="1"
   		 />
    		 <EditText
    			 android:id="@+id/editHomeTelephone"
     			android:width="100px"
     			android:layout_width="wrap_content"
     			android:layout_height="wrap_content"
   		 />
		……………….

	</TableRow>

</Tablelayout>
ScrollView
This is a Layout container for a view hierarchy that can be scrolled by the user. This means that it can be larger than the physical display.
A ScrollView is a FrameLayout, meaning you should place one child in it containing the entire contents to scroll.
This child may itself be a layout manager with a complex hierarchy of objects. A child that is often used is a LinearLayout in a vertical orientation, presenting a vertical array of top-level items that the user can scroll through.
XML for ScrollView
<ScrollView xmlns:android="http://schemas.android.com/apk/res/android" xmlns:tools="http://schemas.android.com/tools" android:layout_width="fill_parent" android:layout_height="fill_parent" tools:context=".ScrollTestActivity" > <LinearLayout android:id="@+id/linearLayout2" android:layout_width="fill_parent" android:layout_height="wrap_content" android:orientation="vertical" > <TextView android:layout_width="wrap_content" android:layout_height="wrap_content" android:text="@string/label1" android:textSize="40sp" /> <!– etc. -> </LinearLayout> </ScollView> -
Landscape and Portrait
Portrait and landscape layouts need to be handled separately by your application
Include a Portrait layout and a Landscape layout
Handling Portrait and Landscape modes
Create 2 activity_main.xml files one for landscape mode and one for portrait mode and put these 2 activity_main.xml files into the res folder as shown below
/res/layout-land/activity_main.xml
/res/layout-port/activity_main.xml
Android Studio
- Creating Separate Layouts for Landscape and Portrait
- Make sure you are in “Project Files” view and not “Android” view
- Directory name layout-land or layout-port
- Resource Type layout
Detecting Orientation in code
public void onConfigurationChanges(Configuration newConfig)
{
		Configuration c =
			getResources().getConfiguration();
		if (c.configuration ==
			Configuration.ORIENTATION_PORTRAIT)
		{
			// portrait
		}
		else if (c.configuration ==
			 Configuration.ORIENTATION_LANDSCAPE)
		{
			// landscape
		}
}
Changing Orientation
The following screenshots outline how to switch modes when you are running the Android Emulator.
You can make use of the 2 rotate options shown on the right hand side of the emulator.
X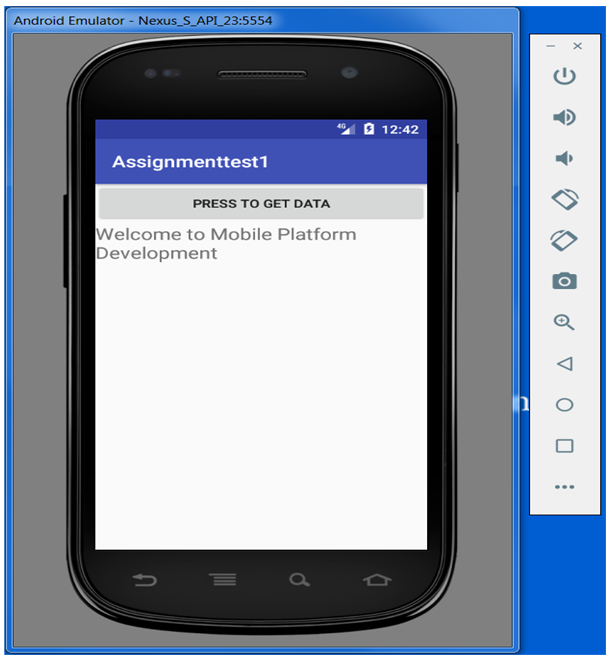 X
X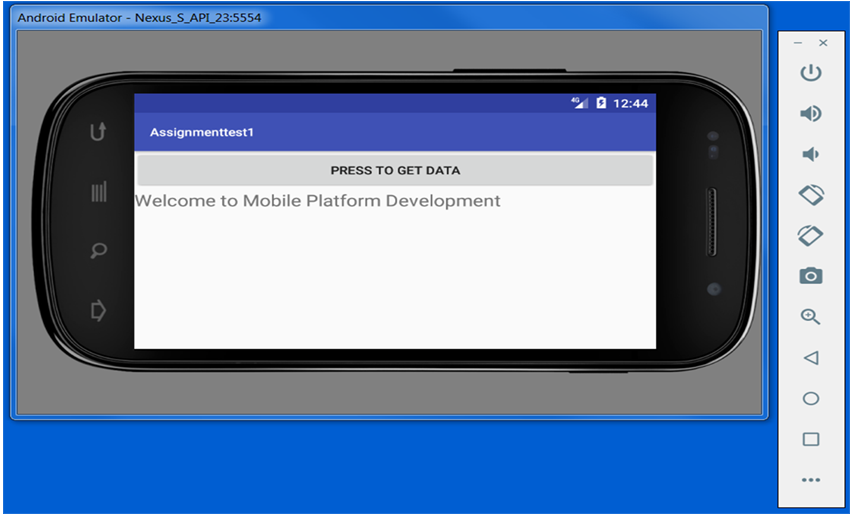
-
Events
Handling Events
“On Android, there's more than one way to intercept the events from a user's interaction with your application. When considering events within your user interface, the approach is to capture the events from the specific View object that the user interacts with. The View class provides the means to do so.”
On Android studio, there’s different ways to intercept with events when user interact with your application. The approach is to capture the events from a specific View object that the user interacts with within your user interface. This can be achieved by using the View class method.
There are several public callback methods within the view classes that are called by Android framework when an e/object is triggered within the user interfaces. For example, when a View method (such as a Button) is clicked, the onClick() is called on that object. And for this to work, you will need to extend the class and override the method and use the View class which contains a collection of nested interfaces called event listeners that are used to capture user inputs during interactions within the user interfaces.
Event Listener
“An event listener is an interface in the View class that contains a single callback method. These methods will be called by the Android framework when the View to which the listener has been registered is triggered by user interaction with the item in the UI.”1
onClick/onClickListener
onClick()From View.OnClickListener is called when the user either touches (when in touch mode), click the item or focuses upon the item with the navigation-keys or trackball and presses the suitable "enter" key or presses down on the trackball.
- Click Events
- Activity class implements OnClickListener interface
- Implements the onClick method
- SetOnClickListener for each interested object
onClick
public void onClick (View v)
{
	if (v == button3)
	{
		// do domething
	}
}
Long Click
onLongClick()From View.OnLongClickListener. This is called when the user either touches and holds the item (when in touch mode), or focuses upon the item with the navigation-keys or trackball and presses and holds the suitable "enter" key or presses and holds down on the trackball (for one second).
- OnLongClickListener/onLongClick
- Activity class implements OnLongClickListener interface
- Implements the onLongClick method
- SetOnLongClickListener for each interested object
onLongClick
public boolean onLongClick (View v) { boolean status = false; if (v == button4) { // do domething status = true; } return status; }- onTouch/OnTouchListener
- Activity class implements OnTouchListener interface
- Implements the onTouch method and returns true if event “consumed”
- SetOnTouchListener for each interested object
onTouch
public boolean onTouch (View v)
{
boolean status = false;
	if (v == button3)
	{
		// do domething
		status = true;
	}
	return status;
}
1. http://developer.android.com/guide/topics/ui/ui-events.html
-
Parsing
Parsing is when you analyse text by looking for sequences of tokens. The analysis is being carried out to determine the grammatical structure of the text. In our case we will be analysing XML text to “pick” out useful data.
XML Data
See XML Data for Assignment.
PullParser
- Android supports the XML Pull Parser interface. The Pull Parser approach requires the developer to “look for” events such as:
- Start of Document
- End of Document
- Start Tag
- Etc.
PullParser Setup
XmlPullParserFactory factory = XmlPullParserFactory.newInstance();
factory.setNamespaceAware(true);
XmlPullParser xpp = factory.newPullParser();
xpp.setInput( new StringReader ( dataToParse ) );
Where dataToParse is a String object.
PullParser
- Android supports the XML Pull Parser interface. There are a number of useful methods
- getEventType()
- getName()
- next()
- nextText()
PullParser
The XML Pull Parser approach generates events. It is these events that are of interest to the programmer who requires to extract information from the various tags in an XML document.
next() provides access to high level parsing events
nextText() provides the text if the current event is START_TAG
- Note how next() is used in the examples
- The current event state of the parser can be determined by calling the getEventType() method.
- Initially, the parser is in the START_DOCUMENT state.
- The method next() advances the parser to the next event. The int value returned from next determines the current parser state and is identical to the value returned from following calls to getEventType ().
- The following event types are seen by next()
- START_TAG An XML start tag was read.
- TEXT Text content was read; the text content can be retrieved using the getText() method. (when in validating mode next() will not report ignorable whitespace, use nextToken() instead)
- END_TAG An end tag was read
- END_DOCUMENT No more events are available
Sample Code
XmlPullParserFactory factory = XmlPullParserFactory.newInstance();

         factory.setNamespaceAware(true);
         XmlPullParser xpp = factory.newPullParser();
         xpp.setInput( new StringReader ( "<foo>Hello World!</foo>" ) );
         int eventType = xpp.getEventType();
         while (eventType != XmlPullParser.END_DOCUMENT) {
          if(eventType == XmlPullParser.START_DOCUMENT) {
              System.out.println("Start document");
          } else if(eventType == XmlPullParser.START_TAG) {
              System.out.println("Start tag "+xpp.getName());
          } else if(eventType == XmlPullParser.END_TAG) {
              System.out.println("End tag "+xpp.getName());
          } else if(eventType == XmlPullParser.TEXT) {
              System.out.println("Text "+xpp.getText());
          }
          eventType = xpp.next();
         }
         System.out.println("End document")
Full Sample Code can be viewed here
Example
Let’s have a look at more complex example
XML String
Let’s assume that we need to “parse” the following XML string
<WidgetCollection>
     <Widget>
         <Bolt>M8 x 100</Bolt>
         <Nut>M8 Hex</Nut>
         <Washer>M8 Penny Washers</Washer>
     </Widget>
</WidgetCollection>
Information Required
- The information that we want to extract from the code above is:
- M8 x 100
- M8 Hex
- M8 Penny Washers
So we probably need a Widget class to store these data and a collection to store the widgets.
Widget Class
public class Widget
{
private String bolt;
private String nut;
private String washer;

// Constructors plus get and set methods
}
Collection Class
import java.util.LinkedList;
private LinkedList<Widget> alist;
alist = new LinkedList<Widget> ();
  alist.add(aWidget);
Retrieving the Data
public LinkedList<Widget> retrieveWidget()
{
    return alist;
}
Class and Collection
- You need to decide where to put:
- the creation of the Widget class
- the creation of the Collection
See lab exercise.