-
Android Life Cycle
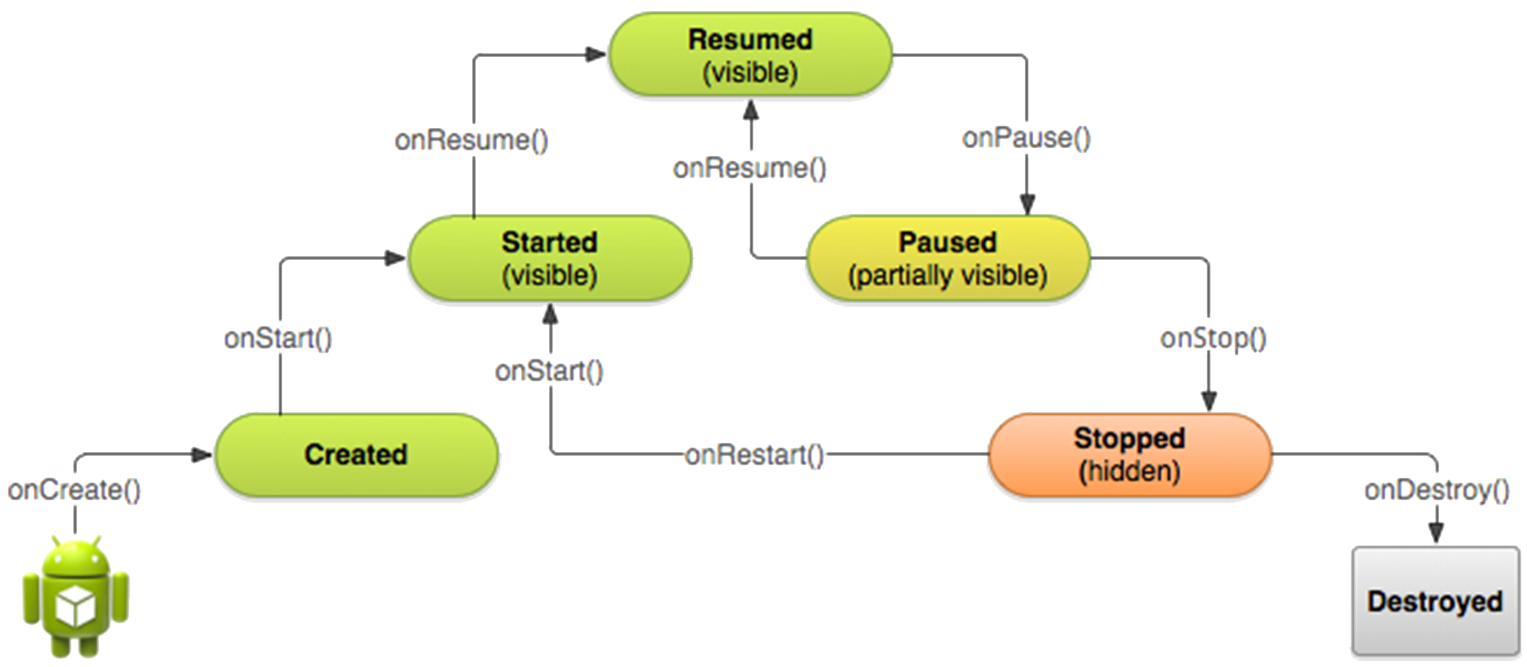
Activity Life-Cycle is a core set of lifecycle methods in a sequence similar to a step pyramid. Each stage of the activity lifecycle is a separate step on the pyramid. As the system creates a new activity instance, each callback method moves the activity state one step toward the top. The top of the pyramid is the point at which the activity is running in the foreground and the user can interact with it.
- Activity Life-Cycle States
- Created
- Started
- Resumed
- Paused
- Stopped
- Destroyed
Android Activity LifeCycle model
-
Active/Running State
This is a state when an activity is in the front and has focus in it. It is completely visible and active to the user. It is activated when the methods onCreate(), onStart(), onResume() have been executed.
Paused
In paused state, the activity is partially visible to the user but not active and lost focus. This occurs when some other Activity is on top of this one which does not cover the entire screen or having some transparency so that the underlying Activity is partially visible. A paused activity is completely alive and maintains its state, but it can be killed by system under low memory when memory can be freed by no other ways.
Stopped
This is when the Activity is no longer visible in the screen. Another activity is on top of it and completely obscures its view. In this state also the activity is alive and preserves its state, but more likely to be killed by the system to free resources whenever necessary.
Destroyed
An Activity is said to be dead or destroyed when it no longer exists in the memory. Either the Activity hasn’t been started yet or once it was started and killed by the system in Paused or Stopped state to free resources.
-
Activity Life Cycle
Depending on the complexity of your activity, you probably don't need to implement all the lifecycle methods.
Starting an Activity
When creating a new instance of an activity the system calls onCreate(), onStart(), and onResume() in sequence. Once this sequence of callbacks is complete, the activity reaches the Resumed state where users can interact with the activity until they switch to a different activity.
When we launch an Activity in Android, it first calls the onCreate() method. This is where we do User Interface creation and initialization of data elements. This method is provided with a Bundle object as parameter to restore the UI state.
onStart() method is called before the Activity is being visible to the User. Remember that Activity is still not Active.
With the onResume() method, the Activity becomes visible and Active for the user to interact with. The Activity will be at the top of the Activity stack at this point. Now the Activity is in running /active state and is able to receive user inputs.
-
Basic LifeCycle
Pausing and Resuming an Activity
When the system calls onPause() for your activity, it technically means your activity is still partially visible, but most often is an indication that the user is leaving the activity and it will soon enter the Stopped state. You should usually use the onPause() callback to stop animations or other ongoing actions that could consume CPU. Commit unsaved changes, but only if users expect such changes to be permanently saved when they leave (such as a draft email). Release system resources, such as broadcast receivers, handles to sensors (like GPS), or any resources that may affect battery life while your activity is paused, and the user does not need them.
Paused State
An Activity can remain in the paused state if the user has pressed the home button, another activity or notification which is on top of it doesn’t completely obscures the visibility of underlying Activity and when the device goes to sleep.
You should keep the amount of operations done in the onPause() method relatively simple in order to allow for a speedy transition to the user's next destination if your activity is actually being stopped. You should perform heavy-load shutdown operations during onStop().
Resume State
You should implement onResume() to initialize components that you release during onPause() and perform any other initializations that must occur each time the activity enters the Resumed state (such as begin animations and initialize components only used while the activity has user focus).
-
Basic LifeCycle
Stopping and Restarting an Activity
The Activity class provides two lifecycle methods, onStop() and onRestart(), which allow you to specifically handle how your activity handles being stopped and restarted.
Unlike the paused state, which identifies a partial UI obstruction, the stopped state guarantees that the UI is no longer visible, and the user's focus is in a separate activity (or an entirely separate app).
The system retains your Activity instance in system memory when it is stopped. It is possible that you don't need to implement the onStop() and onRestart() or even onStart() methods at all.
For most activities that are relatively simple, the activity will stop and restart just fine and you might only need to use onPause() to pause on going actions and disconnect from system resources.
Activities and States
The link below details more on the lifecycle of an Activity.
🔗 http://developer.android.com/guide/components/activities.html
-
Google Map Apps in Android
Creating a map App
To create a map app, you first need a Google account. This is because you need to generate a “key” to allow you to access the map APIs. Use the Google Maps Activity to generate the necessary files.
Generating a key
Once you have created a Google Maps project in Android Studio. Then go to
https://console.developers.google.com/flows/enableapi?apiid=maps_android_backend&keyType=CLIENT_SIDE_ANDROID&r XXXXXX
You will find this link in the google_maps_api.xml file in the values folder. Add the key generated to the google_maps_key entry in the google_maps_api file.
Google_maps_api.xml<resources> <!-- TODO: Before you run your application, you need a Google Maps API key. To get one, follow this link, follow the directions and press "Create" at the end: https://console.developers.google.com/flows/enableapi?apiid=maps_android_backend&keyType=CLIENT_SIDE_ANDROID& r=B7:06:8B:AA:A0:58:C6:9B:8A:B9:29:09:CE:46:03:35:B7:8B:D7:8F%3Bmyandroidstuff.me.org.maptestapp1 You can also add your credentials to an existing key, using these values: Package name: B7:06:8B:AA:A0:58:C6:9B:8A:B9:29:09:CE:46:03:35:B7:8B:D7:8F SHA-1 certificate fingerprint: B7:06:8B:AA:A0:58:C6:9B:8A:B9:29:09:CE:46:03:35:B7:8B:D7:8F Alternatively, follow the directions here: https://developers.google.com/maps/documentation/android/start#get-key Once you have your key (it starts with "AIza"), replace the "google_maps_key" string in this file --> <stringname="google_maps_key"templateMergeStrategy="preserve"translatable="false">generatedKeyisPlacedHere </string> </resources> -
Manifest File
Information about the key is then added to the manifest file and a permission entry is added to the manifest file as well. Check this out once you have entered the key and built the programme.
Running the app at this stage
Generated Code
public class MapsActivity extends FragmentActivity implements OnMapReadyCallback
{
	protected void onCreate(Bundle savedInstanceState)
	{
	}
	public void onMapReady(GoogleMap googleMap)
	{
	}
}
Fragments
The above example uses Fragments. A Fragment is a portion of a user interface in an activity. Fragments can be combined in an activity to build multi pane User interfaces and can be reused in multiple activities.
- Map Actions
- Add markers
- Zoom in and out
- Change map style
What’s next?!
A simple example which illustrates the use of a Google map Fragment is attached. This example is an application which places a map fragment in the main_activity.xml file and then access it from Java code. The Java code accesses the fragment and registers a callback that is used when the map is ready. A marker is then placed on Glasgow in the map. The user is able to flip between the map and a settings screen. The settings screen allows the user to change the appearance of the map.
A couple of examples of using Fragments are attached in zip files along with some commentary are provided for you and can be accessed on the sample code tab within this presentation or at the footnote.
You will need to build create the projects and add in the code. Details are in the attached commentary.