- Intro
- Code
- 11.1
- 11.2
- 11.3
- 11.4
- 11.5
- 11.6
- 11.7
- 11.8
- 11.9
- 11.10
- 11.11
- 11.12
- 11.13
- 11.14
- 11.15
- Summary
-
11.1 Increment 4: Completing the game
In this final increment we will complete the GCU adventure game. This means we have to meet the following requirements that were not met in the previous increments:
● The sequence of turns should repeat until a command is given to quit
● At each turn, the player can type a command to specify the action which he or she wants to take during that turn
● The player should be able to ask for help during any turn instead of navigatingMeeting these requirements will give a program that behaves like a game and allows the player to engage and interact with the game. It is worth noting that although the game is a very simple one which is not really fun to play, the model we have built, using sound object oriented principles and practices, would provide a solid basis for the development of a more complex and interesting version of the game.
-
11.2 Introducing interactivity - handling commands
Up to this point the adventure game is lacking in interactivity. There is no way for someone who is playing the game to control what happens. In a text-based adventure game, players interact with the game by typing commands. There is usually a limited set of commands that the game understands and which may cause some change in the game state. The user can type anything at all, but only valid commands will be understood.
An example of a command might be:
go west
The result of this command would be that the Player object would go to another room, using the exit from the current room marked west. The first command word (go) indicates the type of action to take, while the second command word (west) gives additional information about how to perform the action.
Some commands may have only one command word, for example:
help
This command would simply list the valid (first) command words in the game.
The design of the Player class will change now so that instead of simply using the objects in the current room, the takeTurn method will have a wider range of possible actions. This will be achieved by having the takeTurn method process a command.
-
11.3 The Command class
A command is fairly simple –just one, or possibly two, strings. It will be useful, though, to have a class that represents a command. The Player object will then process a Command object within its takeTurn method, and perform the requested action. It will be easier to write the new code in Player to do this if it can get a command as a single object rather than two separate strings.
We can also put some additional methods into Command to make it more convenient to use. A method hasSecondWord will provide an easy way to check whether a one-word or two-word command has been entered. Another method isUnknown will provide an easy way to check whether a command with an invalid first word has been entered.
Here is the code for the Command class:
public class Command
{
    private String commandWord;
    private String secondWord;

    public Command(String commandWord, String secondWord)
    {
        this.commandWord = commandWord;
        this.secondWord = secondWord;
    }

    public String getCommandWord()
    {
        return commandWord;
    }

    public String getSecondWord()
    {
        return secondWord;
    }

    public boolean isUnknown()
    {
        return (commandWord.equals("?"));
    }

    public boolean hasSecondWord()
    {
        return (secondWord != null);
    }
}
📹 WATCH DEMO: Creating instances of CommandX -
11.4 Relationship between Player and Command
There needs to be a relationship between Player and Command because a Player object will need to be able to send messages to a Command object to, for example, get the command words.
The Player object does not need to own the Command, it simply uses it in order to get information about what action to perform. This is another example of the 💡 “uses-a” pattern.
There is an interesting difference between the Player-Item relationship that you saw previously and the Player-Command relationship. An Item exists as part of the game world - it belongs to a Room and stays there ready to be used by any Player who enters the Room. However, a Command object only needs to exist while it is being processed. As soon as it has been processed, and the player’s turn in complete, that Command object is no longer needed and ceases to exist. The next turn will create a completely new Command object to be processed. Command objects are temporary objects.
The code pattern is similar, though. The revised version of the takeTurn method of Player now has a local variable of type Command.
public boolean takeTurn()
    {
        Command command = ??
        return processCommand(command);
    }
processCommand will be a new method in Player which will contain the code which performs the action indicated by the Command. Note that we haven’t yet decided how the Command will be created (hence the ?? which needs to be replaced at some point with some actual code), so this method is still not complete.
Note that the takeTurn method now returns a boolean value, which will be used in the game loop to decide whether to exit the loop after this turn.
XCODE PATTERN: “USES-A”
Problem: how do you implement a “uses-a” relationship, where an object needs to send a message to another object
Solution: the class which needs to send the message has a method parameter or local variable whose type is the name of the other class.
-
11.5 Turning user input into a Command
There is something missing here. We need something that will do the job of taking the players’ keyboard input and turning it into commands that can be processed. The player could potentially type anything at all – one word, two words or more; valid or invalid commands; complete or partial commands.
This “something” needs to:
● Read in a line of text typed at the command prompt
● Split the input text into individual words
● Check that the first word is a valid command word
● Construct a Command object using the first word and the second word (if there is one), ignoring any additional words -
11.6 The Parser class
In an object-oriented program, “something” is usually an object. We will need an object or objects that can do this job, and so we will need a class to allow these objects to be created. We didn’t identify this class at the start of the development process – the need for it has only become clear when looking in more detail at the implementation of one of the requirements.
The class will be called Parser. A Parser object will not represent an entity or concept in the game. Instead, Parser is class that performs a specific role in the program.
Parser is related to both Player and Command. Here is the class diagram for these classes:
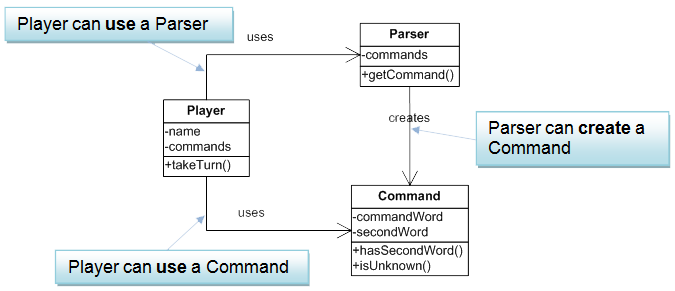
The relationship between Player and Parser is very similar to that between Player and Command – a Player object uses a Parser object. The Parser only needs to exist while it is doing its job.
-
11.7 Relationship between Parser and Command
A key part of the job of a Parser object is to create a new Command. The relationship between Parser and Command is an example of a 💡 new pattern.
Note that these three classes work together as follows:
● A Player uses a Parser to read input and create a Command
● The Player then uses that Command to decide what action to performThe following listing shows some key features of the code for the Parser class. You can download the full code if you want to look at the details of the compete class.
public class Parser
{
    // holds all valid command words
    private String[] commands;
    // source of command input
    private Scanner reader;

    public Parser(String[] commands)
    {
        this.commands = commands;
        reader = new Scanner(System.in);
    }

    public Command getCommand()
    {
        // will hold the full input line
        String inputLine;
        String word1 = null;
        String word2 = null;

        // print prompt
        System.out.print("> ");
        inputLine = reader.nextLine();

        // Find up to two words on the line
        ...

        // replace any invalid command word with ?
        if(!isValidCommand(word1))
        {
            word1 = "?";
        }

        // construct and returns Command
        return new Command(word1, word2);
    }

    private boolean isValidCommand(String commandWord)
    {
       // checks whether commandWord is in array of valid commands
	...
    }

    public String showCommands()
    {
	// returns a list of valid commands
	...
    }
}
The next demo shows how a Parser object can be created to turn user input into a Command object.
📹 WATCH DEMO: Using a Parser object to create a Command objectXCODE PATTERN: “CREATES-A”
Problem: how do you implement a “creates” relationship, where an object creates an instance of another class?
Solution: the class which creates the instance has a method which returns a value whose type is the name of the other class. The instance is newly constructed within this method.
X -
11.8 How a Player uses a Parser to create a Command
We can now fill in the rest of the takeTurn method in Player:
public boolean takeTurn()
{
  Parser parser = new Parser(commands);
  Command command = parser.getCommand();
  return processCommand(command);
}
The variable commands is an array of type String which contains a list of all the valid command words which the Player can process. The command list is defined as a field in Player, which is then passed into the constructor of Parser.
// valid command words
private String[] commands = {"go","quit","help"};
The Parser and Command classes have no knowledge in advance of the actual list of valid commands, and will work with any list supplied by Player (or indeed by any other class which may use them). If we decide to add more commands later, then the only class that needs to be changed is the Player class.
Note that we are giving the Player class the responsibility of knowing what commands are valid. As you will see shortly this makes sense as we also give the Player class the responsibility for processing the command, so it will have to know what commands it can process. It is not completely obvious that these responsibilities belong to Player – we could probably have come up with an equally satisfactory design where these are the responsibilities of the Game itself. In object oriented programming there is not always just one possible way to solve a problem.
-
11.9 Processing a Command
The Player class has a method processCommand that uses the command word of a Command to decide what action to take. It can do one of the following:
● print a message if the command word is “?” (the value set if the user input is not recognised)
● print a help message if the command word is “help”
● go to another room if the command word is “go”
● return true if the command word is “quit” – this will act as a flag to stop the game loopThis method is private – it is not intended to be used by a call from another object. The method will only be called from methods within the Player class. In fact, it will only be called when the takeTurn method runs. It is defined as a separate method to make the code in the Player class more readable and cohesive.
In the case of a “go” command, the Command object will be passed to another private method, goRoom, which will use the second word of the command to decide which exit to go through. In the case of a “help” command, another private method printHelp will be called. In the case of a “quit” command, this method will return true, and will return false otherwise – the return value will be used to decide whether to end to game after this turn.
The code for processCommand is listed here.
private boolean processCommand(Command command) { boolean quit = false; // get command word and use to select option String commandWord = command.getCommandWord(); if(commandWord.equals("?")) { System.out.println("I don't know what you mean..."); } else if (commandWord.equals("help")) { printHelp(); } else if (commandWord.equals("go")) { goRoom(command); } else if (commandWord.equals("quit")) { System.out.println("the game will finish at the end of this round"); quit = true; } return quit; } -
11.10 The switch statement
The sequence of if and else statements in the above code is a rather clumsy way of selecting from a list of choices based on the value of a variable. The switch statement is a statement that can make this arguably more elegant and readable. In a switch statement a variable is input as a condition that will determine the choice to be made. For each choice there is a case, or an action to be carried out. Each case is defined as a sequence of statements, which should end in a break statement.
The selection statement above can be replaced with the following switch statement. The condition variable in a switch statement can be an integer, character or string (note that in older versions of Java, prior to Java 7, strings were not allowed).
// get command word and use to select option String commandWord = command.getCommandWord(); switch(commandWord) { case "?": System.out.println("I don't know what you mean..."); break; case "help": printHelp(); break; case "go": goRoom(command); break; case "quit": System.out.println("the game will finish at the end of this round"); quit = true; break; } -
11.11 The goRoom method
The goRoom method is called if the command word is “go”. Here is part of the code for this method, giving an outline of how this works.
public void goRoom(Command command)
{
    if(!command.hasSecondWord()) {
      System.out.println("Go where?");
    }
    else
    {
      String direction = command.getSecondWord();

      Room nextRoom = this.getCurrentRoom().getExit(direction);

      if (nextRoom == null)
      {
        System.out.println("There is no door!");
      }
      else
      {
        this.setCurrentRoom(nextRoom);
        System.out.println(this.getCurrentRoom().
        getDescription());
        // use the items in the room
            ...
       }
    }
}
The first part of the code checks whether the command has a second word – the player can’t move unless a direction is specified.
If the command has a second word, then we ask the current room for an exit with a label matching the second word, using the getExit method. If there is an exit with this label, we change the current room of the player to the room which that exit refers to.
The complete version of this method also loops through the items in the new room and calls the use method of each one. The code here is based on the code that we used in the takeTurn method of Player in previous increments before refactoring that method to process commands. You can download the full code from GCULearn if you want to look at the compete method.
-
11.12 The modified game loop
We are nearly finished the game. The last thing we will have to do is to modify the game loop, which is in the play method of Game. The last time we looked at this it simply gave the player one turn, then stopped. Now, we can make it continue looping until the player enters a quit command.
Note that the processCommand method returns true if the command is “quit”. The takeTurn method in turn returns true to the code which calls it, which is the game loop. The game loop can then use the value returned by takeTurn to set the value of finished, the boolean variable it uses as a flag to stop the loop executing:
public void play() { printWelcome(); // Enter the main command loop. // Here we repeatedly read commands and execute them until game // is over boolean finished = false; do { System.out.println("Player: " + player.getName()); finished = player.takeTurn(); } while (! finished); System.out.println("Thank you for playing. Good bye."); } -
11.13 Running the game
We can run the game simply by right-clicking on the Game class in the BlueJ class diagram and selecting the main method. The output appears in the terminal window.
However, you do not expect users of your application to run it in BlueJ. Applications are usually run by clicking on an icon (for applications with a graphical user interface) or typing a command at a command prompt. BlueJ can package the game project so that it can be run at a system command prompt.
You select the Project > Create Jar File... menu option in BlueJ. This will package the contents of the project into a single, executable file, called a Jar. This is similar to a Windows .exe file.
The main method, which is the entry point which the operating system needs to launch the application, is in the Game class, so you need to specify that this is the main class in the Create Jar File dialog.
We can then name the jar file and save it in a suitable location, for example C:\adventure.jar.
The application can then be run by entering the command:
java –jar c:\adventure.jar
The next demo shows the adventure game program running within BlueJ, and shows it packaged into an executable jar file and run at the command prompt.
📹 WATCH DEMO: Running the completed program in BlueJ and as a JARX -
11.14 Compiling and running Java programs without an IDE
Throughout this module we have used the BlueJ IDE (Integrated Development Environment) to help manage the process of editing, compiling, testing, debugging and deploying Java applications. Most programmers use an IDE because it helps them to do their job and to be more productive. BlueJ is designed to help you to learn about object-oriented programming, while more advanced IDEs like NetBeans and Eclipse (for Java) and Visual Studio (for C#) will provide support as you develop and apply your skills.
It is, however, useful to know how to work “without a tightrope”. The Java JDK provides a range of command prompt tools which, together with a simple text editor, can be used to create and run Java programs without an IDE. We have just looked at one example, the java command, which can be used to execute a JAR file created with BlueJ.
Here, we will look at how the adventure game application can be compiled and run using command prompt tools. There are also many other tools in the JDK, including the javadoc tool for creating documentation.
Compiling
The Java compiler is called javac. To compile a Java source file, for example Game.java, you use the command:
javac Game.java
The command:
javac *.java
uses the wildcard character * to select all Java source files in a folder and compile them. A compiled .class file is created for each class in the Java source files.
Setting paths
Note that for this to work, the folder which contains the file javac.exe needs to be in the current path. Javac.exe is usually in a folder called bin within the JDK installation folder. You may need to add the Java bin folder to your path.
In Windows, the PATH environment variable contains a list of folders that Windows will search in when it is asked to execute a file that is not in the current folder. Other operating systems that support Java have similar environment variables that need to be set.
Instructions for setting the PATH variable for various operating systems can be found at http://java.com/en/download/help/path.xml
Running
We can run the program by using the java command, specifying the name of the class which contains the main method. The command is:
java Game
When the Game class executes, it also requires the class files for the other classes in the game, for example Player.class and Room.class, which need to be in the current folder.
The java command is the same one we used earlier to execute a JAR file. The –jar option is required to execute a JAR. Note that the java command can also be used to create a JAR file. Deploying an application as a single JAR is more convenient than as a collection of separate class files.
The next demo shows the classes for the adventure game being compiled using javac.
📹 WATCH DEMO: Compiling Java source code at the system command promptX -
11.15 Creating documentation
You saw earlier that BlueJ can generate and show a documentation view of a class, making use of any javadoc comments you include in your code. The command line javadoc tool can do the same thing, but is much more powerful. For example, it can generate documentation for a complete program, as a set of HTML pages similar to the Java API documentation pages. In fact, Oracle’s Java API documentation is created with the javadoc tool.
The following command will generate documentation for all the source code files in the current directory, and place the results in a subfolder called docs.
javadoc –d docs *
A list of messages in the command window shows the progress of the operation. If documentation comments are incomplete, for example missing @param elements, then you will see warnings. When the operation is complete you can view the results in a web browser, and you can browse all the classes.
The next demo shows the use of the Javadoc tool and the documentation it creates for the adventure game classes.
📹 WATCH DEMO: Creating documentation with javadocX -
Summary
You’ve been introduced in this lecture to the following concepts:
Switch statement, Jars, Java command-line tools
Next week you will learn about using a more advanced Java IDE to create Graphical User Interfaces for Java programs.
Download PDF Version