- Intro
- Code
- 5.1
- 5.2
- 5.3
- 5.4
- 5.5
- 5.6
- 5.7
- 5.8
- 5.9
- 5.10
- 5.11
- 5.12
- 5.13
- 5.14
- Summary
-
Viewing the code
As you go through this chapter it will be useful to refer to the complete code for the class, available in the Code tab. You can also download a complete BlueJ project that you can open and explore in BlueJ on your computer.
-
-
5.1 The need for different types of objects
In some very simple situations you can write a program that does the job it needs to do with a single object, or perhaps with a few objects of the same type. However, the world is not always simple, and neither are the jobs which programs do. More realistically, if you try to do everything with a single class, and with just one possible type of object, you end up with a class that is overcomplicated, confused in itspurpose, and difficult to make changes to.
A better approach is to break a problem down into simple objects that work together, or collaborate, to solve the problem. Each class can then stay simple and have a clear purpose within the overall solution. Having several (or many, in complex cases) different classes allow objects of different types, with different roles, to be created.
What does the Bicycle class in the previous lectures actually represent? It represents a “mobile machine” which can respond to instructions that result in its speed changing. In some scenarios that might be all you need. However, when did you last see a bicycle moving, speeding up, slowing down, and so on, by itself? To move a bicycle needs a rider, so what you actually see on the road is a combination of a rider and a bicycle. In some scenarios it might be necessary to model in more detail. The extent to which you need to break the problem down into separate classes depends very much on the complexity of the overall job that the program needs to do.
For example, in a game you might need the rider to be able to swap to a different bicycle at some point. In that case, it makes sense to model the rider and bicycle as separate objects that can work together. For example, a rider object can give instructions, or send a message, to its bicycle object to change gear, and the bicycle can perform the corresponding action as a result.
-
5.2 Abstraction and encapsulation
The rider object only needs to know a few essential facts about a bicycle object. For example, it needs to know that the bicycle can be made to change gear, and what message needs to be sent to make it do so (in our model that’s a call to the method changeGear). It doesn’t need to know anything about the mechanism that the bicycle uses to actually change gear (that’s the code inside the method changeGear).
The process of reducing something to its essential characteristics is known as abstraction. Abstraction is a key concept in object-oriented programming. As described in the first lecture, abstraction lets us model a bicycle by representing only the characteristics that are actually important within a particular scenario. Abstraction ties in with another key concept that you were introduced to previously, encapsulation. Abstraction allows the essential things we need to represent about a bicycle to be implemented. Encapsulation then allows the bicycle to expose its capabilities, as public methods, while hiding the details of how they work. Any object that uses a bicycle object, a rider object in this case, just needs to know how to call the public methods. The set of public methods exposed by an object are sometimes known as its interface.
In this lecture you will look at the Rider class and how it interacts with the Bicycle class. You can look at the code itself in BlueJ and as before it is recommended that you do so as you read these notes. For reference, though, the code for the whole Rider class is listed at the end of this section of notes. Some small changes have been made to the Bicycle class, and these will be highlighted as needed.
-
5.3 Fields in the Rider class
The Rider class is quite simple. It only has two fields, name and bicycle, defined as follows:
public class Rider
{
   private String name;
   private Bicycle bicycle;
The field bicycle represents the bicycle that the rider is currently riding.
Let’s look at an object diagram of a rider object.
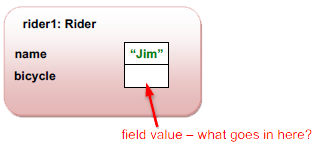
It’s easy to represent the value of the name field – the String type is a string of characters – so an example value is shown. What about the bicycle field, though? It is declared in the code as an instance variable whose type is Bicycle, so it’s an object, not a simple value.
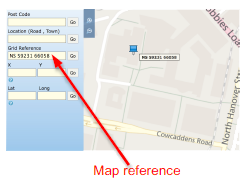
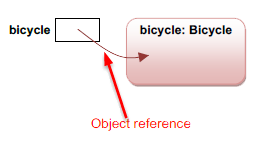
How should we show that in the diagram? We can’t really squeeze a picture of an object into the field value box, and in fact it would be wrong to try. As mentioned previously, a variable that has an object type doesn’t contain the object itself – it contains a reference to the object. You can think of a reference as an instruction for the computer to use to find the object – just like a map reference for a place is essentially an instruction how to find that place on a map. We will draw an object reference as an arrow pointing to the object.
So here’s the complete object diagram for a rider object. The bicycle field contains a reference to a Bicycle object. This tells you something very important about an instance of Rider. It’s not actually just one object;; it’s a composition of two objects of different types.
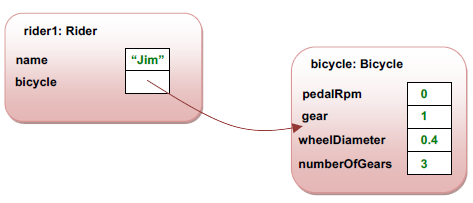
You’ve seen that in an object diagram we include the object name. As far as the rider object is concerned, the bicycle object is called bicycle (the field name), so in this case we put that in the object diagram as its object name.
💡 Read more about Strings - Primitive Type or Object Type?XYou have seen that the data type of a variable can be one of Java’s primitive types, which hold a simple value such as an integer. You have also seen that a variable can hold a reference to an object.
What about a string, as in the name field of Rider? A string is not one piece of information – it is a collection of characters. Actually, a string is an object type – it is an instance of a class String which is one of many ready-made classes which Java provides to help you. Strings are a bit special, though, as you can assign a simple string of characters, in quotes, to a String variable without using the new key word. We can represent a string conveniently in the same way in an object diagram.
-
5.4 Class diagram
Class diagrams are another useful way of visualising object-oriented programs.
Class diagrams show the classes that can be used to create objects, and essentially describe the code. The main window area in BlueJ is a simplified class diagram of the classes in your project.
On the other hand, object diagrams show the objects that are created as the program runs. The object diagram can change as the program runs, while the class diagram remains static. The object bench and object inspectors in BlueJ play the role of an object diagram.
Here is a class diagram of the Rider and Bicycle classes.
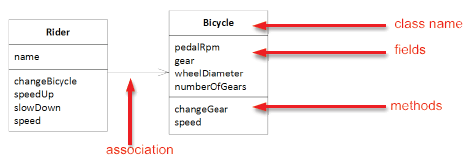
You will see more class diagrams later, but here are a few things to note for now:
● The name of the class is shown, but not an object name
● The class diagram shows field names, but not values (values belong to a specific instance, not to the class)
● The Bicycle field in Rider is not shown in the class, as it is implied by the arrow that represents an association with the Bicycle class
● The class diagram shows methods as well as fieldsNote that BlueJ doesn’t show the fields or methods in its simple version of a class diagram.
-
5.5 Creating objects that can interact
Let’s see what happens when you create a rider object. The Rider class has the following constructor:
public Rider(String name)
{
   this.name = name;
   this.bicycle = new Bicycle(0.4, 3);
}
This takes a parameter for the name of the rider. The next line does something you have seen before – it instantiates a new Bicycle object, initialises it and assigns it to a variable. The variable in this case is its own bicycle field. Note that the rider now decides what sort of bicycle (wheels/gears) it wants.
📹 WATCH DEMO: Creating interacting objectsIn the demo you see that creating a rider object in BlueJ actually created two objects, a rider and a bicycle. The bicycle object was created by code that is in the constructor of the Rider class. This demonstrates something important – objects can create other objects.
Let’s say that again, because it’s really important - objects can create other objects.
X -
5.6 Objects interacting by calling methods
Close the object inspectors. Right-click on the rider object in the object bench and call the speedUp method. Now inspect the rider object and then the bicycle object again. What has changed? You should see a different value for the pedalRpm field. How can this change? As you saw in lecture 2, the only way that the Bicycle class allows this field to be changed is by calling its setPedalRpm setter method.
You have just seen something else important – calling a method of one object can result in a method of another object being called. The two objects have interacted – the rider object has sent a message to its bicycle object.
Let’s look at the code for the method you called from BlueJ, speedUp in the class Rider. The full code for this is actually a bit complicated, so here’s a simpler version that shows how this interaction works more clearly (you’ll see how the full version works shortly).
public void speedUp()
{
   int newPedalRpm = this.bicycle.getPedalRpm();
   newPedalRpm = newPedalRpm + 50;
   this.bicycle.setPedalRpm(newPedalRpm);
}
This method gets the pedal rpm value of the rider’s bicycle, adds 50 to it and sets the pedal rpm value of the bicycle to this new value. So, the code in this method in Rider calls methods of Bicycle, so that the rider object sends messages to the bicycle object. The result of the second message is that a field of that bicycle object changes its value.
We could write this a little bit more compactly, by passing the result of adding 50 to the return value of getPedalRpm directly as a parameter to setPedalRpm. Can you see that this code is equivalent to the version above? One is not necessarily better than the other, you could write the code whichever way you prefer.
public void speedUp() { this.bicycle.setPedalRpm( this.bicycle.getPedalRpm() + 50); } -
5.7 Assigning and changing object references
The Rider class has another constructor.
public Rider(String name, Bicycle bicycle)
{
  this.name = name;
  this.bicycle = bicycle;
}
This constructor takes a second parameter whose type is Bicycle. Like fields and local variables, parameters can be variables of object types. Once the constructor has completed, the bicycle field in the rider object will now be a reference to whatever object you passed in as a parameter.
In lecture 1 you saw how to create a bicycle object and assign that object as the constructor parameter when creating a rider object. This process used this second constructor. Follow through that process again to refresh your mind.
The equivalent code is:
Bicycle bicycle1 = new Bicycle();
Rider rider1 = new Rider("Jim", bicycle1);
Here, instead of one object creating the other, you are creating two objects separately and assigning the bicycle object to the bicycle field of the rider object.
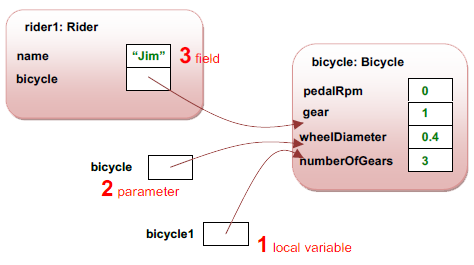
Let’s think about how we refer to that bicycle object. It is a bit of a chameleon, actually. It takes on whatever identity it needs to, depending on what is happening around it – in other words, depending on what section of code is currently running:
1. It is initially the local variable bicycle1 in the code above (program code)
2. It is then passed in as a constructor parameter to Rider, and becomes the constructor parameter bicycle (Rider constructor code)
3. Finally, the bicycle object is assigned to the bicycle field of the rider object
(Rider constructor code and instance variable)It’s important to realise that it is the same object all the way through this process. However, there are three different references to that object at different times. The constructor parameter reference is temporary – it’s only important while the constructor code is running. Here’s an object diagram that tries to show this – references which are not fields of an object are shown outside the object boxes.
What if we want a rider to be able to change to a different bicycle later on? The Rider class has a method that allows this, called changeBicyle.
public void changeBicycle(Bicycle newBicycle)
{
   this.bicycle = newBicycle;
}
This works in a similar way to the constructor – it takes a parameter that is a reference to a bicycle object and assigns a reference to it to the bicycle field. The main difference is that a method can be called any time, not just when the rider object is being initialised.
📹 WATCH DEMO: Changing an object referenceSo, to sum up, you have just seen the rider leap from a moving bicycle onto a stationary one, and start pedalling the new bicycle while the other one carries on riderless at the same speed – not very realistic, but this is just an example!
X -
5.8 Responsibilities of objects
When you are riding a bicycle in the real world, making it speed up is not quite as simple as just pedalling faster. As the speed increases, you need to change gears so that you can make the bicycle go fast without pedalling ridiculously fast.
A rider needs to learn how to use the gears efficiently to match the selected gear to the road speed. It is the rider’s responsibility to know how to do this. The bicycle does not help the rider with this– it just provides the mechanisms (pedals and gears) to allow the rider to use the knowledge. It is the responsibility of the bicycle to provide these mechanisms. Our classes should model these responsibilities.
There are some fancy bicycles being developed that have automatic gearshifts, and these take on some of the rider’s responsibilities. However, we are modelling “ordinary” bicycles here.
So how do we build this knowledge into our rider objects? Let’s look at the full version of the speedUp method – the knowledge is encapsulated in the way this method works.
Essentially, our model rider can only pedal at speeds up to 300rpm. Speeding up involves pedalling 50rpm faster than before. If this change would result in pedalling faster than 300rpm, then the rider should decide to tell the bicycle to change to a higher gear. At this point, the rider should adjust pedalling speed to match the current road speed – the road speed should not change immediately while changing gear.
public void speedUp()
{
  if((this.bicycle.getPedalRpm() + 50) > 300)
   {
     int currentGear = this.bicycle.getGear();
     changeUp();
     int newGear = this.bicycle.getGear();
     this.bicycle.setPedalRpm(
     this.bicycle.getPedalRpm() *
     currentGear / newGear);
   }
  else
   {
     this.bicycle.setPedalRpm(
     this.bicycle.getPedalRpm() + 50);
   }
}
This method makes a decision, using an if statement, based on the current pedalRpm value of the bicycle, changes gear if necessary or just increases the pedalRpm value by 50rpm otherwise. You will examine this method again later, so assume for the moment that it works.
📹 WATCH DEMO: Calling the speedUp methodX -
5.9 Private methods
Note that the speedup method of Rider calls a method changeUp. This is not a method of Bicycle, like getPedalRpm. It is a method defined in the Rider class itself. It is a helper method containing some code that will be used in several methods of Rider, and so is worth separating out into a method that can be used each time without re-writing the same code. It is not intended to be used by other objects or program code so it can be defined as private.
This method is actually quite simple, containing one line of code which sends a message to the bicycle object to change gear in a specified direction, so we are not saving much coding at all by separating it out, but using private methods like this can often be very useful for more complex tasks.
private void changeUp() { this.bicycle.changeGear(1); } -
5.10 What exactly is an object-oriented program?
You have now seen classes and objects, and seen how objects interact. We have also referred to “program code” that creates objects. But what exactly do we mean by a “program” in Java?
A program is, as you learned in the first lecture, generally thought of as a set of instructions that can be executed one after another. The program starts by executing the first instruction. You “run” a program by giving some command on the computer, for example double-clicking or tapping an icon, or typing a command at a command prompt.
Java programs are no different, but you haven’t seen anything like this yet. This is because in a well-designed Java program almost all of the work should be done by objects. So far you have learned how to create objects and call their methods (in BlueJ and with “program code”). You have also seen that code inside one class can create and call methods of objects that are instances of another class.
In a Java program, though, there is indeed a “first instruction”. To create a program that you can actually run you need to add a special method, called main into the code. The main method is the entry point of a program. Its job should be to create an object, or possibly a few objects, which can then take over and perform the tasks of the program. Execution of the program starts with the first line of code in the main method.
-
5.11 The main method
The main method has to have a very specific signature. Here is the code for a class called Program that has been added to the project.
public class Program
{
  public static void main(String[] args)
   {
     Rider r = new Rider("Jim");
     System.out.println("speed: " + r.speed() + "rpm");
     r.speedUp();
     System.out.println("speed: " + r.speed() + "rpm");
   }
}
This class is different from the others you have seen. It doesn’t model anything, and you never create an instance of it. It is just there to provide somewhere to put the main method, as a method in Java can’t exist outside a class. In fact, the main method can go in any class in the project but it makes most sense to put in its own class. It could go in Bicycle, for example, but it is not an action that is relevant to a bicycle object so that would not really make sense, even though it would work.
This main method simply creates a rider object and calls its speedUp method. Remember that creating a rider object in this way also causes a bicycle object to be created (by the rider object!). So, executing a line of code in the main method can actually cause quite a lot of code that is written in the class definitions to run and to (hopefully) do something useful.
It also produces some output, so that you can see what the program is doing. System.out.println is a special method that prints to the terminal window (or command line). It takes a string as a parameter, and outputs that string. In the example code we join together some string values ("speed: " and "rpm") and the return value of the speed method of the rider object. They are joined with + signs – when applied to strings the + sign joins, or concatenates, the values rather than adding them together as it would with numbers.
When the last instruction has executed, the program is finished – we say that it terminates.
-
5.12 Running a program
To run a Java program you need to call the main method. You can do this in BlueJ by calling the method in the usual way by right-clicking and selecting the method from the menu. The difference is that you right-click the class, not an object. You don’t need to create an instance of Program at all.
📹 WATCH DEMO: Running a program in BlueJWhen you write a program it is convenient to work in an IDE such as BlueJ. However, once it is complete and tested you want users to be able to run it on its own – you don’t want users to have to install BlueJ just to run your program. The next demo shows how to run the same program from a command prompt without using BlueJ
📹 WATCH DEMO: Running a program at the system command promptJava classes, as we said earlier, should do most of the work of the program, and the main method should contain very little code (as little as possible, in fact). Most of the time when you are writing a program you are writing classes which will interact with each other. It is very useful to be able to test these classes by creating objects and making sure they do the jobs you want them to do. The more complicated the program becomes, and the more classes which are required, the more important it becomes to be able to test the classes individually rather than just hoping they will all do their own jobs when you run the complete program. As you have seen, BlueJ lets you create and manipulate objects without writing a complete “program”, and for much of the time in this module you will make use of this capability.
So, to recap the question posed earlier, what exactly is an object-oriented program? Well, in Java anyway, it is really a set of classes that are templates for creating objects which perform the functions required of the program, with a main method as an entry point to allow the program to execute.
XX -
5.13 User interfaces
Many, though not all, programs have a user interface (UI) which allows users to provide input and to see output. Java programs can provide many different types of interface. Here are just two examples of UI types, and the way they might make use of the main method:
● Graphical User Interface (GUI) – presents a visual interface as a window or screen on a computer or device desktop. The user controls the program by clicking or touching parts of the window or screen. In Java the window or screen is itself an object which in turn makes use of other objects. The main method simply creates the initial window and lets the code in the window class take over
● Console application – runs at a command prompt (e.g. in the command window in Windows). The user types commands and the output is text. In Java, the main method might contain all the code to read user input and write the output, and create other objects as required to perform the functions. Alternatively, the main method might simply create an object which has code to do those things
-
5.14 Test classes
You have seen that it is useful while developing to be able to test your classes without writing a complete program with a UI, and that you can do this in BlueJ by creating objects in the object bench. Sometimes, though, you want to do a test that involves creating several objects, or calling several methods, which can be time consuming to do in BlueJ.
You might want to test that the speedUp method you say earlier actually does what it is supposed to do, and that the rider changes gear at the right time. To test this, you would have to create a rider object, call speedUp and inspect the rider’s bicycle object to see what the current speed and gear are. You did this earlier, but once is not enough to test properly. Speeding up once doesn’t get the rider pedalling fast enough to need to change gear. You’d have to keep on calling the method and inspecting over and over so that you could see when the gear changes happen.
The BlueJ project that you can download for this lecture contains a test class RiderTest which does this test automatically. It has a test method called testChangingSpeed that contains code to create a rider object, repeatedly call speedUp and print the current speed and gear to the terminal after each call. The next demo shows the test class being used.
You don’t need to look at the code yet, let’s just run the test to see if the code in Rider works. The main method, in the Program class, now runs the test.
public static void main(String[] args)
{
   RiderTest rt = new RiderTest();
   rt.testChangingSpeed();
}
📹 WATCH DEMO: Using a test classThis way of testing classes is useful, but later in the module you will see how BlueJ can help you with a better way to create and run test classes.
X -
Summary
You’ve been introduced in this lecture to the following concepts:
Abstraction and encapsulation, Object interactions, Class Diagrams, Assigning and Changing References, Responsibilities, Private Methods, Main Method, Programs and User Interfaces, Test Classes
In the next lecture you will learn about designing algorithms to carry out useful functions and about the language features and constructs which allow you to write code to implement these algorithms in methods in Java classes.
Download PDF Version