-
Client side Database Programming with Java
- This week the topics we will cover include:
- Client-side programming in Java.
- A java environment (project structure) used in java programming.
- How java environment connects to a MySQL server using JDBC driver.
- Some simple Java programs with embedded MySQL queries.
- … and will result in the following learning outcomes
- Understanding of how to link a java client program to a database.
- Understanding of java project structures and why they matter.
- Knowledge of a development environment to develop your own client-side applications.
- Knowledge of how to execute MySQL queries from java and do something with the result.
-
9.1 Overview
- This week deals with the topic of client-side database programming. Client-side programming can be done in numerous languages, including Java, which is a popular choice for developers, one of the reasons the Java language has already been introduced to on this course.
- Java Database Connectors are software tools that allow java developers to use databases in an embedded way – i.e., databases become an inseparable part of a java application, running e.g. on a desktop. In this case the program running on the desktop is often referred to as the ‘client application’. We will be providing some examples of desktop applications (see below).
- However, desktop applications are not the only potential ‘client’ communicating with a database on a server – client programs can exist on mobile phones, and other mobile devices, or on bespoke hardware. The latter might, for example, contain sensors whose states then get communicated to a database from its client program. Inside a business, a shared database is likely to be accessed from numerous, and different kinds, of client program.
- In other areas of your course, you will already have learned some of the java language, and become familiar with java development environments. This week, we will look at the set-up of a java development environment. Then, within this development environment we will start to look at how to connect to a MySQL database from a java program, then we will develop some simple java examples and applications.
- On university courses we are limited to developing relatively small applications. This is helpful, firstly, because it helps students to learn basic principles without which large-scale applications simply cannot be developed. However, real word applications and technologies that get developed in the context of software development teams are highly complicated. Therefore, even though we cannot introduce such large scale Java code, we can consider this real-world context and some example client programs…
-
9.2 Client-side database programming: real-world context
- As we have previously noted, query languages are powerful from the point of view that they easily allow us to create databases and declare what data we want from an existing database. However, declarative aspects of query languages are specific for declarative purposes and cannot be used to develop codes that perform different and more complicated tasks. Query languages are often not considered to be programming languages:
As Ritchie states- “A non-programming interactive approach is clearly more suitable for ‘end user’ development, where database designer may have limited programming knowledge. However, it does ultimately limit the potential of the software in producing a system exactly to the user requirements. Professional database system developers typically have to stretch the software to meet the needs of the client and this often necessitates the use of programming. Even within systems offering effective interactive facilities, implementations can often be improved by the use of programming.”
Ritchie (2002)
-
9.2.1 Example: client side logistics programs
- As we have throughout the course, consider another ‘logistics’ example. In the logistics sector many software technologies exit that allow a business to manage its vehicle fleet. As part of such technology, a common requirement is the provision of applications that connect to a database from different kinds of client.
- For example, the vehicle itself is likely to be equipped with GPS technology. A client application residing in on-board hardware will communicate information to a database with a given update frequency. For example, accelerometer data might be communicated at relatively high frequency (say 10 Hertz – 10 times a second). This information can be used to measure how well the driver is driving the vehicle and whether or not they might benefit from some training to help them reduce the accelerations (which result in more fuel uptake and increased costs).
- Meanwhile, every minute, GPS data, which indicates the location of a vehicle might be streamed to the database. The database can then be read from another client application which, this time, sits on a desktop computer within the headquarters office. This desktop application will allow a user to have full visibility of the entire fleet of vehicles (each vehicle has the same technology and communication ability with the database). We can imagine on a desktop application, that a user will be responsible, like an air-traffic controller, for managing the trajectories of vehicles over the day in order to satisfy the needs of business customers (domestic, commercial etc.) at minimum cost. It would be unimaginable for them to do this without the ability to access, through a desktop application, real-time data related to vehicle position, breakdown, re-allocation of vehicles etc. You can imagine as part of this software, that the entire fleet of vehicles are visible to the user as a consequence of a database programmer implementing code that renders GPS information to a map, perhaps using one of the many available geographic mapping services available.
- Therefore, while you are learning essential programming skills, it is important to have in mind the kinds of applications that good programming skills can eventually lead a qualified graduate into creating. There is, of course, no need to restrict your own imagination to any of the examples given to you, and, as you learn how to program, you should think about application development as a creative process; all successful software applications started with an idea!
-
9.3 Java database development environment: core project
- Not something usually very well covered in text books, but is very important.**
- In this section, we will look into how to organise a java project. During the process of converting source code into an executable program, as long as the program source code is on the Java compiler classpath, and the code syntax is valid, then the compiler will generate an executable program from the source code. Consequently, poorly (even very poorly) organised source code will compile.
- However, we have already learned that organising code within a file is very important i.e., statements, loops, and functions etc. should all be clearly indented and easily readable. Similarly, this is true when we come to organise our classes, and place our classes into appropriate packages. At this level, organisation is critical to the readability, and therefore understanding, of the source code, both to the developers of the code and other developers who may use the code in the future.
- We will cover three areas:
- 1. Organisation is also critical in terms of the overall project structure. Therefore, because we will be developing some applications, it is important to establish some good principles concerning project organisation. This will give you confidence in organising your own code in the future and will help you to easily navigate around a Java project. The project structure that we will follow is based on an industrial strength approach. Java files will be organised into packages, inside a nested directory structure, which is based on the assumption that the main codebase is separated from the test codebase.
- 2. Once we have detailed this approach we will go through the steps necessary to connect such a project to an external codebase, which will be packed as a .jar file. This external codebase will, in fact, be a version of the MySQL JDBC and we will thus learn about external jar files generally while undertaking the specific task of connecting out project to the MySQL JDBC.
- 3. We will also take a closer look at preparing a real-world database, using the code point resource available from the UK government website. This will involve the writing and execution of an SQL script, which is designed to read a comma separated file version of code point Open into a database version. This database will then form the basis of the JDBC example Applications.
- Once we have covered these three points we will be in a position to develop some applications where we will connect to the database then write some code to interact with the database, by executing embedded MySQL queries from pure Java code.
-
9.3.1 Java project structure
- You should already be familiar with the distinction between source files and executable files, which is a typical distinction in many programming languages. However, here is a quick summary for Java. In java you store source code within files that have a <.java> extension. When you compile/build your source code (i.e., the collection of .java files), typically, you will compile to a different kind of file known as a <.class> file. It is a good idea to separate the storage of these files. This can, simply, be that you do not confuse .class with .java files during development. For example, .java files are more precious than .class files because the latter are built from the former; if you delete a .class file, you can easily recompile. However, if you delete a .java file, you have to re-write the code. This is also reflected in the use of version control systems (cvs, svn, git etc) where it is only the .java files that are versioned.
- Either way, the .class (built) files and the .java (developed source) files sit in separate directories within a project.
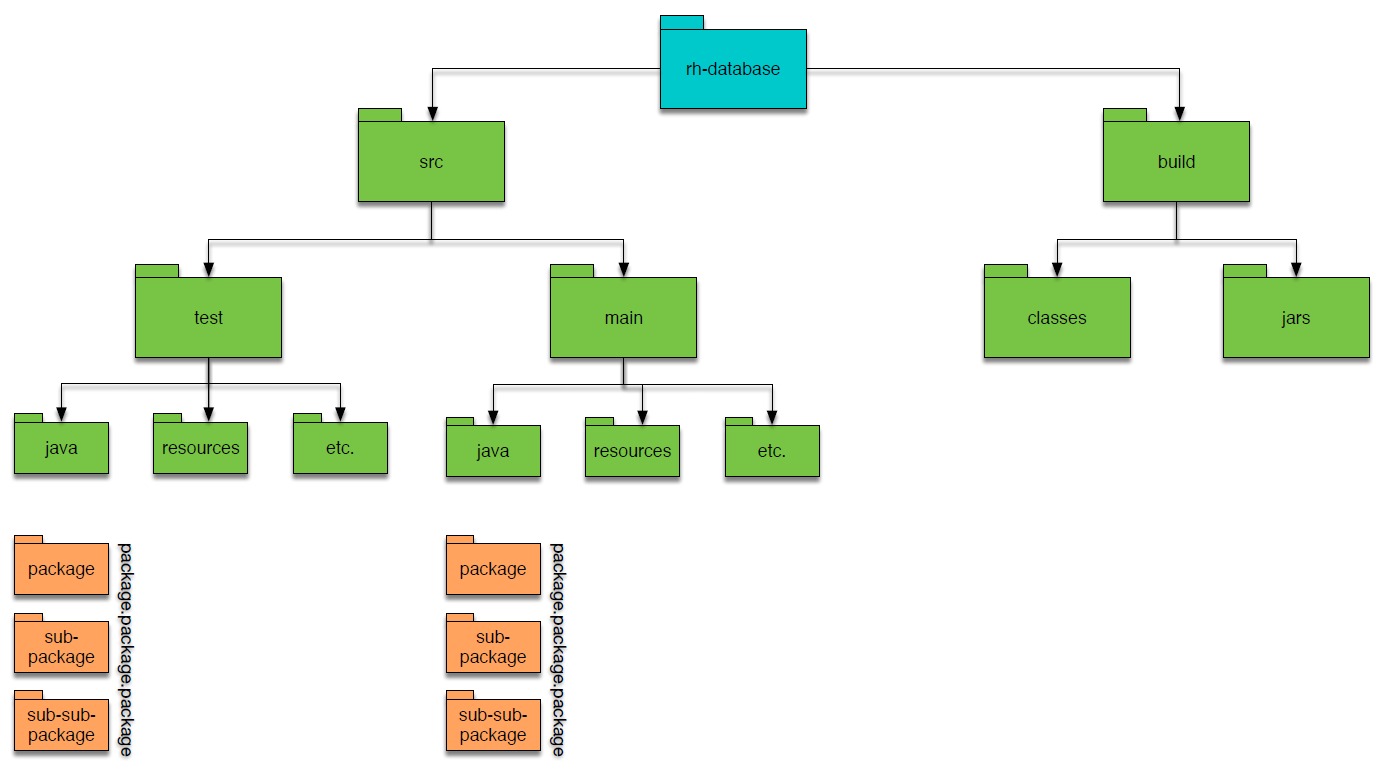
- Figure 1: Project structure.
- We will be using src for the source files and build for the built files.
- The src directory: There is more internal structure within the source folder. Within the src directory you should separate tests from the main source code. This is because, as a developer you will develop tests for your code, but these should not be considered as part of the main source code – i.e., the tests are not something you would release as part of your final executable software, because are tests of the codebase, not part of the final software product itself in anyway. However, tests are source code <.java> so they go in their own test folder. Additionally, within the main and the test directories there will be more folders. For example, if a program relies on the use of images, then this is likely to be stored within a folder named resources. All .java files will be stored in the java sub-directories of the respective main or test folders, depending on their purpose.
- The build directory: the typical default file that a .java is converted to is a .class file. Therefore, within the build folder we have a classes folder, and this will contain the directories that are created from the packages, and then inside those packages the appropriate .class files will reside. However, in java we can chose what kind of ‘binary’ file we want to create. Instead of having lots of .class files we might choose to build our .java files and archive them to a .jar file. This, for example, is something that was done during the build of the MySQL JDBC, which will download later. This important point here, then, is that the build directory can have subdirectories. Later on in the development of the project, this structure makes it easier to configure different build options without affecting the ones that exist.
-
9.4 Java database development environment
9.4.1 JDBC as a ‘dependency’
- Within any industrial development environment, we will, typically, draw on a number of resources. These resources are not part of our own products, but our own source code depends on these resources. From the point of view of our own codebase, these resources define our ‘dependencies’.
- For example, when we connect to the database, the JDBC is such a resource. Third-party software is also often referred to as a library, on which our source code depends. We will therefore create a standard project called library. Within this project we will assume that we store all of the third-party code in an appropriate folder name.

- Figure 2: Project structure for dependencies.
-
9.4.2 Preparation for use of MySQL JDBC
Download the platform independent zip archive from: https://dev.mysql.com/downloads/connector/j/ Extract the zip archive. You will see a number of files, e.g., build.xml, CHANGES, COPYING etc. The file we are interested in is: mysql-connector-java-5.1.40-bin Copy the mysql-connector-java-5.1.40-bin.jar to apt dependencies folder: Add the mysql-connector-java-5.1.40-bin.jar to the .classpath of the java project outlined in section 9.3.1. - Table 1: MySQL JDBC, preparation for use
-
9.5 Simple connection class: MySqlCommunicator.java
9.5.1 Class declaration and imports
package ac.uk.gcu.data.db.rbd.conn;

import java.sql.Connection;
import java.sql.DriverManager;
import java.sql.SQLException;

public class MySqlCommunicator {
…
…
…
Code commentary
- This is very simple. We will be using resources from the java.sql.* package. That is the ‘Connection’, DriveManager’and ‘SQLException’ classes.
-
9.5.2 Class fields
/**
* Username to connect to database, associated with {@link PASSWORD}
*/
private static final String USERNAME = "root";
/**
* Password to connect to database, associated with {@link USERNAME}
*/
private static final String PASSWORD = "password";
/**
* This is the target url of the JDBC connection.
*/
private static final String TARGET_URL = "jdbc:mysql://localhost?&useSSL=false&/";
/**
* The connection to the database
*/
private Connection connnection;
Code commentary
- The first three fields to notice are three String types. These fields will be used to connect to the database. As we now know, in order to connect to a database, we need a password and a username. Of course we also need a database server to connect to. The username (USERNAME) and password (PASSWORD) are set as static final strings. That is, they are not going to change value at all during the execution of the program. The same is true of the the target url (TARGET_URL). It is typical in Java programming that fields like this are expressed in upper case. Notice, java does not require this, but it is considered good form to do this. These three strings will be used to parameterised a call to a new connection object (see below).
- This connection object will be stored in the class field connection. Notice that we are now using the Connection class, which is within view due to the java.sql.Connection import, as described above.
-
9.5.3 Constructor method
/**
* Default constructor
*/
public MySqlCommunicator(){

     try {
       connnection = DriverManager.getConnection(TARGET_URL, USERNAME, PASSWORD);
     } catch (SQLException e) {
       e.printStackTrace();
     }
     System.out.println(toString());
}
Code commentary
- The constructor sets the connection field to a new object, but this can only occur if the parameters to the getConnection(String, String, String) method, which belongs to the DriverManager class, are valid. If they are not valid then the getConnection(String, String, String) will throw an exception. Therefore, we try to connect, but if the exception is thrown we need to catch it and deal with it. This is done by printing the stack trace to the console. Hence, the try {} catch {} block.
- The final line of the constructor is a call to its toString method(), printing the content to the console.
-
9.5.4 The toString() method
/**
* Indicate whether or not the connection failed or is exists
*/
public String toString(){

   String str = this.getClass().getSimpleName() + " ...\n";
   str += "...Using TARGET_URL: <" + TARGET_URL + "> \n";
   str += "...Using USERNAME:  <" + USERNAME + "> \n";
   str += "...Using PASSWORD:  <" + PASSWORD + ">\n";

   if(connnection == null) {
      str += "FAILED";
   } else {
     str += "EXISTS";
   }
   return str;
}
Code commentary- This is used for indicating the state of the connection field to the user. It informs the user whether or not the connection has been successful. In either case, it will be useful to send the values of the PASSWORD, USERNAME and TARGET_URL to the console, along with an associated state concerning the connection <EXISTS or FAILED> depending on the state.
-
9.5.5 The main() and getter methods
// Getters

public Connection getConnnection() {
    return connnection;
}

// Local test driver
public static void main(String[] args) {

     MySqlCommunicator comm = new MySqlCommunicator();
     Connection conn = comm.getConnnection();

     if(conn != null) {
        System.out.println("conn is ready to use");
     }
}

} // end of class
Code commentary- The main method creates a MySqlCommunicator object named comm. Then, the local Connection variable conn is set to the value of the connection field in the MySqlCommunicator class, through a call to its getter method getConnnection().
- Notice, if all was well with the creation of that connection then conn is ready to be used.
With code supplied (correct) Incorrect password (passwor) MySqlCommunicator ...
...Using TARGET_URL:
<jdbc:mysql://localhost?&useSSL=false&/>
...Using USERNAME: <root>
...Using PASSWORD: <password> EXISTS conn is ready to useat java.sql.DriverManager….
at ac.uk.gcu.data.db.rbd.co…
at ac.uk.gcu.data.db.rbd….
MySqlCommunicator ...
...Using TARGET_URL:
<jdbc:mysql://localhost?&useSSL=false&/>
...Using USERNAME: <roo>
...Using PASSWORD: <passwor>
FAILED- Table 2: MySqlCommunicator program outputs.
-
9.5.6 Summary
- In summary, the MySqlCommunicator.java file encodes very simple functionality. It provides static strings to connect to a database, and stores the value of the connection for later use.
- The DatabaseMySqlConnectionApp example uses this class to establish a connection and then runs some queries on a database selected from the server. We will look at this class shortly, but first we will look at another class that DatabaseMySqlConnectionApp will use to specify the said queries.
-
9.6 Simple query set class: CodepointQuerySet.java
9.6.1 Class fields
/**
  * The upper limit of the number of rows returned from the database
  */
  private int limit = 10;

/**
  * A list of String MySQL queries
  */
  private ArrayList<String> queries;

/**
  * The name of the database this class has been coded for
  */
  private String dbname = "codepoint_db";
Code commentary
- This code is simply the declarationsof fields. The limit is given a default value of 10 and the dbname a value of “codepoint_db”. The latter is the name of the database on the server and the queries that are specified in this class are designed to work with this database/schema.
-
9.6.2 Constructor methods
/**
 *
 * @param lim
 */
 public CodepointQuerySet(int lim) {

        limit = lim;
        queries = createQuerySet(lim);
 }

/**
 *
 */
public CodepointQuerySet() {

           queries = createQuerySet(limit);
}
Code commentary- Two constructors are given. This first takes as a parameter a limit on the number of rows in question, storing this to the limit field value as appropriate, whereas the second constructor will not change the default limit value of 10. Both constructors allocate a list of String types to the field queries via the call to createQuerySet(int).
-
9.6.3 The main () and getter methods
// Getters

public ArrayList<String> getQueries() {
       return queries;
}

public String getQuery(int i) {
       return queries.get(i);
}

public String getDbName() {
       return dbname;
}

// Main method
public static void main(String[] args) throws SQLException {

       CodepointQuerySet qs = new CodepointQuerySet();
       System.out.println(qs.toString());
}
Code commentary
- The main method simply creates a CodepointQuerySet and prints the content to the console (see Table 3, below). This content is available to other classes through calls to the getter methods getQueries() and getQuery(int i), as is the value of the dbname field via a call to the getter method getDbName().
- Looking at the code output in Table 3, below, gives you a good indication of the Strings, which are loaded into the queries field from the createQueriesSet() method. We will, therefore, not explain this method (feel free to look a the codes provided at this point, however).
Queries held in class <ac.uk.gcu.query.CodepointQuerySet> would appear as pure sql as follows:

SELECT Postcode FROM codepoint_data LIMIT 10
SELECT Eastings FROM codepoint_data LIMIT 10
SELECT Eastings, Northings FROM codepoint_data LIMIT 10
SELECT Postcode, Eastings, Northings FROM codepoint_data LIMIT 10
- Table 3: CodepointQuerySet: program output.
-
9.6.4 Summary
- Therefore, the class CodepointQuerySet is also very simple. It creates a simple set of 4 query strings, held as a list. These queries are accessible to other classes through its getter methods.
-
9.7 Querying RDB from java: MySqlApp.java
- During the previous two sections we have spent time to explain some fairly simple classes. Now you understand these classes, you will be able to understand the following codes, which are stored in the MySqlApp. The codes will:
- connect to a database from java, exploiting the MySqlCommunicator class;
- create a set of queries, using CodepointQuerySet class;
- Run the queries on the database and;
- display the output.
-
9.7.1 Class fields
/**
 * The connection to a MySQL database using the MySqlCommunicator class
 */
Connection connection;

/**
 * The statement object used to execute a query
 */
Statement statement;

/**
 * The result of a given query
 */
ResultSet result;

/**
 * An example set of queries to execute
 */
CodepointQuerySet queries;
Code commentary
- The connection fields is of a type Connection. You have already seen this code. The statement field is a type of Statement and the result field is a type of ResultSet. Each of these fields therefore needs to ‘see’ the respective Connection, ResultSet and Statement classes, so these, contained in the java.sql* package are imported (check the source code).
- The other field is a type of class that we introduced above, the CodepointQuerySet and you know the functionality this class implements already.
-
9.7.2 Constructor
/**
 *
 * @throws SQLException
 */
public MySqlApp() throws SQLException {
    connnection = new MySqlCommunicator().getConnnection();
    statement = connnection.createStatement(ResultSet.TYPE_SCROLL_INSENSITIVE,
    ResultSet.CONCUR_READ_ONLY);
    queries = new CodepointQuerySet();
}
Code commentary
- In the constructor, the first thing we do is assign a connection. All of the logic for this assignment is contained in the MySqlCommunicator class, which we have described above. Remember that connection field of the MySqlCommunicator is assigned in the constructor, so we can access the value of MySqlCommunicator.connection by calling the appropriate getter. This is what the line:
- connnection = new MySqlCommunicator().getConnnection();
- …does.
- The statement is created using the connnection instance by calling its createStatement(int, int) method whose parameters determine the properties of the statement created:
- TYPE_SCROLL_INSENSITIVE: The cursor can scroll forward and backward, and the result set is not sensitive to changes made by others to the database that occur after the result set was created.
- CONCUR_READ_ONLY: Creates a read-only result set.
- These properties will allow us to easily display some information from the database to the console.
-
9.7.3 The runQueries() method
/**
 * Run a set of queries
 *
 * @throws SQLException
 */
public void runQueries() throws SQLException {

       // Use the codepoint_db schema
       // ---------------------------
       String query = "USE " + queries.getDbName();
       System.out.println("Running query: " + query);
       statement.executeQuery(query); // no results from this query.

       // Run a CodepointQuerySet set of queries
       // --------------------------------------

       for (int i = 0; i < queries.getQueries().size(); i++) {
              query = queries.getQuery(i);
              System.out.println("Running query: " + query);
              result = statement.executeQuery(query);
              Codepoint.displayData(result);
       }
}
Code commentary
- The common pattern of code in this method is to:
- Specify query in local String query.
- Print the query to the console.
- This is true of the code above and within the for loop. The code above the for loop uses queries fields to access the name of the database those queries are relevant to, then runs the query. Similarly, a query is set for each iteration of the for loop, but this time the query will contain results. We therefore assign these results to the result field and then:
- Print the result of the query using the Codepoint.displayData(String) method.
-
9.7.4 tidyUp()
/**
 * Close the fields that, which are currently in a state capable to affect
 * the state of the database.
 *
 * @throws SQLException
 */
public void tidyUp() throws SQLException {

       if (result != null) {
              result.close();
       }
       if (statement != null) {
              statement.close();
       }
       if (connnection != null) {
              connection.close();
       }
}
Code commentary- When opening connection to a database, it is always important to close the resources, such that the database is not still open to being communicated with after your program has exited. The way this is done is to close the resources in the reverse order in which they were opened. In the constructor we opened a connection, then created a statement. Then, in the runQueries(), method we loaded the results fields. We therefore close them in the opposite order.
-
9.7.5 The main() method
// Main method
public static void main(String[] args) throws SQLException {

       MySqlApp app = new MySqlApp();
       app.runQueries();
       app.tidyUp();
}
Code commentary- The main() method is nice and neat. We Create a the application, app , which is a MySqlApp, type. Then app.runQueries() is the line that results in output to the console, before we run tidyUp() as also explained.
- The console output is displayed in Table 3.
MySqlCommunicator ... ...Using TARGET_URL: <jdbc:mysql://localhost?&useSSL=false&/> ...Using USERNAME: <root> ...Using PASSWORD: <password> EXISTS Running query: USE codepoint_db Running query: SELECT Postcode FROM codepoint_data LIMIT 10 Postcode 1: AB101AA 2: AB101AB 3: AB101AF 4: AB101AG 5: AB101AH 6: AB101AL 7: AB101AN 8: AB101AP 9: AB101AQ 10: AB101AR Running query: SELECT Eastings FROM codepoint_data LIMIT 10 Eastings 1: 394251 2: 394232 3: 394181 4: 394251 5: 394371 6: 394326 7: 394367 8: 394291 9: 394371 10: 394371 Running query: SELECT Eastings, Northings FROM codepoint_data LIMIT 10 Eastings|Northings 1: 394251|806376 2: 394232|806470 3: 394181|806429 4: 394251|806376 5: 394371|806359 6: 394326|806522 7: 394367|806542 8: 394291|806424 9: 394371|806359 10: 394371|806359 Running query: SELECT Postcode, Eastings, Northings FROM codepoint_data LIMIT 10 Postcode|Eastings|Northings 1: AB101AA|394251|806376 2: AB101AB|394232|806470 3: AB101AF|394181|806429 4: AB101AG|394251|806376 5: AB101AH|394371|806359 6: AB101AL|394326|806522 7: AB101AN|394367|806542 8: AB101AP|394291|806424 9: AB101AQ|394371|806359 10: AB101AR|394371|806359- Figure 3: Console output from MySqlApp.java
-
9.8 Summary
- We learned about java programming in relation to MySQL queries.
- We highlighted the important features of a typical Java project.
- We then covered the steps involved in installing the MySQL connector.
- Java code examples were presented which show a simple application to run a number of MySQL queries on an existing database from java.
- The intention is to help provide you with basic java skills to allow you to use these technologies.
- Download PDF Version