- Intro
- Code
- 11.1
- 11.2
- 11.3
- 11.4
- 11.5
- 11.6
- 11.7
- 11.8
- 11.9
- 11.10
- 11.11
- 11.12
- 11.13
- 11.14
- 11.15
- 11.16
- Summary
-
11.1 Working with an advanced IDE
IDEs such as Eclipse, NetBeans, Oracle JDeveloper and IntelliJ IDEA offer much more advanced features for the expert developer than BlueJ does. They are, however, complex applications that, unlike BlueJ, require a lot of time spent learning how to use them in order to get the best out of them.
Advanced features typically found in professional-level IDEs include:
● Support for many project types, including GUI applications, web applications, mobile applications
● Flexible organisation of project files, which is essential in larger projects
● Sophisticated code editors with code completion and real-time error checking
● Refactoring support
● Sophisticated debuggers and profilers
● Integration with Java and other tools, e.g. documentation, testing, version control
● UI design toolsThe next demo shows a version of the adventure game project that has been created as a project in NetBeans and is running inside the IDE.
📹 WATCH DEMO: First look at NetBeansX -
11.2 Packages and libriaries
In the demo you saw Java source files organised into packages. A package is a collection of related classes. We have previously used API classes which belong to packages, such as the Date class in the java.util package.
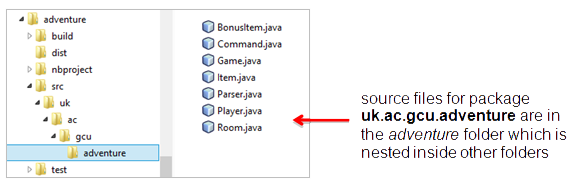
NetBeans encourages you to organise your own classes into packages, and in this case the classes in the adventure game are in a package called uk.ac.gcu.adventure. It is common when naming packages for an organisation to use its internet domain name, reversed, as the first part of the package name, to make sure that the package name will be globally unique. In a larger program, the classes will often be organised into many different packages. Note also that NetBeans has organised the unit test classes into a separate test package.
When you want a class to be in a specific package, you need to put a package statement at the top of the source file, before the class itself and before any import statements. For the adventure game, all source files include the statement:
package uk.ac.gcu.adventure;
It is usual for a Java IDE to organise source code for packages in a folder stucture which is derived from the package name. Typically, all source files are placed in a folder src inside the project folder, and each part of the package name is translated into a level in a folder hierarchy. Therefore in this example, the source files are in a folder src/uk/ac/gcu/adventure. This means your code can end up deep inside nested folders, but it does mean it is clearly organised, and different packages are kept separate. Usually the compiled class files are placed in a matching folder hierarchy, separate from the source files. Note that NetBeans displays the packages by name, and not the actual folder structure, in Project view as shown in the screenshot below. The following figure shows the contents of a NetBeans project folder for adventure project in the NetBeans screenshot below.
If you don’t specify a package name in your classes, they will be considered to be in the default package and are placed in the main project folder. This is what we have done up to now in our BlueJ projects. BlueJ can in fact work with packages if you want it to.
When creating larger programs you often need to use classes which are not part of the Java API but come in the form of third-party libraries. NetBeans will include the libraries which are typically needed for the type of project which is being created, and will help you to add other libraries which you may need for your specific project. Note that the adventure application only includes the JDK 1.8 and JUnit libraries.
-
11.3 User interfaces
Most computer programs are designed to be used by people. Such programs need to provide a way for those users to interact with the program. Users need to give instructions and input to the program and to receive output. While some programs, particularly those used by expert users, require the user to interact by entering text commands at a command prompt, it is more common to have a graphical user interface, or GUI. A GUI gives the user a visual indication of the actions which can be carried out, for example as buttons or menu options; it can display elements which can be used to provide input, such as forms; and it can display output visually.
There are many different types of GUI, running on a variety of devices, for example “traditional” desktop applications (for example office applications) on a PC, apps on a phone or tablet, games on any of these or on specific consoles, and specialised applications on a variety of custom-made devices such as kiosks, ATMs, medical instruments, etc. Some applications run on remote server computers and send a GUI to the user in the form of web pages that are viewed in a browser on the user’s device.
There are also many different toolkits available for building GUIs. If you want to build a GUI for a program that is written in a particular programming language, to run on a particular type of device, then you need to choose from the available toolkits for that combination of language and device and learn to use the one you have chosen. For another project, you may need to select and learn another toolkit altogether. For example, even if you always program in Java, the toolkit you use for a desktop application will be different than for an Android phone app.
-
11.4 GUI toolkits
A program with a GUI needs to be able to detect and respond to user actions. For example, if the user of a desktop application is to give a command by clicking a button on the screen, the program needs to:
● Draw a visual representation of a button at an appropriate position on the display
● Detect the user’s mouse click and its position on the display
● Decide whether the click position is within to the area of the display occupied by the button
● Invoke the program action which carries out the command that the user intended to giveYou could write code at a low level, from scratch in other words, to draw shapes to represent the button, detect clicks/taps and check their position, and so on. However, it is much more efficient to use a toolkit which allows developers to create GUI applications using pre-defined components, known as widgets or controls. A button control, for example, is a component (in Java it’s an object) which knows how to draw itself, knows when it has been clicked and can tell the program that this has happened so that the program can take the appropriate action.
A toolkit can provide many different kinds of control, each of which behaves in an appropriate way – for example a button can be clicked, while a text box can have text typed into it and stores that text.
To add a control in your GUI you simply create an instance of that control, and the control and its toolkit take care of the low level detail
Most modern GUI toolkits offer a broadly similar set of features. They:
● provide controls with specific appearance and capabilities
○ e.g. a button control looks something like this and can be clicked
○ clicking is an event associated with the button – its something that the button is capable of detecting
○ other controls have different events relevant to the way they work, for example for a text box, changing the contents is an event
● provide a way of responding to user actions
○ you can write code which runs when a button is clicked (i.e. when the button click event is fired)
○ the code is attached to the button as an event handler
● render controls and fire events in response to user actions -
11.5 Java GUI toolkits
There are several toolkits available in Java specifically for creating desktop applications. One nice feature of Java is that applications are cross-platform - because the compiled code for a program runs on a virtual machine, the same application can run on different desktop operating systems, and a Java GUI application will run on, and look much the same on, Windows, MacOS and Linux. Java GUI toolkits are all able to create cross-platform user interfaces, although they achieve this in different ways.
● AWT (Abstract Windowing Toolkit)
○ Introduced early on in the development of Java
○ Cross-platform
○ Each control is a “wrapper” round a native operating system widget (an OS such as Windows, MacOS has its own GUI widgets which can be used by many different programming languages)● Swing
○ Introduced as a more advanced toolkit to replace AWT
○ Renders its own widgets
○ Can emulate the “look and feel” of various operating system widgets● SWT
○ Maintained by Eclipse Foundation, separate from main Java releases
○ Uses native widgets, like AWT● JavaFX
○ Introduced in 2007 to support modern rich GUIs on desktop and in browser
○ Optimised for animation/effects
○ Used its own scripting language (JavaFX Script)● JavaFX 2 / JavaFX 8
○ Programmed in Java, not JavaFX Script
○ Included in J2SE, Oracle’s preferred GUI toolkit for desktop, web and embedded
○ Provides a rich widget set
○ Updated and renamed to JavaFX 8 with release of Java 8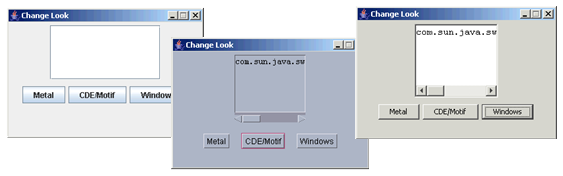
Swing GUI emulating different OSs “look and feel”
-
11.6 Creating a JavaFX application
We will now look in a bit more detail at one toolkit, JavaFX 8 (we’ll just refer to it as JavaFX from now on), and learn how to use it to create a simple desktop UI. Note that JavaFX application can potentially also run within a web browser to provide a rich web interface, but we will look only at the desktop here.
JavaFX borrows some terminology from the theatre. You put everything you want to show in the user interface in a Scene. A Scene is an object that has a property called root which is a container for controls which will be shown. These controls, which are the child elements of the scene, are called Nodes. A Scene is placed on a Stage, which defines the application window, or display area if running in a web browser.
The controls in the scene can include the following categories:
● Layout controls
○ containers for other controls to position them in the interface, for example grid pane, stack pane● Interactive controls
○ buttons, combo boxes, check boxes, etc.● Display controls
○ displaying or entering text
○ drawing directly on a surface
○ displaying data● Application controls
○ menus, toolbarsAll Java applications need to have an entry point. A JavaFX application is defined in a class which extends Application and has a method called start. As with other Java applications, there needs to be a main method which is the actual entry point, and which contains only the code needed to launch the application.
The next demo shows how to create a very simple JavaFX application project in NetBeans.
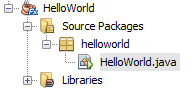
This will create a project that is shown in the Projects window like this:
 📹 WATCH DEMO: Creating a JavaFX application in NetBeans
X
📹 WATCH DEMO: Creating a JavaFX application in NetBeans
X -
11.7 Looking at the simple JavaFX application
The generated source code file will contain a class that extends Application, with a basic start method. It will also contain import statements for some JavaFX classes. This code demonstrates a basic application that opens a GUI window with a button control and responds to the user clicking the button. The following listing shows this class with some notes to explain what the added code does:
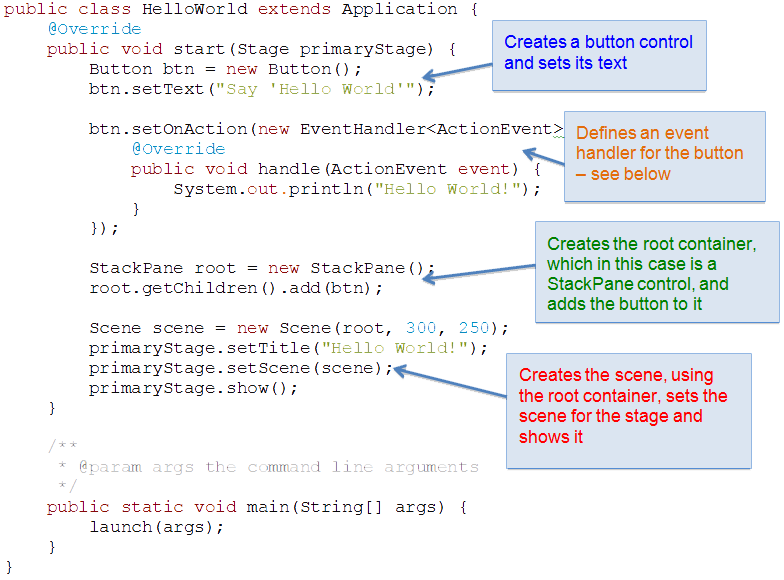
Since a Button control is used, an import statement is needed for the class javafx.scene.control.Button.
-
11.8 Handling events
This basic application simply displays a button. The application is interactive, though - when the button is clicked a message is printed to the console window. This interactivity needs an event to be fired and handled. The JavaFX Button control can detect when it has been clicked, and automatically fires a click event.
The setOnAction method of the Button class connects an event handler to the button. The event handler contains a method handle, which is where you put the code to define what happens when the event is fired – here it simply prints something. The code which is wrapped around this method is actually a class with no name specified, known as an anonymous class. Whenever you write an event handler, that part will always be pretty much the same, but the handle method will be different depending on what you want to happen.
The next demo shows the Application class with this code and shows how to run the program.
📹 WATCH DEMO: Examining and running a basic JavaFX applicationX -
11.9 Models and GUIs
In the Hello World example, all of the code for the program was contained within a single class. This is not the way we normally write programs! It was possible because this was a very simple example demonstrating how to create a GUI. In reality, however, a Java program with a GUI will be providing a way for users to interact with and control the functionality provided by collaborating objects, just like any other object oriented program. A useful Java desktop application will consist of, at the very least:
● A class or classes which implement the functionality of the program – we can call these the model classes
● A class or classes which implement the GUIThe GUI code will create and use instances of model classes to perform the important logic of the program. For example, in lecture 6 you saw a class called TemperatureConverter, which contained methods to convert between temperatures in Centigrade and Fahrenheit. This class contained the following method, and a similar method to do the reverse conversion:
public double centigradeToFahrenheit(double centigrade)
{
   double fahrenheit = (centigrade * 9 / 5) + 32;
   return fahrenheit;
}
In BlueJ you can create an instance of TemperatureConverter and call its methods. This is not much use for an end user who does not want to have to open BlueJ to run a program. In the next section we will take this class, which provides the functionality for temperature conversion (the formulae in this case), and build a GUI that makes use of a TemperatureConverter object to create a graphical temperature conversion application.
-
11.10 Creating a GUI with FXML
The first JavaFX example used Java code to create controls and place them in a Scene. JavaFX provides an alternative approach, which is also becoming common in other toolkits for other languages. The GUI code is split into two parts:
- ● FXML file – a file which contains code written in FXML, which is an XML-based markup language used to define all the controls and their position, size and appearance in the interface. This defines the user’s view of the interface
- ● Controller – a Java class which contains the event handler methods for the controls defined in the FXML
XML is a language that defines elements using tags marked with <brackets>. Specific variants of XML, like FXML, have their own set of allowed element names. Another example of an XML-based language is XHTML, used to define the content of web pages using tags like <header> and <p>, defining a heading and a paragraph respectively. In FXML, the tags correspond to the names of controls, for example <Button>.
A JavaFX application will usually also contain a model class or classes which contain the code which allow the objects to be created which perform the actual function of the program. This separation of the model, the controller and the view is a common pattern in many programming platforms and is sometimes called the model-view-controller (MVC) pattern.
-
11.11 Designing the GUI
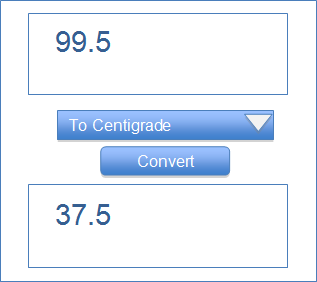
Before we start coding, let’s draw a representation of the GUI we want to create. The temperature converter application will:
● Allow the user to enter a temperature to convert
● Allow the user to specify conversion from Centigrade to Fahrenheit or vice versa
● Display the result of the conversionHere’s a possible GUI design for this. The element with the text “To Centigrade” will ve a drop-down box that allows a choice to be made between the option shown and “To Fahrenheit”.
-
11.12 FXML controls
You can view the complete FXML code in the file ConversionFX.fxml in the NetBeans project ConversionFX that you can download for this lecture. This project was created using the JavaFX FXML Application option when creating the new project, which generates basic FXML and controller classes, and modifying these as required. The FXML code to define the main controls for this GUI is shown below:
<TextArea fx:id="input" maxHeight="1000" minHeight="-1.0"
        text="[Temperature to convert]" wrapText="true"
        GridPane.rowIndex="1" />
<ChoiceBox fx:id="choice" prefWidth="150.0"
        GridPane.halignment="CENTER" GridPane.rowIndex="2"
        value="To Centigrade">
             <items>
                  <String fx:value="To Centigrade" />
                  <String fx:value="To Fahrenheit" />
             </items>
</ChoiceBox>
<Button fx:id="button" onAction="#handleButtonAction"
        text="Convert" GridPane.halignment="CENTER"
        GridPane.rowIndex="3" />
<TextArea fx:id="output" maxHeight="1000" minHeight="-1.0"
        text="" wrapText="true" GridPane.rowIndex="4" />
Note the following:
● This code contains tags which create two TextArea elements, a ChoiceBox and a Button
● Most tags start with < and end with />
● The ChoiceBox tag contains another tag <items> which contains the choice items, and ends with a </ChoiceBox> closing tag
● Tags contain attributes in addition to the element name – these contain information about positioning, sizing, and so on
● Each tag has an attribute fx:id which specifies a unique name for the element, which you will see how to use shortly
● The button tag has an attribute onAction which specifies a name for an event handler, which again you will see how to use shortly. -
11.13 FXML layout
The FXML code above is contained inside a GridPane element. GridPane is a JavaFX layout control that will the root container for this GUI. GridPane is good for poistioning controls using a grid structure. Even though the GUI design in this example will only require a single column, as all the controls will be positioned one above the other, a GridPane is still a good way (although not the only) way to achieve this layout.
<GridPane id="container" alignment="CENTER" hgap="10.0"
    prefHeight="280.0" prefWidth="280.0" vgap="10.0"
    xmlns="http://javafx.com/javafx/8"
    xmlns:fx="http://javafx.com/fxml/1"
    fx:controller="conversionfx.ConversionFXController">
   <children>
      …controls code from above…
   </children>
   <rowConstraints>
        <RowConstraints vgrow="NEVER" />
        <RowConstraints vgrow="ALWAYS" />
        <RowConstraints vgrow="NEVER" />
        <RowConstraints vgrow="NEVER" />
        <RowConstraints vgrow="ALWAYS" />
   </rowConstraints>
   <columnConstraints>
      <ColumnConstraints />
   </columnConstraints>
</GridPane>
Note the following:
- ● The rowConstraints and columnConstraints elements define the dimensions of the layout grid (5 rows and only one column in this example) and control the relative sizes of these and how these can grow to fill the available space in the scene
- ● The GridPane.rowIndex attribute for each control determines what grid row the control is placed in
- ● The fx:controller attribute of GridPane specifies the name for the controller class for this GUI, which you will see how to use shortly
The next demo shows how you can edit FXML in NetBeans and using Oracle Scenebuilder.
📹 WATCH DEMO: Editing FXML with Oracle SceneBuilderX -
11.14 Model and Controller classes
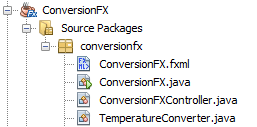
The ConversionFX project contains some more files. The model class is TemperatureConverter.java, which is a straightforward Java class, described earlier, and has no GUI code at all. The controller class, ConversionFXController.java, contains code to handle events associated with the controls defined in the FXML file – remember that the FXML code referred to the name of this class in order to make the connection between controls and controller.
Now, remember the button element in the FXML, which had the following attribute:
onAction="#handleButtonAction"
This means that the controller class needs to have a method called handleButtonAction, which will perform the action we want to happen when the button is clicked. Here is the code for this method in the controller:
@FXML
    private void handleButtonAction(ActionEvent event) {
        if(choice.getValue().equals("To Fahrenheit"))
        {
            double centigrade =
                Double.parseDouble(input.getText());
            double fahrenheit =
                converter.centigradeToFahrenheit(centigrade);
            output.setText(String.format(
                "%2.1f \u00b0F",fahrenheit));
        }
        else
        {
            double fahrenheit =
                Double.parseDouble(input.getText());
            double centigrade =
                converter.fahrenheitToCentigrade(fahrenheit);
            output.setText(String.format(
                 //Note that the code \u00bo simply generates a degree symbol(°) in the formatted string
                "%2.1f \u00b0C",centigrade));  /

        }
    }
This method reads the value selected in the ChoiceBox (which has the id choice) to decide which conversion to do, then gets the text of the TextArea with the id input. The text of the output TextArea is set to the result of the conversion, suitably formatted. We need to have instance variables in the controller with names and types which match those in the FXML, annotated with @FXML, in order to make the appropriate connections.
@FXML private TextArea input;
@FXML private TextArea output;
@FXML private ChoiceBox choice;
So how is the actual function of the program, the temperature conversion done? This is not the job of the controller, or any other code which is part of the UI – it is the job of the model class, TemperatureConverter. The controller simply creates an instance of TemperatureConverter, as an instance variable:
public class ConversionFXController implements Initializable {
    private final TemperatureConverter converter = new
       TemperatureConverter();
and calls its methods as appropriate in the event handler to do the conversion, for example from the listing above
converter.centigradeToFahrenheit(centigrade);
-
11.15 Launching the application
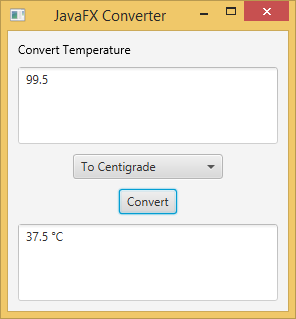
There is one more class in the project that we need to know about. ConversionFX.java is the application class that contains the start method, just as in the Hello World example. Here, instead of containing code to create controls it simply loads the FXML file to create them:
public void start(Stage stage) throws Exception {
        Parent root = FXMLLoader.load(getClass().
             getResource("ConversionFX.fxml"));
The completed application looks like this when it runs:
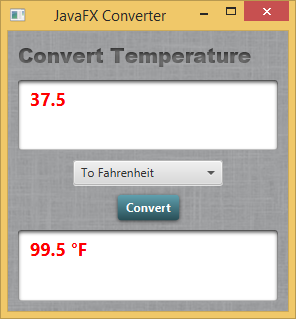
JavaFX also allows you to enhance the appearance of your GUI using the Cascading Style Sheets (CSS) mechanism that is widely used for web pages. If you are familiar with CSS then you can create a stylesheet and attach it to the UI with a reference in the FXML file.
<stylesheets>
       <URL value="@converter.css" />
</stylesheets>
The stylesheet included in the ConversionFX project modifies the appearance of many aspects of the controls in the UI, so that it looks like this:
The next demo shows the application running.
📹 WATCH DEMO: Running the JavaFX temperature converterThe examples you have seen illustrate the basics of using JavaFX to create desktop applications (and these will also run within a web browser). JavaFX can be used to build much more complex applications with features such as complex layouts, menus and toolbars, data binding and multiple windows. Oracle SceneBuilder is itself a JavaFX application and illustrates what can be done.
X -
11.16 The GCU Adventure game as a JavaFX application
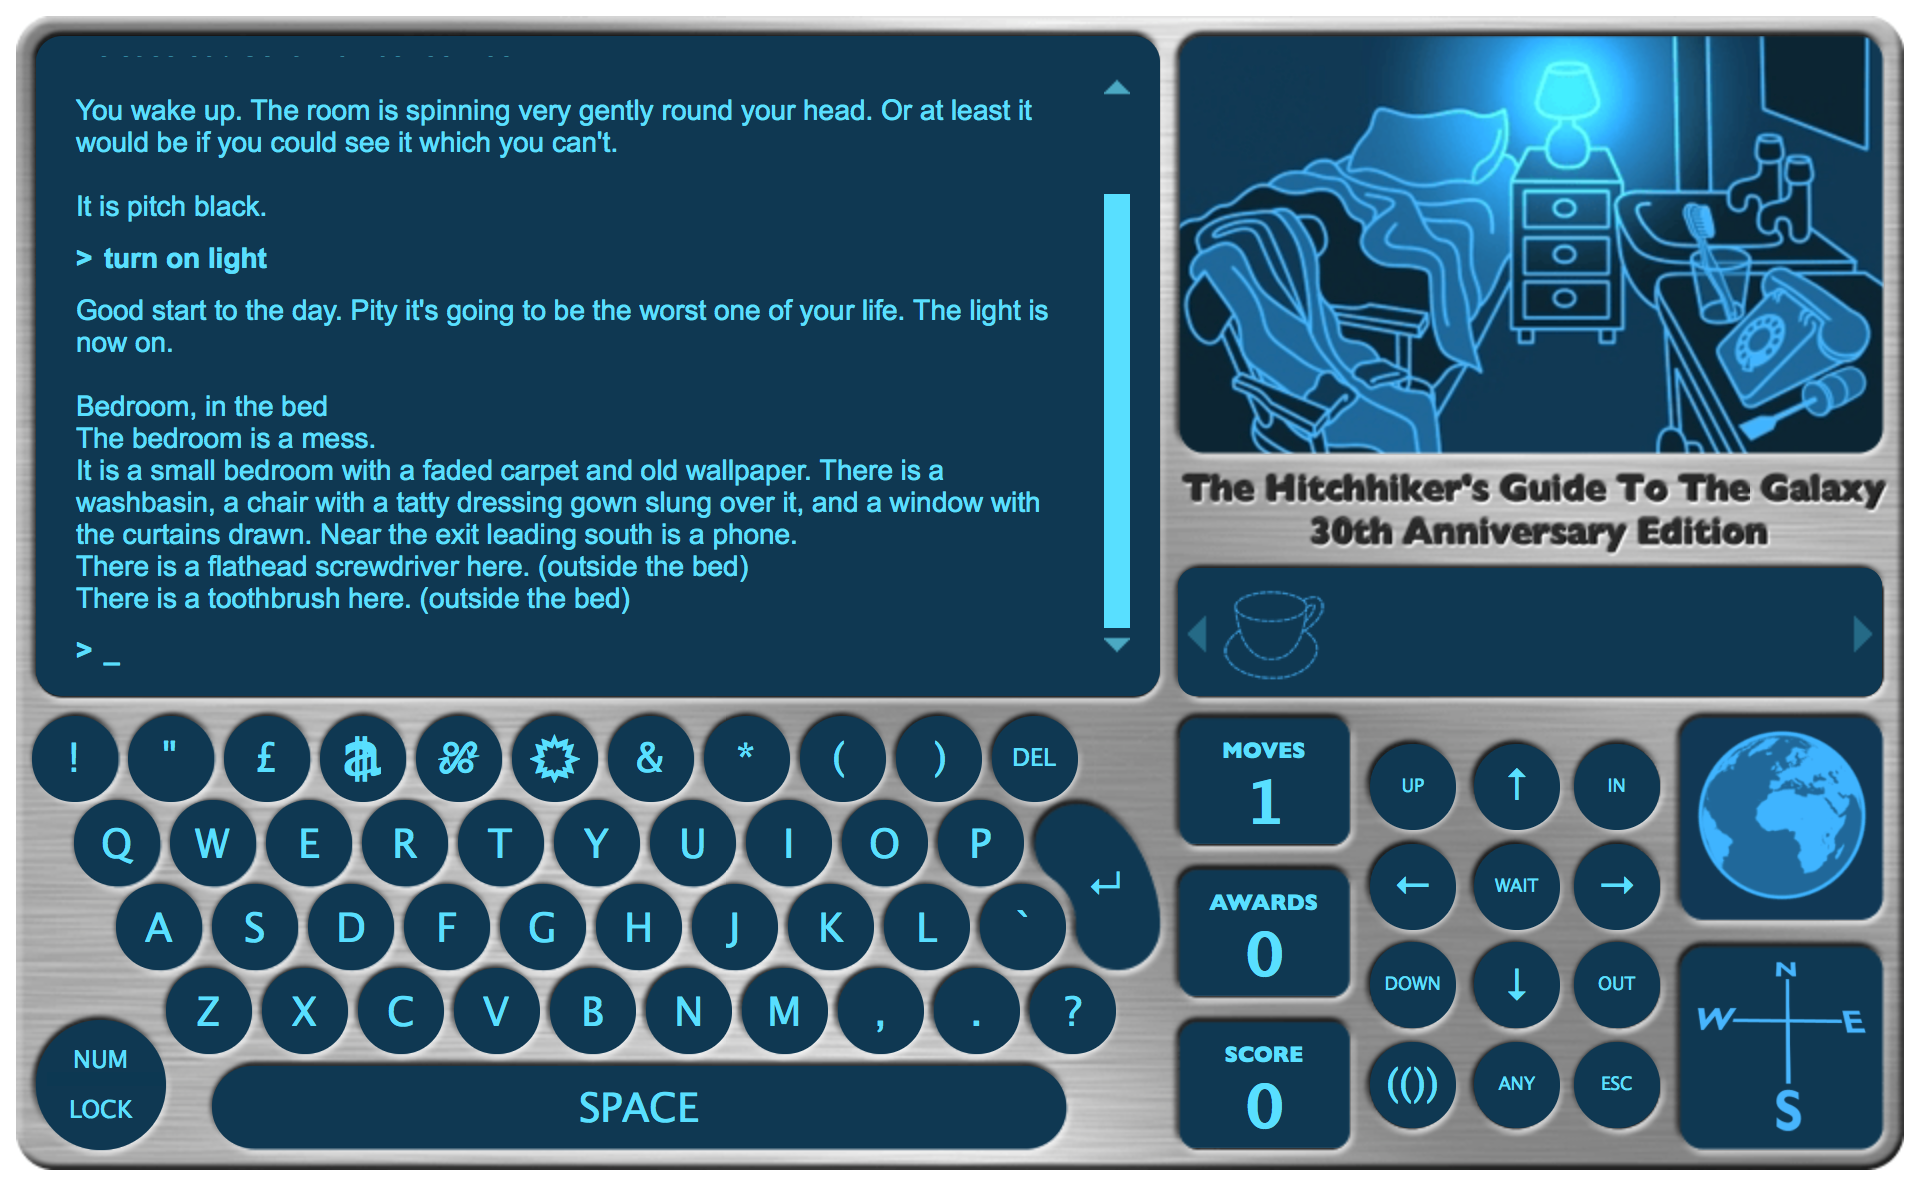
Finally, let’s look at a GUI version of the adventure game. It may seem a bit strange to have a GUI for a text-based adventure, but this is quite common – even if the main way of interacting is through entering and reading text, the GUI can provide shortcuts for common commands and some visual information. For example, the BBC website has a graphical version of the Hitchhiker’s Guide game, which looks like this. Note that one feature here is the visual display of the number of moves made – how do you think our adventure game could be modified to support a similar feature?
In the next demo we take the classes that have been developed over the last few lectures into a console application, and use these as the model classes for a JavaFX application.
📹 WATCH DEMO: Running the JavaFX adventure gameX -
Summary
You’ve been introduced in this lecture to the following concepts:
NetBeans IDE, packages, user interfaces, GUI toolkits, Java GUI toolkits, JavaFX, FXML, model-view-controller
That is the end of this introductory programming module. Depending on your course you may go on to learn more advanced programming and software engineering techniques, other programming languages and styles of programming, programming for specific platforms such as web and cloud, and much more.
Download PDF Version